Activate a License for Cloud Managed Prisma Access and Prisma SD-WAN Bundle Through Common Services
Table of Contents
Activate a License for Cloud Managed Prisma Access and Prisma SD-WAN Bundle Through Common Services
Learn how to activate your Cloud Managed Prisma Access and Prisma SD-WAN tenants
through Common Services
| Where Can I Use This? | What Do I Need? |
|---|---|
|
|
After you receive an email from Palo Alto Networks identifying the license you are
activating, including all your add-ons and capacities, use the activation link to
begin the activation process. The service will help you with the process of claiming
your license, creating your tenant, and managing your users.
Select Activate Subscription in your email.
- Log in with your email address.
- If you have a Palo Alto Networks Customer Support account, then enter the email address you used when you registered for that account and select Next.
- If you do not have a Palo Alto Networks Customer Support account, then .
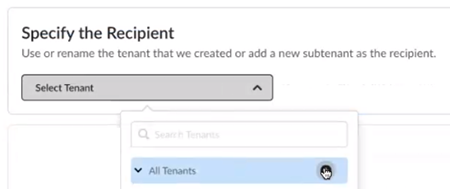
The service uses this email address for the user account assigned to the tenant that you use for this license. This tenant, and any others created by this email address, will have the Multitenant Superuser role.Choose the Customer Support Account number that you want to use to claim the license.![]() Allocate the subscription to the recipients of your choice.For Managed Security Service Providers (MSSPs) and distributed enterprises, you can allocate the subscription directly on any tenant in the hierarchy. What is a tenant? For a Prisma SD-WAN tenant, allocating the license at the child-level automatically provisions it at the top-most, root-level, parent Prisma SD-WAN tenant as well. This enables the parent tenant to do ION device management for the child tenants.After activation, you can build out your tenant hierarchy as needed. You can create your tenant hierarchy to reflect your existing organizational structure. You can also consider identity and access inheritance when creating the hierarchy, in addition to tenant hierarchy limits.However, any tenants that you create between the child tenant and the top-most, root-level, parent tenant do not get automatically provisioned with the license. That is a one-time process that happens only at activation.
Allocate the subscription to the recipients of your choice.For Managed Security Service Providers (MSSPs) and distributed enterprises, you can allocate the subscription directly on any tenant in the hierarchy. What is a tenant? For a Prisma SD-WAN tenant, allocating the license at the child-level automatically provisions it at the top-most, root-level, parent Prisma SD-WAN tenant as well. This enables the parent tenant to do ION device management for the child tenants.After activation, you can build out your tenant hierarchy as needed. You can create your tenant hierarchy to reflect your existing organizational structure. You can also consider identity and access inheritance when creating the hierarchy, in addition to tenant hierarchy limits.However, any tenants that you create between the child tenant and the top-most, root-level, parent tenant do not get automatically provisioned with the license. That is a one-time process that happens only at activation.- Create a new tenant from All Tenants +.
![]() Name the tenant and select Done.
Name the tenant and select Done.![]() (Optional) For Managed Security Service Providers (MSSPs) and distributed enterprises, create a new child tenant by selecting from the parent tenant that you previously created.
(Optional) For Managed Security Service Providers (MSSPs) and distributed enterprises, create a new child tenant by selecting from the parent tenant that you previously created.![]() (Optional) Name the child tenant and select Done.
(Optional) Name the child tenant and select Done.![]() Select the Region where you want to deploy your product.There is no cross-region aggregation. Make sure that all your tenants are in the same region for monitoring purposes.Create New Strata Logging Service for storing logs, amount of data log storage, and Strata Logging Service Region is populated based on your earlier region selection.(Optional) Select a Cloud Identity Engine for this tenant.Agree to the Terms and Conditions.Activate Now. The products and add-ons that you are activating (such as Prisma SD-WAN or Strata Logging Service) are now provisioned. As the subscriptions are activating, the progress status will display. When the process is complete, the tenant status displays as Up. You now have a tenant provisioned with instances of the products that you purchased. The tenant has one user — the account that you used when you began this process.To complete the product setup, you must access the products you purchased and perform any required postinstallation configuration. For information about your products, see:
Select the Region where you want to deploy your product.There is no cross-region aggregation. Make sure that all your tenants are in the same region for monitoring purposes.Create New Strata Logging Service for storing logs, amount of data log storage, and Strata Logging Service Region is populated based on your earlier region selection.(Optional) Select a Cloud Identity Engine for this tenant.Agree to the Terms and Conditions.Activate Now. The products and add-ons that you are activating (such as Prisma SD-WAN or Strata Logging Service) are now provisioned. As the subscriptions are activating, the progress status will display. When the process is complete, the tenant status displays as Up. You now have a tenant provisioned with instances of the products that you purchased. The tenant has one user — the account that you used when you began this process.To complete the product setup, you must access the products you purchased and perform any required postinstallation configuration. For information about your products, see:- Prisma Access Cloud Managed Administrators Guide
- Prisma SD-WAN Administrator’s Guide
- Open APIs
- Strata Logging Service Getting Started Guide
(Optional) In a multitenant hierarchy, monitor your tenants with the SASE Summary Dashboard.(Optional) add user access and assign roles.