Replace a PA-7000 Series Switch Management Card (SMC)
Table of Contents
Replace a PA-7000 Series Switch Management Card (SMC)
If the SMC fails, the log card (LPC or LFC)
and NPC cards power down, the chassis reboots and attempts to recover
the SMC. If the chassis reboots more than 3 times in 30 minutes,
it enters maintenance mode at which time you must power off the
chassis until you replace the SMC.
If the device is in FIPS-CC
mode, you must power off the firewall before adding or replacing
an SMC, otherwise the device will boot into maintenance mode.
The
replacement SMCs ship with a factory default configuration and version
of PAN-OS. You may need to upgrade or downgrade the PAN-OS version
to your preferred version and you will need to restore the firewall
configuration from a backup. Alternatively, you may swap out the
boot drive from the original SMC if the drive is not the cause of
the card failure. See Replace a PA-7000 Series SMC Boot Drive to learn how
to replace the SSD in a first generation PA-7050-SMC and PA-7080-SMC.
For details on replacing an SMC-B drive, see Replace
a PA-7050-SMC-B or PA-7080-SMC-B Drive.
There are four
SMC versions: the PA-7050-SMC version 1 and version 2,
the PA-7050-SMC-B, and the PA-7080-SMC-B. The PA-7050 firewall must be
running PAN-OS 6.1 or a later release to recognize a PA-7050-SMC
version 2 SMC and the firewall must be running PAN-OS 9.0 and later
to recognize the PA-7050-SMC-B or PA-7080-SMC-B. The procedure to
replace all of these SMCs is similar. For more details, see PA-7000
Series Firewall SMC Component Descriptions.
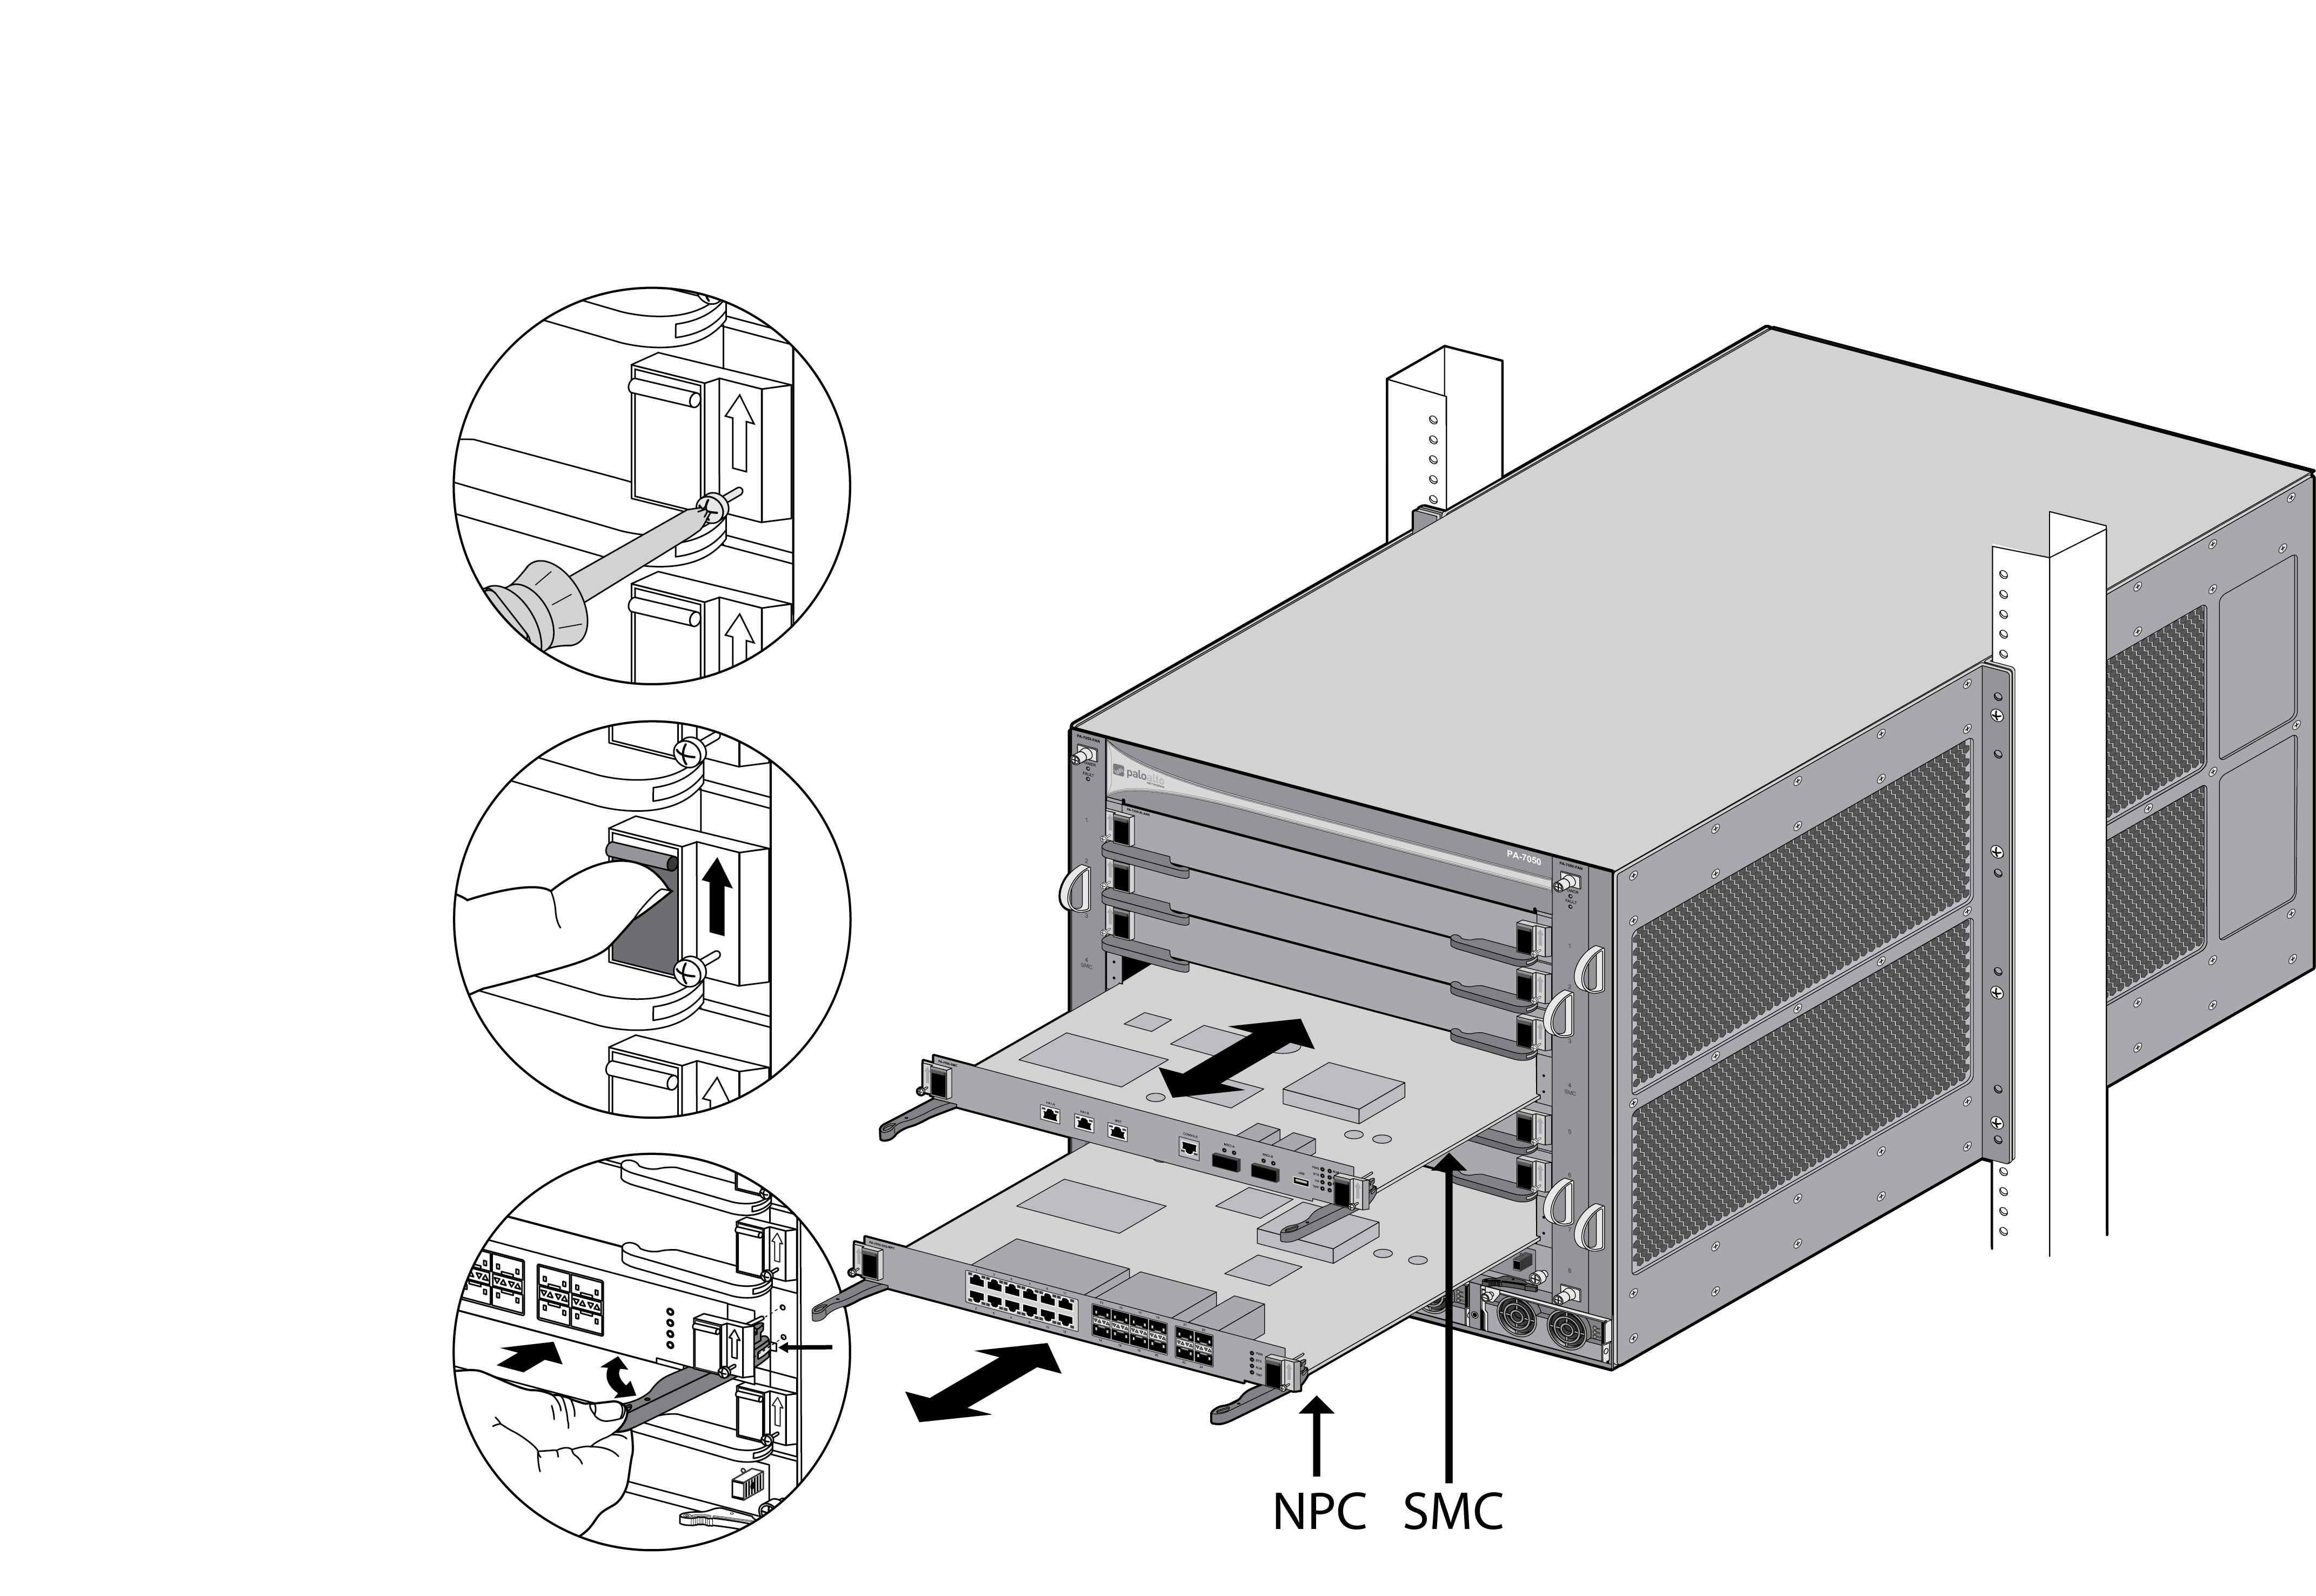
- Put the provided ESD wrist strap on your wrist ensuring that the metal contact is touching your skin. Then attach (snap) one end of the ground cable to the wrist strap and remove the alligator clip from the banana clip on the other end of the ESD grounding cable. Plug the banana clip end into one of the ESD ports located on the front of the chassis before handling ESD sensitive hardware. For details on the ESD port location, see PA-7050 Front Panel (AC) or PA-7080 Front Panel (AC).Power off the chassis and disconnect the power source to the chassis.Make note of the cable connections and then loosen the screws on each side of the SMC. On the PA-7050 firewall, the SMC is located in slot 4; on the PA-7080 firewall, the SMC is located in slot 6.Remove the failed SMC from the chassis. If you are replacing a failed PA-7050-SMC-B or PA-7080-SMB, also remove the SSD drives and label the drives (Sys 1 and Sys2) to ensure that you install them in the same SSD slots on the replacement SMC-B (See Replace a PA-7050-SMC-B or PA-7080-SMC-B Drive).
![]()
![]() Remove the replacement SMC from the antistatic bag. If you are replacing a failed PA-7050-SMC-B or PA-7080-SMC-B, install the SSDs that you removed in the previous step.Slide it into the SMC slot, ensuring that the handles are in the open position. When the card is about 1/4-inch from being fully inserted, adjust the levers to align with the chassis and then close the levers to seat the card in place.The small notches located near the hinge of the card levers are used to fully seat the card into the back connector of the slot. To prevent damage, ensure that the notches line up with the chassis so that when you close the levers, the levers fully seat the card into the backplane connectors.Tighten the screws on each side of the SMC with a Phillips-head screwdriver to secure it to the chassis.Reconnect power and power on the chassis.The session distribution policy configuration is stored on the SMC so if you replace a failed SMC, the default option is set in the configuration. If you configured an option other than the default, you will need to reconfigure the distribution policy after installing the new SMC (see Session Distribution Policies).
Remove the replacement SMC from the antistatic bag. If you are replacing a failed PA-7050-SMC-B or PA-7080-SMC-B, install the SSDs that you removed in the previous step.Slide it into the SMC slot, ensuring that the handles are in the open position. When the card is about 1/4-inch from being fully inserted, adjust the levers to align with the chassis and then close the levers to seat the card in place.The small notches located near the hinge of the card levers are used to fully seat the card into the back connector of the slot. To prevent damage, ensure that the notches line up with the chassis so that when you close the levers, the levers fully seat the card into the backplane connectors.Tighten the screws on each side of the SMC with a Phillips-head screwdriver to secure it to the chassis.Reconnect power and power on the chassis.The session distribution policy configuration is stored on the SMC so if you replace a failed SMC, the default option is set in the configuration. If you configured an option other than the default, you will need to reconfigure the distribution policy after installing the new SMC (see Session Distribution Policies).