Replace a PA-7050-SMC-B or PA-7080-SMC-B Drive
Table of Contents
Replace a PA-7050-SMC-B or PA-7080-SMC-B Drive
The PA-7050-SMC-B and PA-7080-SMC-B have two
SSD drives in a RAID 1 configuration. This configuration provides
redundancy so if a drive in a RAID 1 array fails there is no unplanned
service interruption or loss of data.
When
ordering replacement drives from Palo Alto Networks or your reseller,
you will receive two drives that are the same model. Do not attempt to
replace the drive with a third-party drive. Also, do not mix drive
models within the RAID 1 array.
You
must power off the firewall and remove the power cords from the
chassis before you remove and service a Switch Management Card (SMC).
- Identify the failed drive and note the drive model by running the following operational command and viewing the status and model fields:
admin@PA-7080> show
system raid detail
For example, the following output shows that the Sys 2 partitions are degraded, which indicates that the Sys 2 drive failed, and the drive model is MICRON_M510DC_MT.Overall RAID status degraded ---------------------------------------------------------------------- Drive status Disk id Sys1 Present (MICRON_M510DC_MT) Disk id Sys2 Present (MICRON_M510DC_MT) ----------------------------------------------------------------------- Partition status panlogs clean Drive id Sys1 active sync Drive id Sys2 degraded maint clean Drive id Sys1 active sync Drive id Sys2 degraded sysroot0 clean Drive id Sys1 active sync Drive id Sys2 degraded sysroot1 clean Drive id Sys1 active sync Drive id Sys2 degraded pancfg clean Drive id Sys1 active sync Drive id Sys2 degraded panrepo clean Drive id Sys1 active sync Drive id Sys2 degraded swap clean Drive id Sys1 active sync Drive id Sys2 degraded
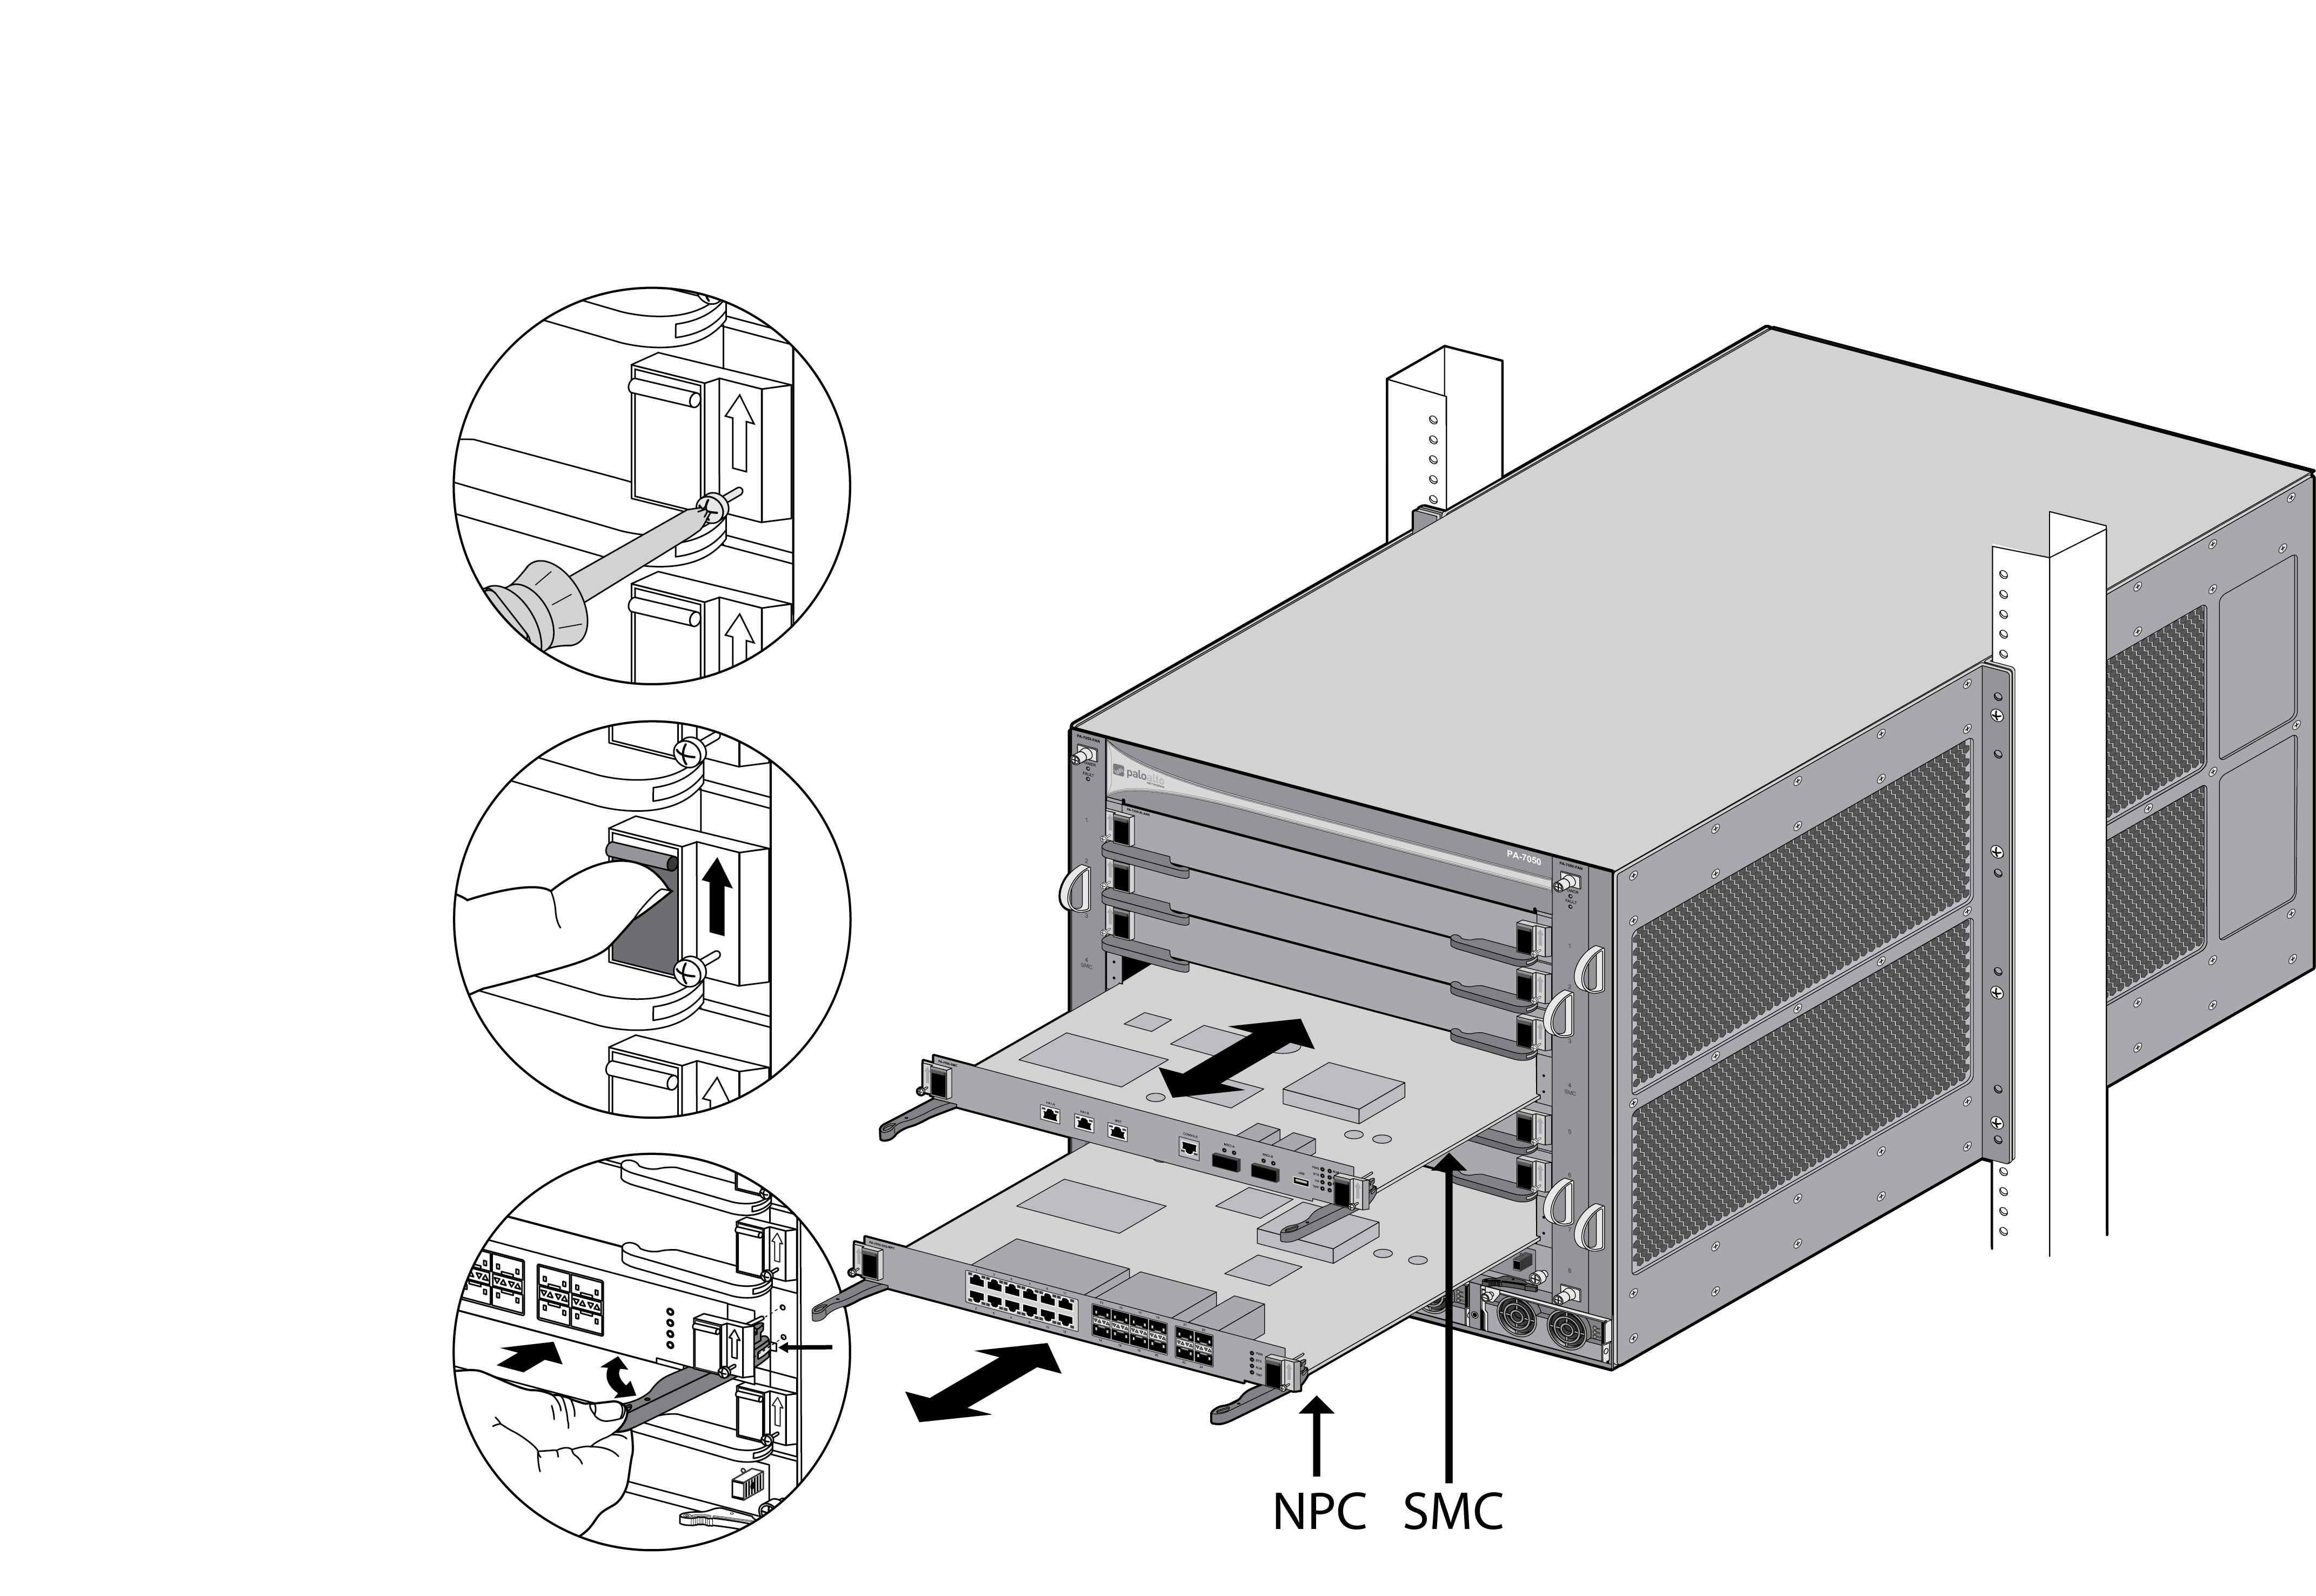
Run the following command to shut down the firewall:admin@PA-7080> request shutdown systemAfter the firewall is down, remove the power cords and make note of the cable connections. Loosen the screws on each side of the SMC-B. On the PA-7050 firewall, the SMC-B is located in slot 4; on the PA-7080 firewall, the SMC-B is located in slot 6.Put the provided ESD wrist strap on your wrist ensuring that the metal contact is touching your skin. Then attach (snap) one end of the ground cable to the wrist strap and remove the alligator clip from the banana clip on the other end of the ESD grounding cable. Plug the banana clip end into one of the ESD ports located on the front of the chassis before handling ESD sensitive hardware. For details on the ESD port location, see PA-7050 Front Panel (AC) or PA-7080 Front Panel (AC).Remove the failed SMC-B from the chassis. The following images show the first-generation SMCs; the procedure is the same for the second-generation SMCs (SMC-B).![]()
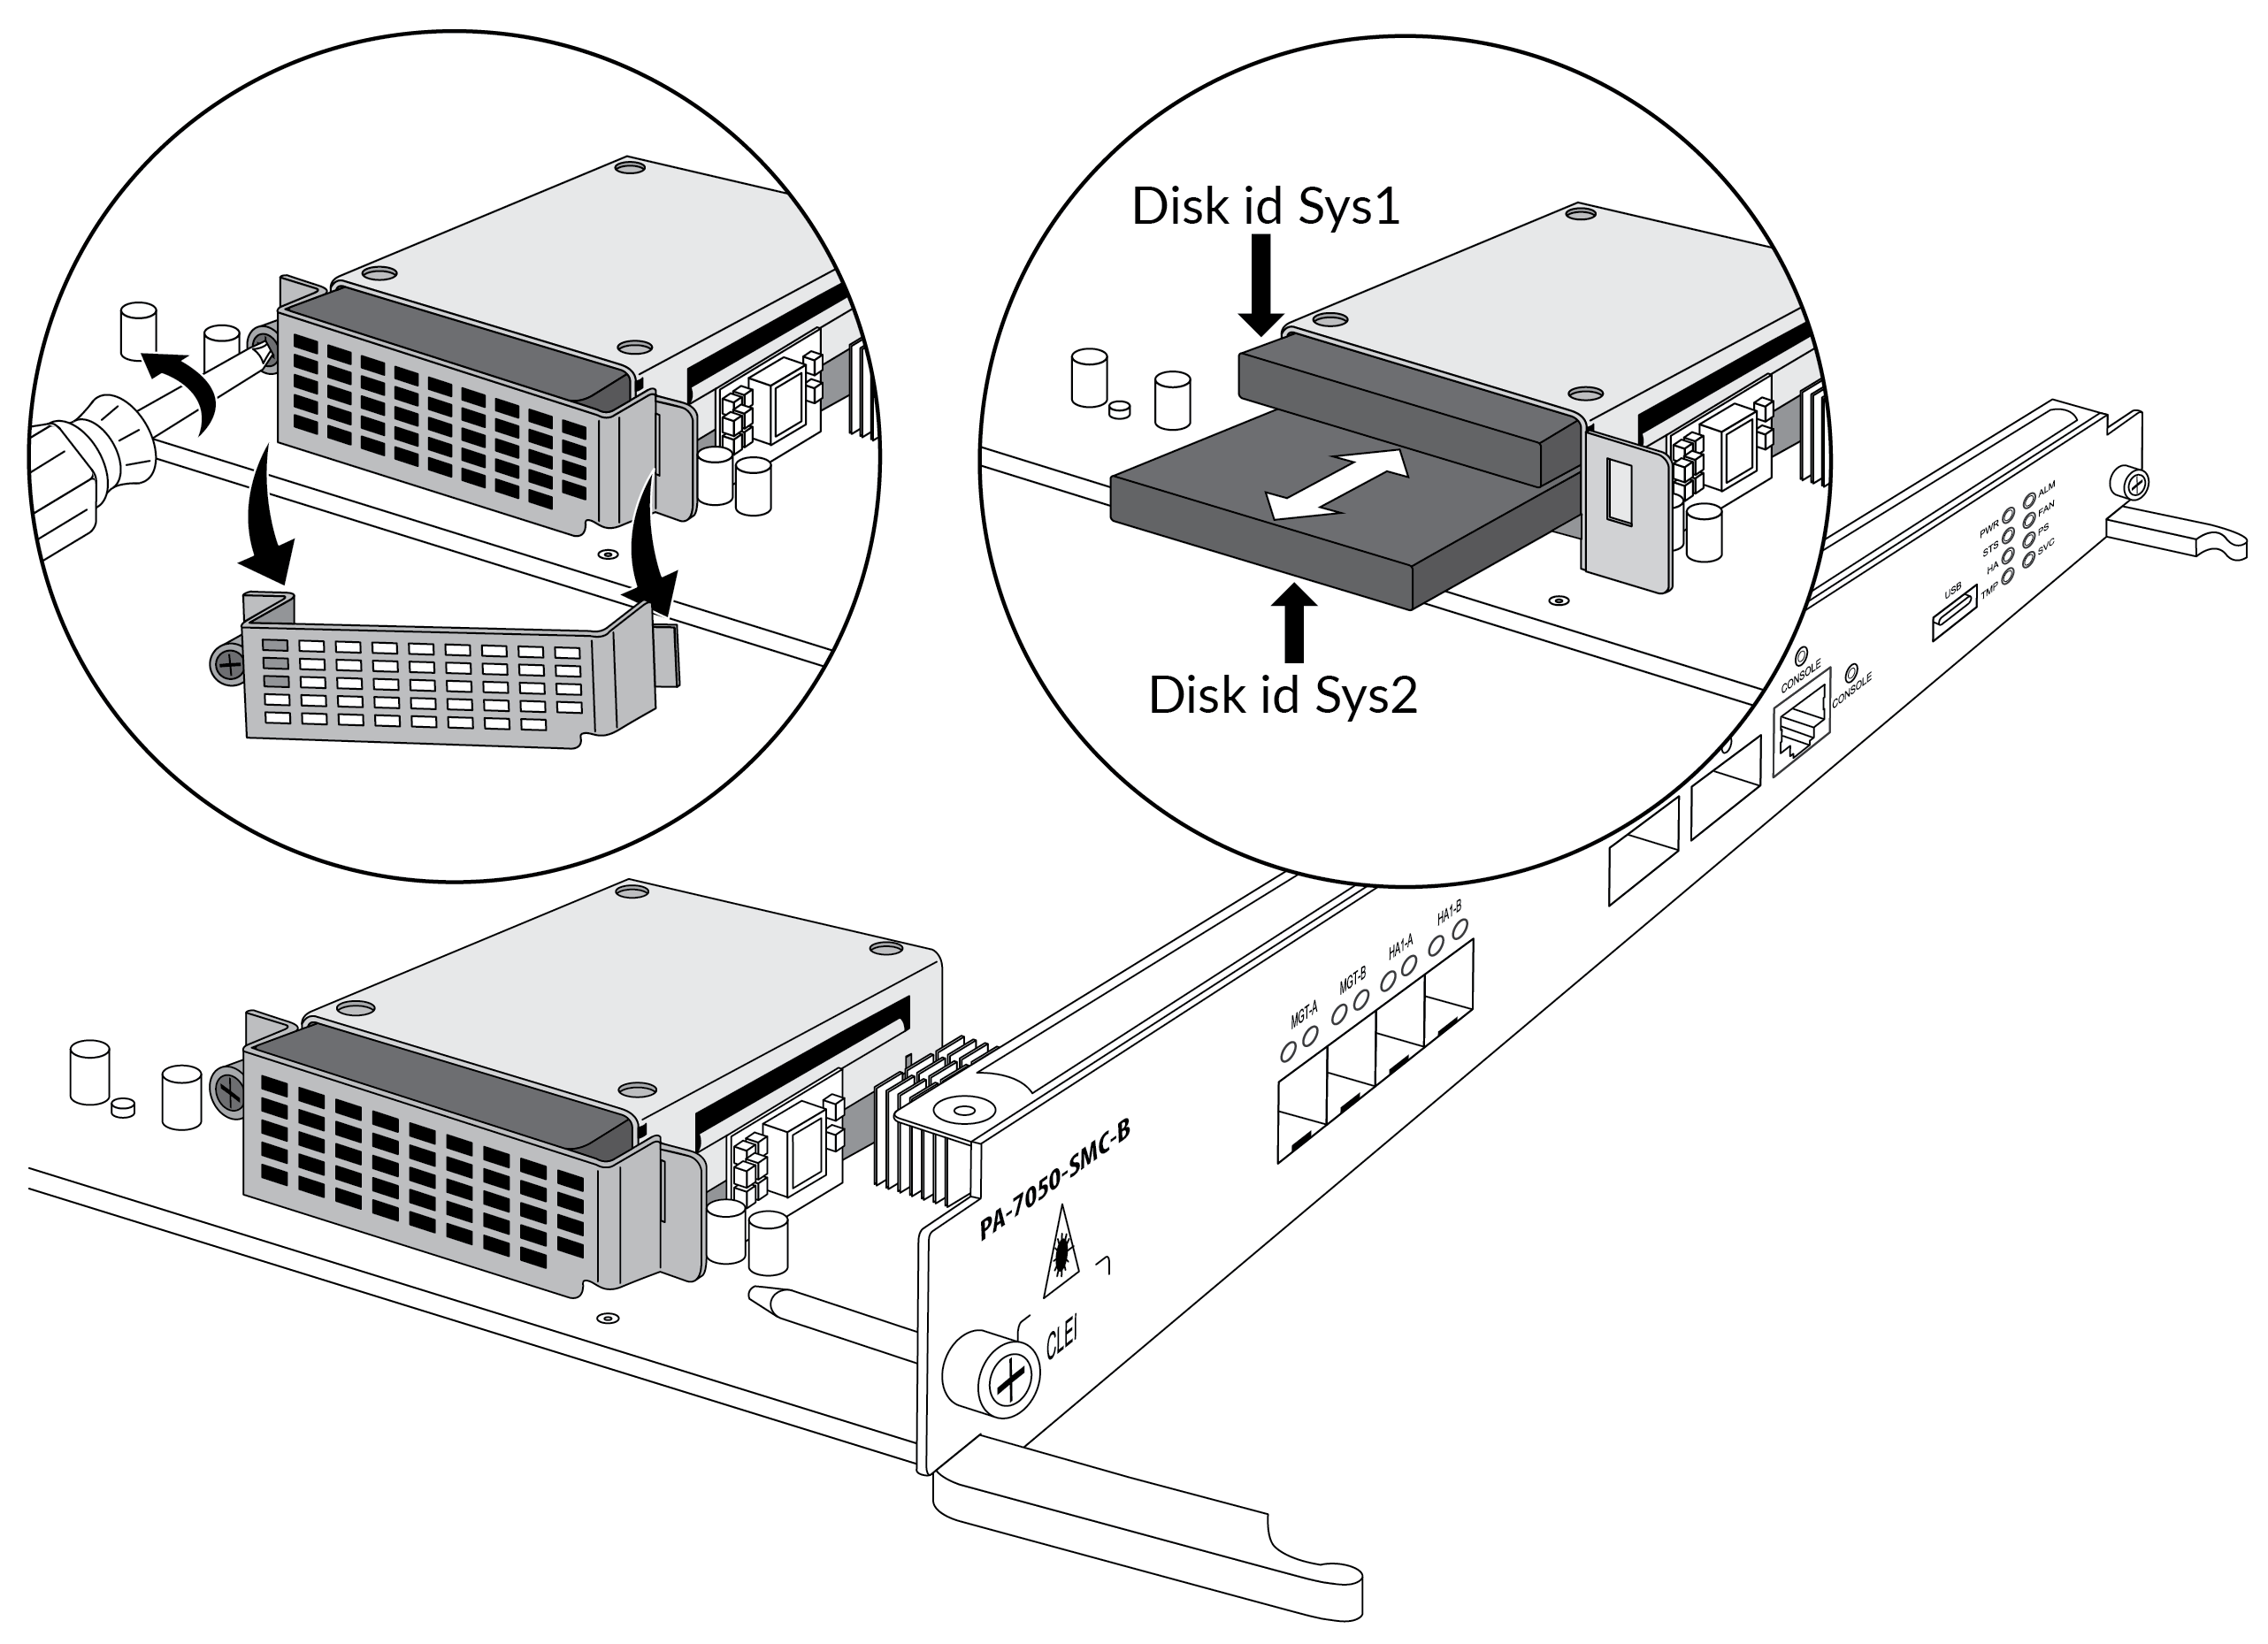
![]() Remove the failed drive (Sys 2 in this example). Turn the screw on the SSD drive slot door counter-clockwise and then remove the door. Pull the failed drive out of the SSD drive slot. Note the model number and compare it to the replacement drive. If the model number is different, you will replace both drives. The following image show the PA-7050-SMC-B; the procedure to replace a PA-7080-SMC-B SSD is the same.
Remove the failed drive (Sys 2 in this example). Turn the screw on the SSD drive slot door counter-clockwise and then remove the door. Pull the failed drive out of the SSD drive slot. Note the model number and compare it to the replacement drive. If the model number is different, you will replace both drives. The following image show the PA-7050-SMC-B; the procedure to replace a PA-7080-SMC-B SSD is the same.![]() Insert the replacement drive (into the Sys 2 slot in this example), reinstall the drive slot door and turn the door screw clockwise until tight.Reinstall the SMC-B into the chassis.Insert the power cords to power on the firewall.The firewall detects the new drive and prompt you with one of the following options:During the drive sync process, you can run the following CLI command to check status: show system raid status.
Insert the replacement drive (into the Sys 2 slot in this example), reinstall the drive slot door and turn the door screw clockwise until tight.Reinstall the SMC-B into the chassis.Insert the power cords to power on the firewall.The firewall detects the new drive and prompt you with one of the following options:During the drive sync process, you can run the following CLI command to check status: show system raid status.- Adding blank but identical drive—The drive model numbers of the existing and new drives match and the new drive is blank. The firewall powers up normally, the new drive is added to the RAID partition without any user interaction, and background RAID sync starts. The alarm LED remains RED until the RAID sync is complete, indicating that there is a single point of failure in the firewall. When the RAID sync completes, the alarm LED turns GREEN. This process could take up to an hour or more. Store the second replacement drive as a spare.
- Adding blank but different drive—The drive model numbers of the existing and new drives are different. The firewall boots, determines that the drives are different, and then boots into maintenance mode with the reason Drive model mismatch. At the prompt, select one of the following options (we recommend the second option so both drive models match):
- Add the new drive to the array, ignoring the model mismatch—In this case, the drives are compatible, but are different models. The drive is added to the array and you are prompted to reboot. Upon reboot, the system behavior is the same as if an identical drive was replaced.
- Migrate from one drive to the other—In this case, the firewall formats the new drive to maximum capacity, copies all contents from the old drive to the new drive, and adds the new drive to the array. After the migration process completes, you are prompted to power down the firewall, remove the old drive, insert the new drive, and then power on the firewall. If you are migrating from a larger drive to a smaller drive, you are warned that all saved logs are removed because there is no guarantee that the logs will be fully migrated.
- Adding old drive back into system—If two synced and running drives become out-of-sync (for example, because one drive was removed for a period of time), the firewall determines that two valid drives paired to the serial number of the firewall are present, so the firewall will reboot into maintenance mode. You are then prompted to select which drive is primary. Select the primary drive and then reboot at the next prompt. Upon rebooting, the firewall adds the secondary drive to the primary drive’s RAID array and then the firewall behavior is the same as if an identical drive was installed. This procedure may require one extra automatic reboot to correctly set up the firewall (due to how automatic RAID selection functions).