Replace PA-7000 Series Firewall NPC in a Single Chassis
Table of Contents
Replace PA-7000 Series Firewall NPC in a Single Chassis
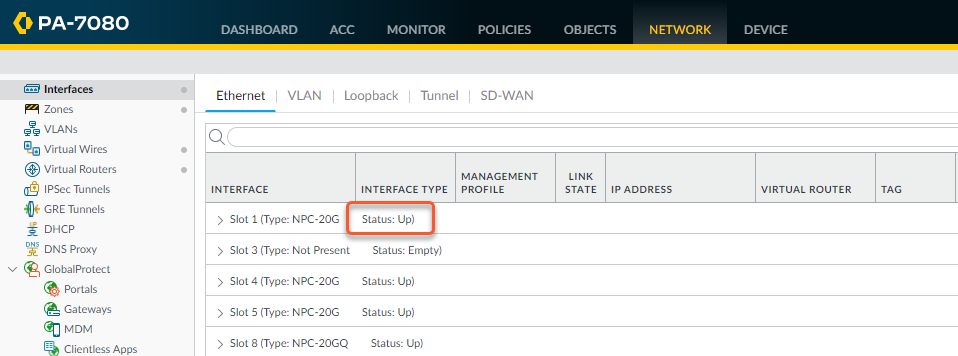
- Check the status of the NPC that is having a problem. You can do this from the web interface or from the CLI. In the web interface, navigate to to view status of each NPC slot.
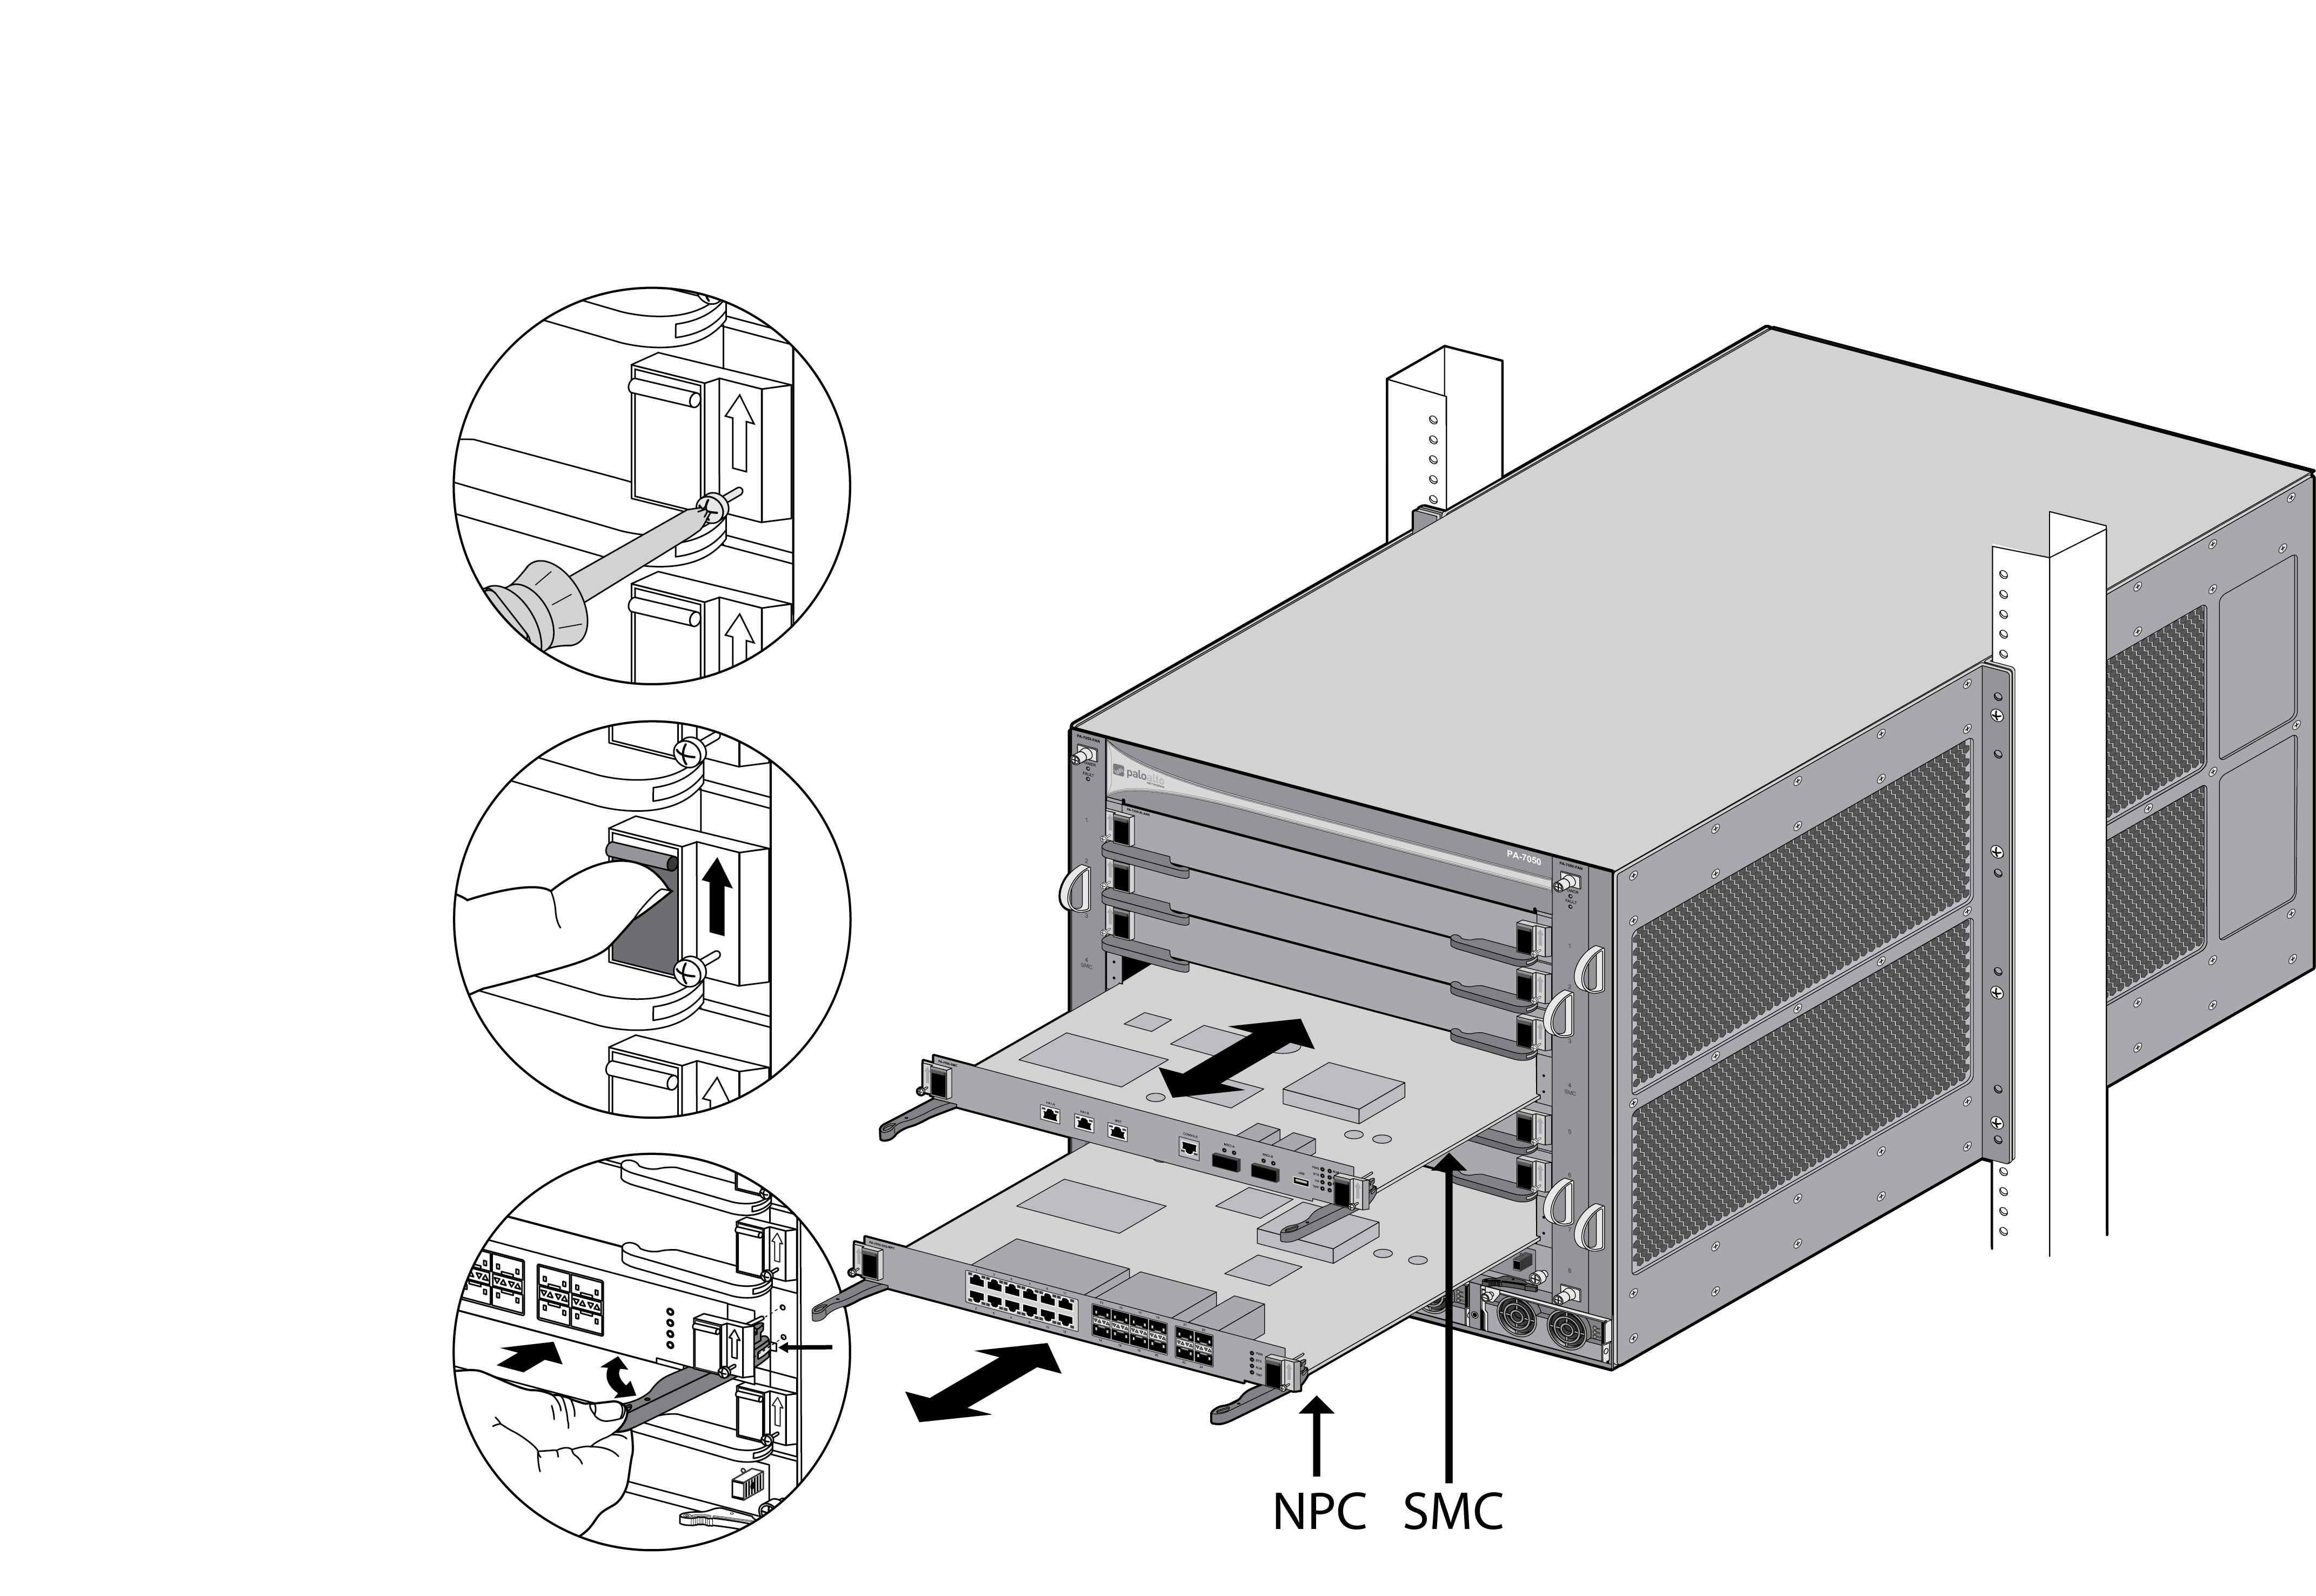
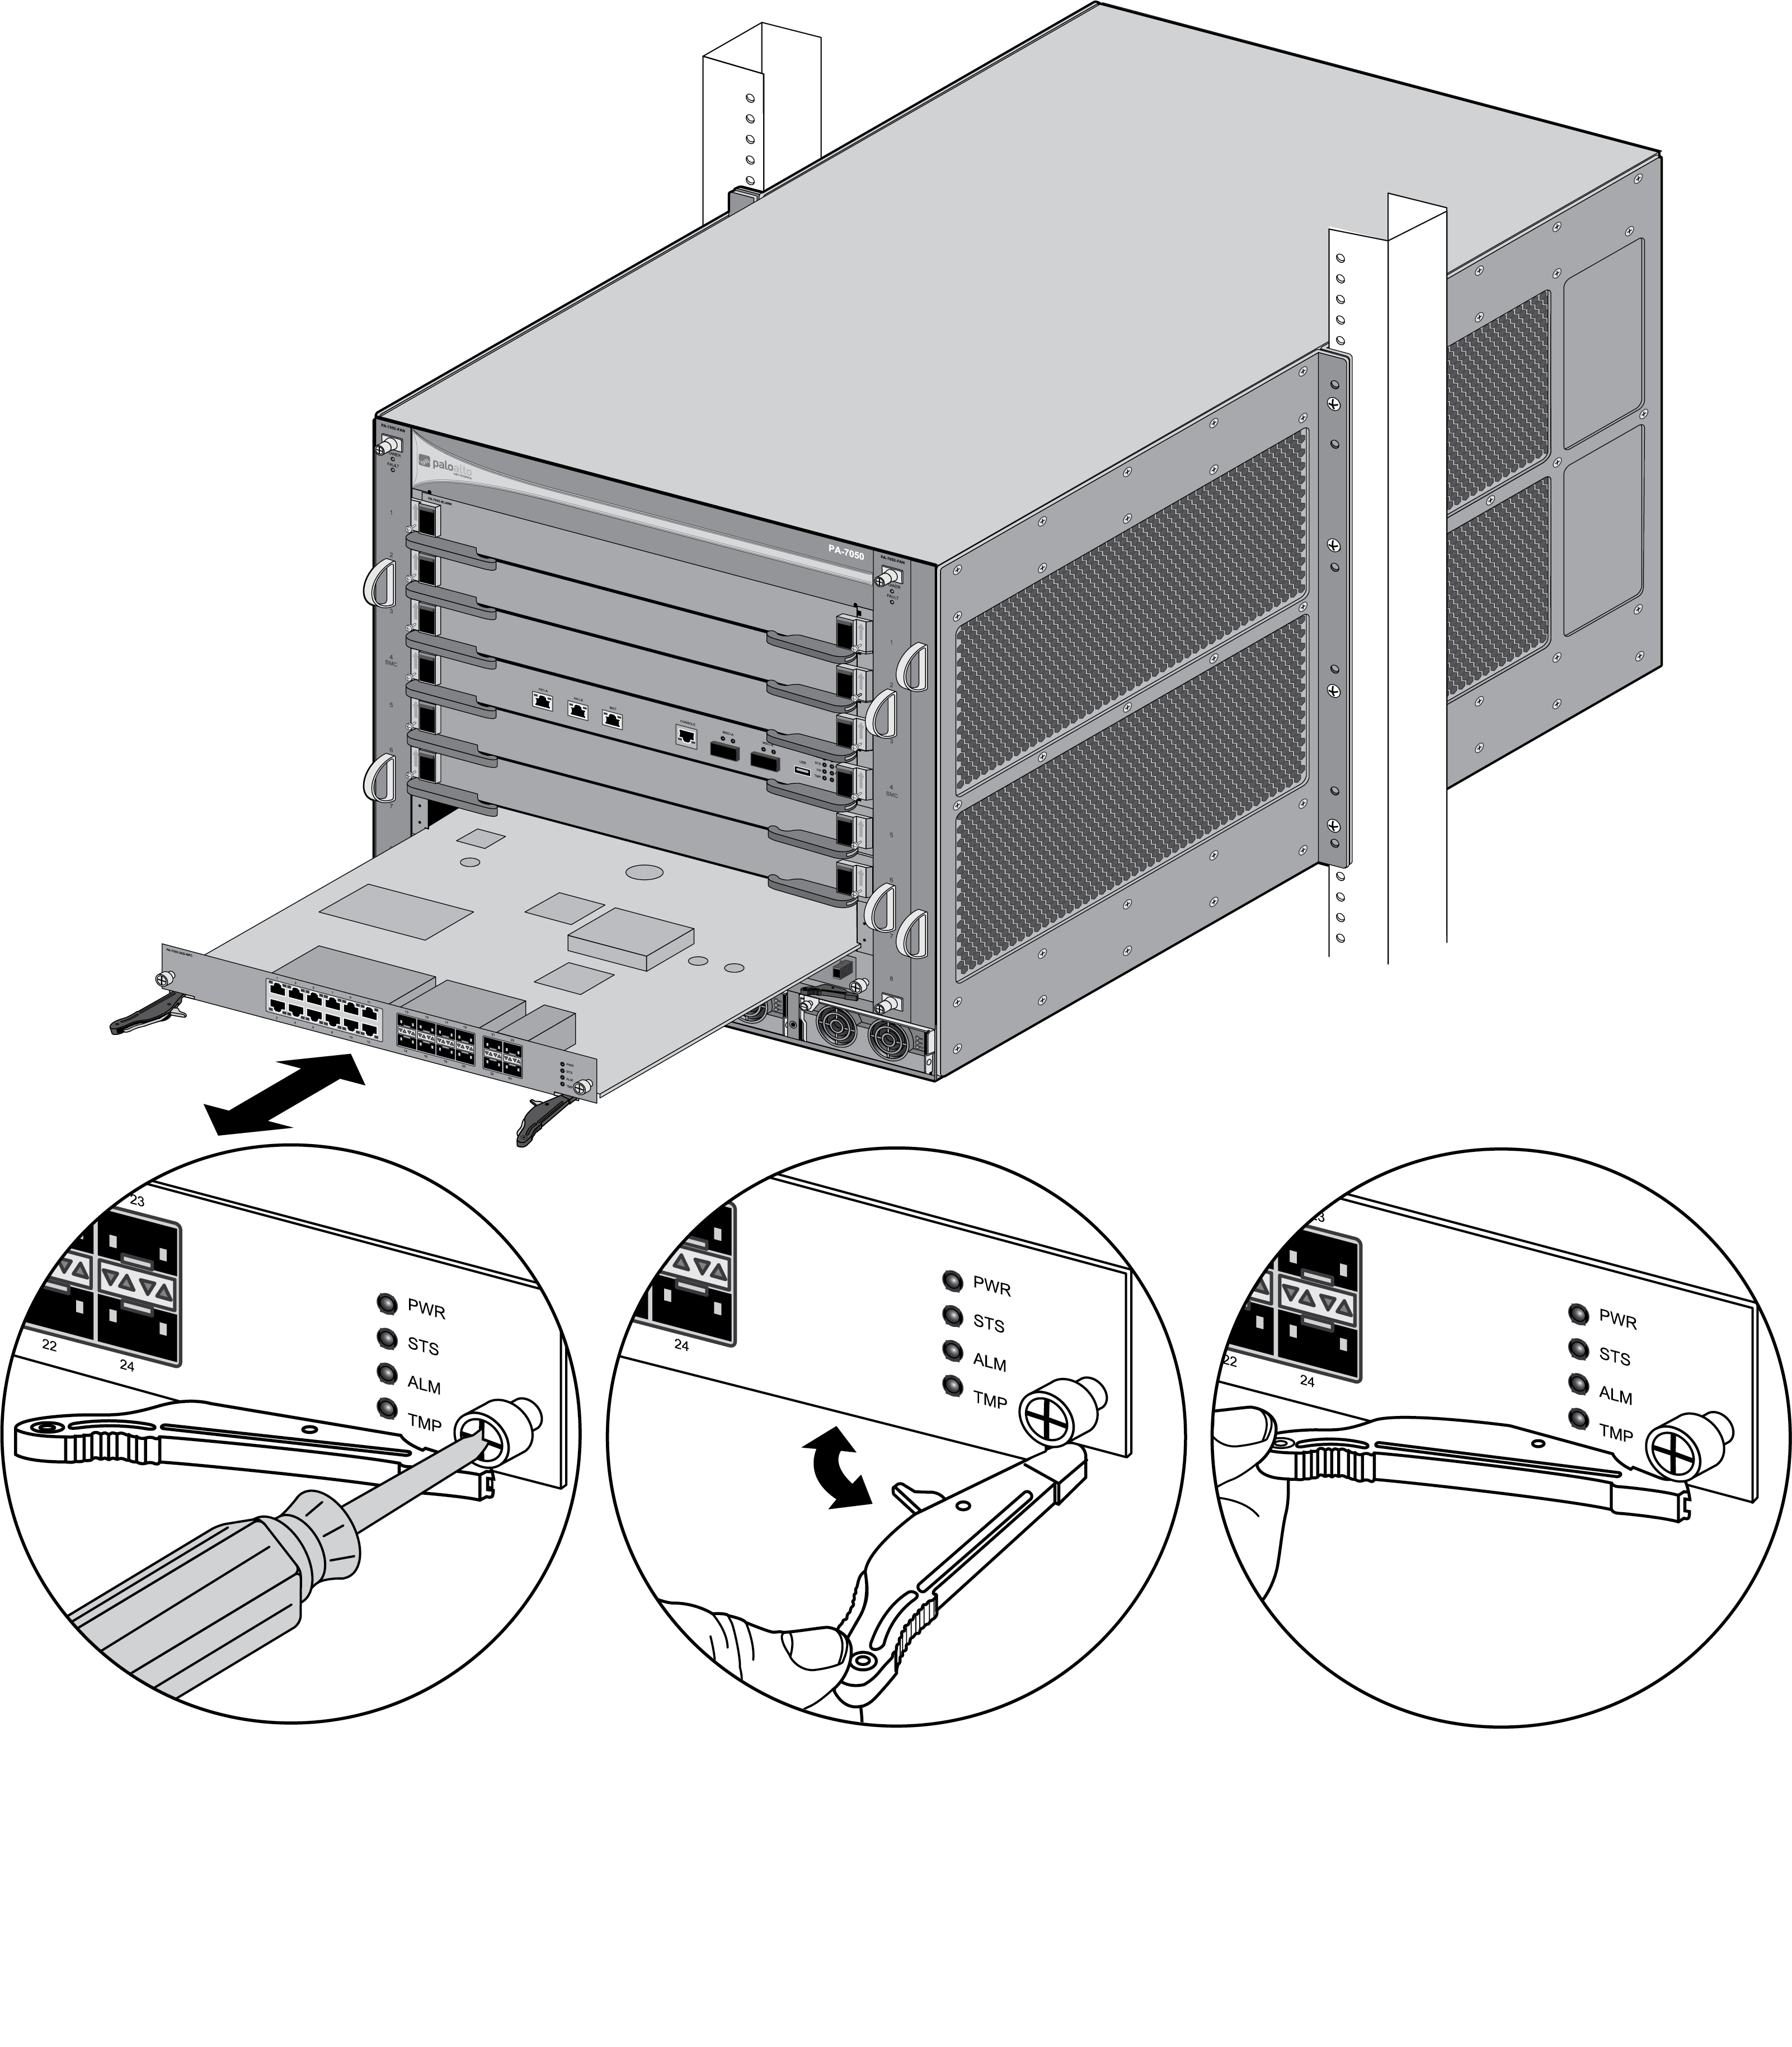
![]() If the NPC failed due to a hardware problem, the status shows Failure. The NPC may also have a configuration problem, in which case you can run the commit force command to try and force a commit.Make note of the cable connections and then loosen the screws on each side of the NPC.Releasing the eject levers on the NPC will trigger a micro switch that powers down the card to prepare it for removal. Only release the levers if you intend to remove the card.Put the provided ESD wrist strap on your wrist ensuring that the metal contact is touching your skin. Then attach (snap) one end of the ground cable to the wrist strap and remove the alligator clip from the banana clip on the other end of the ESD grounding cable. Plug the banana clip end into one of the ESD ports located on the front of the chassis before handling ESD sensitive hardware. For details on the ESD port location, see PA-7050 Front Panel (AC) or PA-7080 Front Panel (AC).Remove the NPC using the appropriate procedure below depending on the version of the installed NPC. There are two versions of the NPC. Version 1 has a black slide switch on each side of the card that is used to release the ejector lever. Version 2 does not use the slide switch; instead it uses a double-lever design where you use an inner lever to release the outer ejector lever before you can use the outer ejector lever to remove the NPC.Removing a version 1 NPC—Turn the card screws on each side of the card counterclockwise until loose and then slide the black lever release switch upward on both sides to unlock the release levers and then wait for the green power LED to turn off. After the power LED is off, pull the outer ejector release levers toward you to pull the card out of the chassis.Removing a version 2 NPC—Turn the card screws on each side of the card counterclockwise until loose and then gently pull the inner release lever to release the outer ejector levers. Wait for the green power LED to go off and then pull the release lever toward you to pull the card out of the chassis.The following images show the two versions of the PA-7000 NPCs.
If the NPC failed due to a hardware problem, the status shows Failure. The NPC may also have a configuration problem, in which case you can run the commit force command to try and force a commit.Make note of the cable connections and then loosen the screws on each side of the NPC.Releasing the eject levers on the NPC will trigger a micro switch that powers down the card to prepare it for removal. Only release the levers if you intend to remove the card.Put the provided ESD wrist strap on your wrist ensuring that the metal contact is touching your skin. Then attach (snap) one end of the ground cable to the wrist strap and remove the alligator clip from the banana clip on the other end of the ESD grounding cable. Plug the banana clip end into one of the ESD ports located on the front of the chassis before handling ESD sensitive hardware. For details on the ESD port location, see PA-7050 Front Panel (AC) or PA-7080 Front Panel (AC).Remove the NPC using the appropriate procedure below depending on the version of the installed NPC. There are two versions of the NPC. Version 1 has a black slide switch on each side of the card that is used to release the ejector lever. Version 2 does not use the slide switch; instead it uses a double-lever design where you use an inner lever to release the outer ejector lever before you can use the outer ejector lever to remove the NPC.Removing a version 1 NPC—Turn the card screws on each side of the card counterclockwise until loose and then slide the black lever release switch upward on both sides to unlock the release levers and then wait for the green power LED to turn off. After the power LED is off, pull the outer ejector release levers toward you to pull the card out of the chassis.Removing a version 2 NPC—Turn the card screws on each side of the card counterclockwise until loose and then gently pull the inner release lever to release the outer ejector levers. Wait for the green power LED to go off and then pull the release lever toward you to pull the card out of the chassis.The following images show the two versions of the PA-7000 NPCs.Install or Remove a PA-7000 Version 1 NPC ![]()
Install or Remove a PA-7000 Version 2 NPC ![]() Remove the replacement NPC from the antistatic bag and slide it into the empty slot, ensuring that the handles are in the open position. When the card is about 1/4-inch from being fully inserted, adjust the levers to align with the chassis and then close the levers to seat the card in place.The small notches located near the hinge of the card levers are used to fully seat the card into the back connector of the slot. To prevent damage, ensure that the notches line up with the chassis so that when you close the levers, the levers fully seat the card into the backplane connectors.Tighten the screws on each side of the NPC with a Phillips-head screwdriver to secure it to the chassis.Insert the network cables that you removed earlier.For slot status information and troubleshooting, see the following sections: PA-7000 Series Front Slot States and PA-7000 Series Firewall Network Processing Card (NPC) Troubleshooting Commands.
Remove the replacement NPC from the antistatic bag and slide it into the empty slot, ensuring that the handles are in the open position. When the card is about 1/4-inch from being fully inserted, adjust the levers to align with the chassis and then close the levers to seat the card in place.The small notches located near the hinge of the card levers are used to fully seat the card into the back connector of the slot. To prevent damage, ensure that the notches line up with the chassis so that when you close the levers, the levers fully seat the card into the backplane connectors.Tighten the screws on each side of the NPC with a Phillips-head screwdriver to secure it to the chassis.Insert the network cables that you removed earlier.For slot status information and troubleshooting, see the following sections: PA-7000 Series Front Slot States and PA-7000 Series Firewall Network Processing Card (NPC) Troubleshooting Commands.