Configure Administrative Roles
Table of Contents
Expand all | Collapse all
-
- Set Up the Endpoint Infrastructure
- Activate Traps Licenses
-
- Endpoint Infrastructure Installation Considerations
- TLS/SSL Encryption for Traps Components
- Configure the MS-SQL Server Database
- Install the Endpoint Security Manager Server Software
- Install the Endpoint Security Manager Console Software
- Manage Proxy Communication with the Endpoint Security Manager
- Load Balance Traffic to ESM Servers
-
- Malware Protection Policy Best Practices
- Malware Protection Flow
- Manage Trusted Signers
-
- Remove an Endpoint from the Health Page
- Install an End-of-Life Traps Agent Version
-
-
- Traps Troubleshooting Resources
- Traps and Endpoint Security Manager Processes
- ESM Tech Support File
-
- Access Cytool
- View the Status of the Agent Using Cytool
- View Processes Currently Protected by Traps Using Cytool
- Manage Logging of Traps Components Using Cytool
- Restore a Quarantined File Using Cytool
- View Statistics for a Protected Process Using Cytool
- View Details About the Traps Local Analysis Module Using Cy...
- View Hash Details About a File Using Cytool
Configure Administrative Roles

From
the AdministrationRoles page, you can see all
the built-in and custom roles for your organization. Creating custom
roles enables you to tailor the access permissions around the security requirements
for your organization.
Each role shows the role name and
description, the number of users that are assigned to the role,
and the date the role was created. Selecting the row for a role expands
that row to display additional details and actions. The actions
you can perform on the role vary for both built-in and custom roles.
While
you cannot modify or delete any of the built-in roles, you can view
the access privileges that are associated with the role. You can,
however, add, modify, or delete a custom role. You can also block
any role to prevent users that are assigned to that role from logging
in to the ESM Console. Similarly, deleting a custom role removes the
access privileges associated with that role from the ESM Console
and prevents users from logging in to the ESM Console if they are
assigned to that role. The ESM Console displays blocked roles with
a red icon
![]() in the status column.
in the status column.
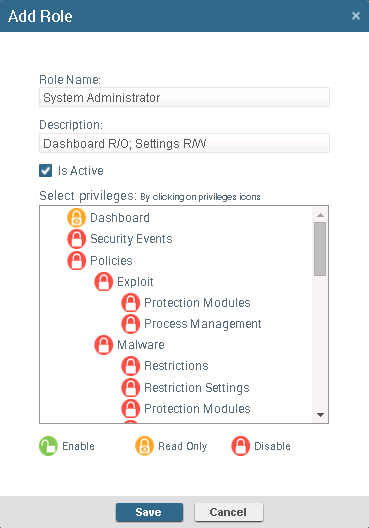
- From the ESM Console, select SettingsAdministrationRoles. The ESM Console displays all built-in and customized roles for your organization.
- Select and then Edit an existing role, or Add a new one.
- Define the Role Name and enter a Description.
- Select the Is Active option to enable the role or deselect the option to disable the role.
- Select a privilege to toggle through the different levels of access for that privilege. By default, all privileges are disabled. Selecting the privilege once changes the setting to Read Only access; selecting the privilege again changes the access level to read-write access (Enable); and selecting the privilege from an enabled state disables the privilege.
- Click Save. The ESM Console displays the new or modified role in the table.
- Assign the role to a user. See Configure Administrative Users, Groups, or Organizational Units.
