Export and Import Hashes
Table of Contents
Expand all | Collapse all
-
- Set Up the Endpoint Infrastructure
- Activate Traps Licenses
-
- Endpoint Infrastructure Installation Considerations
- TLS/SSL Encryption for Traps Components
- Configure the MS-SQL Server Database
- Install the Endpoint Security Manager Server Software
- Install the Endpoint Security Manager Console Software
- Manage Proxy Communication with the Endpoint Security Manager
- Load Balance Traffic to ESM Servers
-
- Malware Protection Policy Best Practices
- Malware Protection Flow
- Manage Trusted Signers
-
- Remove an Endpoint from the Health Page
- Install an End-of-Life Traps Agent Version
-
-
- Traps Troubleshooting Resources
- Traps and Endpoint Security Manager Processes
- ESM Tech Support File
-
- Access Cytool
- View the Status of the Agent Using Cytool
- View Processes Currently Protected by Traps Using Cytool
- Manage Logging of Traps Components Using Cytool
- Restore a Quarantined File Using Cytool
- View Statistics for a Protected Process Using Cytool
- View Details About the Traps Local Analysis Module Using Cy...
- View Hash Details About a File Using Cytool
Export and Import Hashes
The Hash Control page
displays information about the hashes and the verdicts associated
with all executable files that users or machines have tried to open
on your endpoints. Use the export function from the action menu
![]() to back up hash records before migrating
or upgrading to a new server or before deploying hash records to
multiple independent servers. You can export hash records on a global
or individual basis and save them to an XML file. Importing hash
records appends any new hashes to the existing Hash Control table.
to back up hash records before migrating
or upgrading to a new server or before deploying hash records to
multiple independent servers. You can export hash records on a global
or individual basis and save them to an XML file. Importing hash
records appends any new hashes to the existing Hash Control table.
- Export hashes.
- From the ESM Console, select PoliciesMalwareHash Control.
- Select the check box next to the record(s) you want to export.
- From the action menu at the top of the table, select Export Selected.
![]() The ESM Console saves the selected hash records to an XML file.
The ESM Console saves the selected hash records to an XML file.
- Manually create a CSV file of hash records.
- In a text editor of your choice, create
a new comma separated values (CSV) file.
![]() In a CSV file, you enter data in a structured table-like format where each entry is separated by a comma.The ESM Console requires that each entry in the CSV file be enclosed by quotes. Because Microsoft Excel strips the quotes that are required around each value in the file, we recommend that you use an alternate editor to create or edit your file.
In a CSV file, you enter data in a structured table-like format where each entry is separated by a comma.The ESM Console requires that each entry in the CSV file be enclosed by quotes. Because Microsoft Excel strips the quotes that are required around each value in the file, we recommend that you use an alternate editor to create or edit your file. - In your CSV file, enter the table headers for the
hash value (SHA256), the file name (Path),
and Verdict. Use commas to separate each
entry.
SHA256,Path,Verdict
- Create an entry for one or more hashes.Each entry must be on its own line and contain the hash value, path, and verdict. Enclose each hash value, path and verdict in quotes and separate the entries with commas. The path must also include the full file name and a .exe suffix.
SHA256,Path,Verdict
"C6A91CBA00BF87CDB064C49ADAAC82255CBEC6FDD48FD21F9B3B96ABF019916B",
"C:\Users\Administrator\Desktop\calctom.exe","Benign"
"8f64916adf8fc0eeeb87233150672734a572bb881f926023b0e0a05dac9cc569",
"C:\temp\malware.exe","Malware"
- Save your changes.
- In a text editor of your choice, create
a new comma separated values (CSV) file.
- Manually create an XML file of hash records.
- In a text editor of your choice, create
a new XML file.
![]()
- Edit the file to contain the following XML schema
declaration and elements.
<?xml version="1.0" encoding="UTF-8" standalone="yes"?>
<ns1:ArrayOfHashProcessItem xmlns:ns1="http://schemas.datacontract.org/2004/07/Cyvera.Common.Interfaces.Policy" xmlns:xsi="http://www.w3.org/2001/XMLSchema-instance">
	<ns1:HashProcessItem>
		<ns1:Hash>SHA256_hash_value</ns1:Hash>
		<ns1:ProcessName>filename</ns1:ProcessName>
		<ns1:Result>[Malware|Benign]</ns1:Result>
	</ns1:HashProcessItem>
</ns1:ArrayOfHashProcessItem>
Each hash record is identified by the HashProcessItem element and requires a ProcessName and Hash value. You can also optionally specify a verdict (Result). - Add the SHA256 value for the Hash,
the name of the file in ProcessName, and
optionally a verdict, either Benign or Malware,
in Result.
[...]
	<ns1:HashProcessItem>
		<ns1:Hash>C6A91CBA00BF87CDB064C49ADAAC82255CBEC6FDD48FD21F9B3B96ABF019916B
	    </ns1:Hash>
		<ns1:ProcessName>calctom.exe</ns1:ProcessName>
		<ns1:Result>Benign</ns1:Result>
	</ns1:HashProcessItem>
	[...]
- To add additional hash records, copy the syntax for
a HashProcessItem and paste it before the
closing ArrayOfHashProcessItem element for
each additional record. Then edit the values as described in the
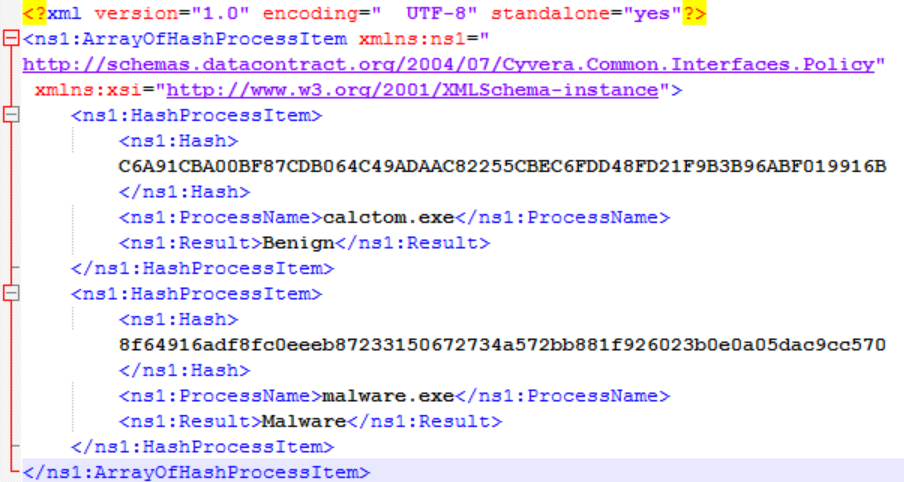
previous step.When you are done, your XML will look similar to the following output but contain the Hash values and ProcessName for each file.
![]()
- Save your changes.
- In a text editor of your choice, create
a new XML file.
- Import hashes.
- From the ESM Console, select PoliciesMalwareHash Control.
- Select Import Hashes from the
action menu at the top of the table.
![]()
- Select whether you want to Import hashes only (Recommended) or Import hashes and verdicts. If you choose the latter option, the ESM Console overrides the WildFire verdict with the verdict you specify in your input file.
- Browse to the XML file containing the hashes and then Upload the file.


