Set Up a Private WildFire Cloud
Table of Contents
Expand all | Collapse all
-
- Set Up the Endpoint Infrastructure
- Activate Traps Licenses
-
- Endpoint Infrastructure Installation Considerations
- TLS/SSL Encryption for Traps Components
- Configure the MS-SQL Server Database
- Install the Endpoint Security Manager Server Software
- Install the Endpoint Security Manager Console Software
- Manage Proxy Communication with the Endpoint Security Manager
- Load Balance Traffic to ESM Servers
-
- Malware Protection Policy Best Practices
- Malware Protection Flow
- Manage Trusted Signers
-
- Remove an Endpoint from the Health Page
- Install an End-of-Life Traps Agent Version
-
-
- Traps Troubleshooting Resources
- Traps and Endpoint Security Manager Processes
- ESM Tech Support File
-
- Access Cytool
- View the Status of the Agent Using Cytool
- View Processes Currently Protected by Traps Using Cytool
- Manage Logging of Traps Components Using Cytool
- Restore a Quarantined File Using Cytool
- View Statistics for a Protected Process Using Cytool
- View Details About the Traps Local Analysis Module Using Cy...
- View Hash Details About a File Using Cytool
Set Up a Private WildFire Cloud
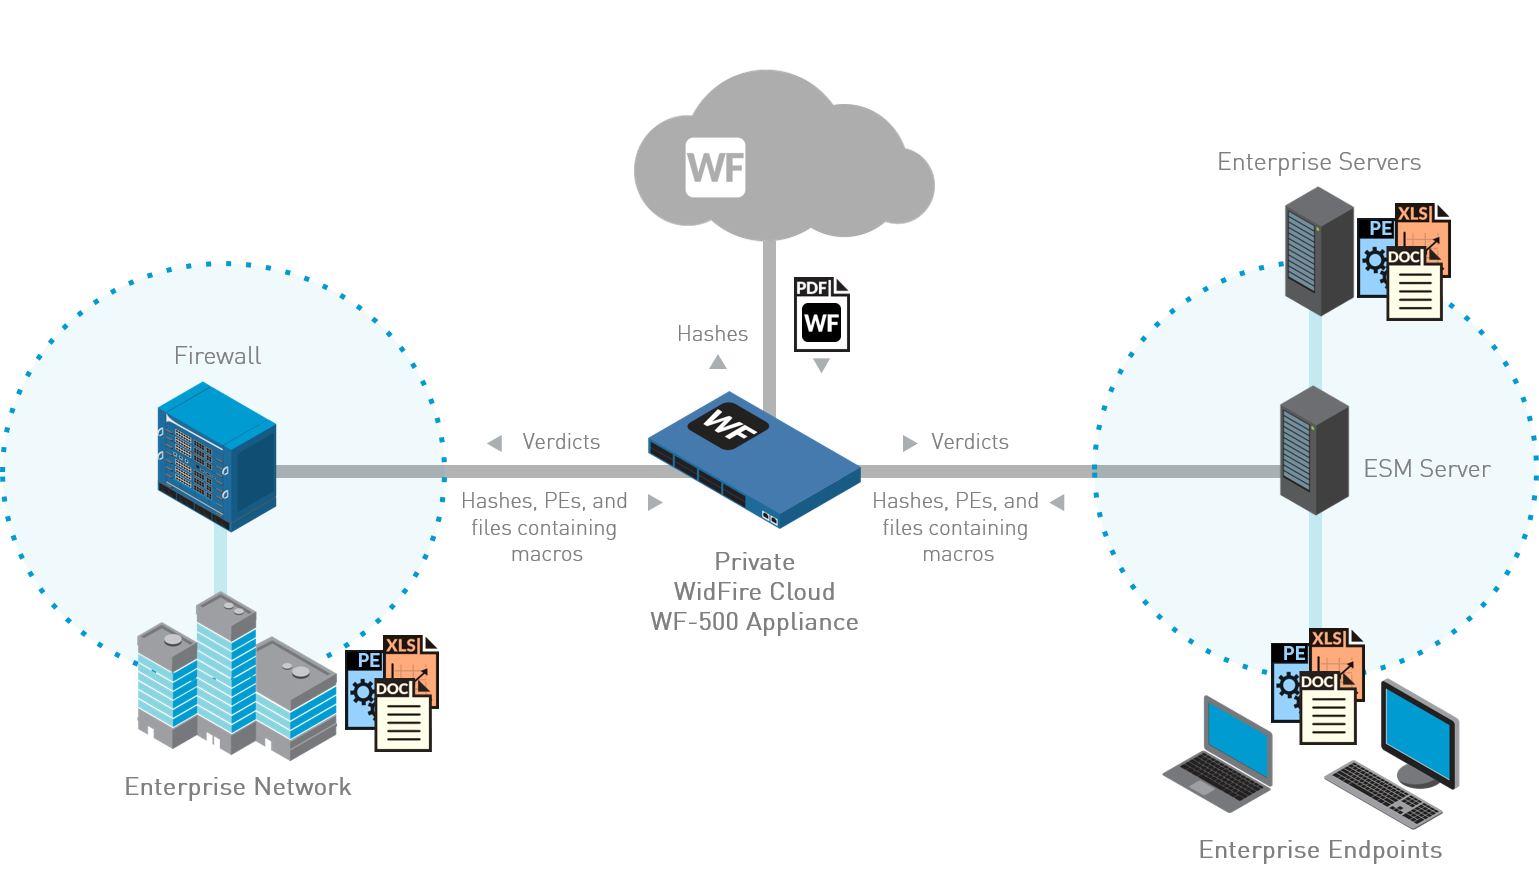
For deployments with privacy and legal regulations
that restrict the transfer of files outside your network, you can
set up your ESM to integrate with a private WildFire cloud. To set
up the private cloud, you must install an on-premise WF-500 appliance.
This appliance supports up to 40,000 Traps agents.

When
an unknown file attempts to run on your endpoints, the WF-500 appliance
queries the WildFire public cloud to obtain the verdict and analyzes
the executable file in the local private sandbox. By default, the
WF-500 appliance does not send discovered malware outside your network,
however, you can choose to automatically forward malware to the
WildFire public cloud to generate and distribute signatures to all
Palo Alto Networks firewalls with Threat Prevention and WildFire
licenses. Otherwise, the WF-500 appliance only forwards the malware
report (and not the sample itself) to the WildFire public cloud.
To
enable the ESM Server to verify and trust the identity of the WF-500
appliance, you obtain the WF-500 Root CA certificate from Support
and import it on each ESM Server.
To integrate a WF-500 application
in with your ESM deployment, use the following workflow:
- On each ESM Server, import the WF-500 Root CA
certificate (Palo Alto Networks Root CA 1) into the Trusted Root
Certification Authorities.
- Contact Support to obtain the WF-500 Root CA certificate and save it to a location you can access from the ESM Server.
- On the ESM Server, open the Microsoft Management Console (MMC.exe).
- Select FileAdd/Remove Snap-InCertificates and add the Certificates snap-in for the Computer account.
- Select Local ComputerFinish, and then click OK.
- Expand the Certificates (Local Computer) folder.
- Right-click Trusted Root Certification Authorities and then select All TasksImportNext.
- Browse to the certificate you saved in the previous step and then click Next. The certificate import wizard displays details about the Trusted Root CA certificate.
- Click Finish.
- Configure WildFire Integration in the ESM Console.
![]()
- Get Your WF-500 Appliance API Keyand copy it into memory.
- From the ESM Console, select SettingsESMWildFire.
- Select Use Private Cloud (Requires a WF-500 appliance).
- Enter the WildFire Address of
the WF-500 appliance:
- Hostname—If the WF-500 appliance has a set hostname, enter the hostname for the WildFire Address (for example: https://HostName/). You must also ensure there is a DNS record to map the hostname to the IP address of the WF-500 appliance.
- Hostname and domain—If the WF-500 appliance has a set hostname and domain, use the FQDN for the WildFire Address (for example: https://HostName.DomainName/). You must also ensure there is a DNS record to map the FQDN to the IP address of the WF-500 appliance.
- No hostname or domain—If the WF-500 appliance does not have a set hostname or domain name, use the IP address of the WF-500 appliance as the WildFire Address (for example: https://172.10.10.10/).
- Paste the WildFire API Key from memory.
- Save the WildFire configuration.
- To verify connectivity between the ESM Server and the
local WF-500 appliance, recheck a hash verdict with WildFire.
- Select PoliciesHash Control.
- Select a record in the hash control table.
- Select Recheck Verdict. If the connection is successful, the WF-500 appliance returns a verdict. If the connection is not successful, the verdict is No Connection.

