Configure Administrative Users, Groups, or Organizational Units
Table of Contents
Expand all | Collapse all
-
- Set Up the Endpoint Infrastructure
- Activate Traps Licenses
-
- Endpoint Infrastructure Installation Considerations
- TLS/SSL Encryption for Traps Components
- Configure the MS-SQL Server Database
- Install the Endpoint Security Manager Server Software
- Install the Endpoint Security Manager Console Software
- Manage Proxy Communication with the Endpoint Security Manager
- Load Balance Traffic to ESM Servers
-
- Malware Protection Policy Best Practices
- Malware Protection Flow
- Manage Trusted Signers
-
- Remove an Endpoint from the Health Page
- Install an End-of-Life Traps Agent Version
-
-
- Traps Troubleshooting Resources
- Traps and Endpoint Security Manager Processes
- ESM Tech Support File
-
- Access Cytool
- View the Status of the Agent Using Cytool
- View Processes Currently Protected by Traps Using Cytool
- Manage Logging of Traps Components Using Cytool
- Restore a Quarantined File Using Cytool
- View Statistics for a Protected Process Using Cytool
- View Details About the Traps Local Analysis Module Using Cy...
- View Hash Details About a File Using Cytool
Configure Administrative Users, Groups, or Organizational Units

From
the SettingsAdministrationUsers page, you can view all
the accounts that provide administrative access to the ESM Console.
An account can be a user, a group, or an organizational unit. To
provide administrative access to a group or organizational unit,
the account must exist on the domain. To provide administrative
access to a user, you can add either a user on the local machine
or a user on the domain. The ESM Console uses the domain or the
credentials defined on the local machine to authenticate the user.
As a best practice, create a separate account
for each user that requires access to the ESM Console.
For
each account, the ESM Console displays the account status (Blocked or Unblocked),
the account Name, the assigned Role,
and the date that the account was created. Selecting the row for
an account will expand the row to display additional details and
actions, including who created the role (System, DbConfig,
or the administrative account that is logged into the ESM Console).
The actions you can perform on a role vary depending on where the
role was created. If you have permissions to do so, you can edit,
block, unblock, or delete any account created by other administrative
users but you cannot block or delete accounts that were created from
DBconfig.
Blocking an account prevents that account from
logging in to the ESM Console. Similarly, deleting an account removes
the account and settings from the ESM Console and prevents the account
from logging in to the ESM Console. When a role that is associated
with an account is blocked, the ESM Console displays the Role as <role
name> (inactive). When a role that is associated
with an account is deleted, the ESM Console displays the Role as N/A
(inactive). The ESM Console also displays blocked
accounts with a red
![]() icon in
the status column and indicates a deleted or blocked role with a
red
icon in
the status column and indicates a deleted or blocked role with a
red
![]() icon next to the Role name.
icon next to the Role name.
- From the ESM Console, select SettingsAdministrationUsers. The ESM Console displays
the accounts for your organization, including users, groups, and
organizational units. If you cannot log into the ESM Console, use the Database (DB) Configuration Tool to verify, and optionally change, the users and groups that have access to the ESM Console (see Configure Administrative Access to the ESM Console Using the DB Configuration Tool).
- Click Add User, Add Group, or Add Organizational Unit to create a new account. Alternatively, select the row of an existing account and click Edit to modify the account settings. From this view, you can also Block, Unblock, or Delete an account.
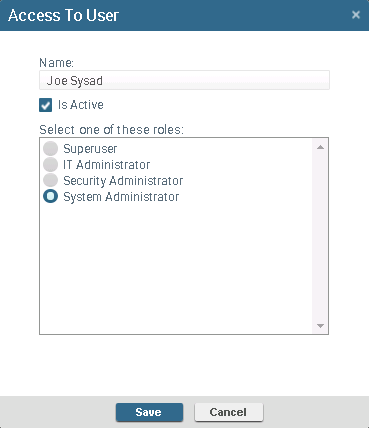
- Enter the Name of an existing
account. If you are using machine authentication, you can only add
existing users on the local machine. If you are using domain authentication, you
can add any existing domain user, group, or organizational unit. The ESM Console truncates usernames over 20 characters. As a result, users must log in to the ESM Console using only the first 20 characters of their username.
- Select the Is Active option to enable the account or clear the Is Active option to disable the account.
- Select the role from the list to assign access privileges to the account. To create a new role, see Configure Administrative Roles.
- Save your changes. The ESM Console displays the new or modified account in the table.
