Install the Endpoint Security Manager Console Software
Table of Contents
Install the Endpoint Security Manager Console Software
You can install the ESM Console software on
a dedicated server or on the same server as the ESM Server software.
- Before you begin:
- Verify that the system meets the requirements described in ESM Console Software Requirements.
- Obtain the software from https://support.paloaltonetworks.com ().
- Initiate the ESM Console software installation. You can
also install the ESM Console using Msiexec (see Install
Traps Components Using Windows Msiexec).
- Double click the ESMConsole installation file.
- Click Next to begin the setup process.
- Select the I accept the terms of the License Agreement check box and then click Next.
- Specify the installation folder for the ESM Console.Keep the default installation folder or click Change to specify a different installation folder and then click Next.
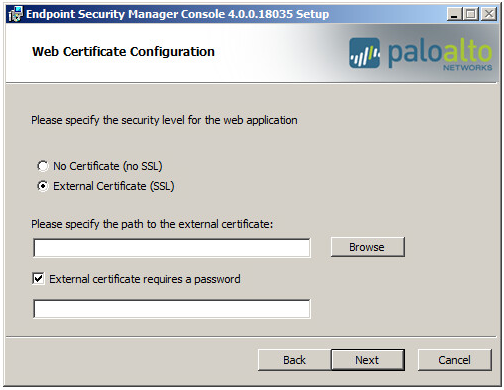
- Specify the security level for communication between
the administrator and the ESM Console.To encrypt communication over SSL, use a server-client certificate file (PFX format) and supply the password for decrypting the private key.
![]()
- Select the certificate configuration method:
- No Certificate (no SSL)—Do not encrypt communication to and from the ESM Console.
- External Certificate (SSL)—(Recommended) Encrypt communication to and from the ESM Console over SSL (default). Then Browse to the server-client certificate and enter the password required to decrypt the private key.
- Click Next.
- Select the certificate configuration method:
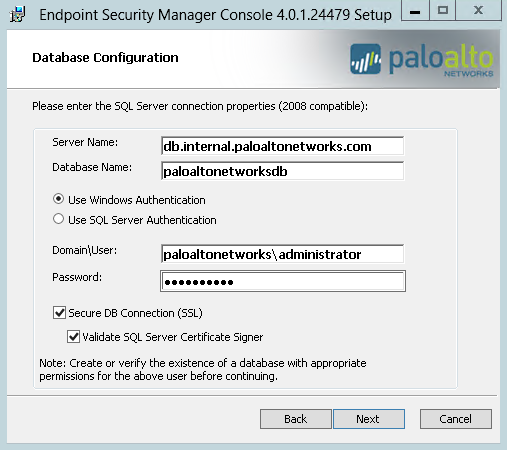
- Configure the settings that enable communication between
the ESM Console and the database.To set up access to the database, you must specify the authentication method and a user that has administrative privileges to administer the database. The username (and password) that you enter depend on the type of authentication method that you select: either Windows authentication (recommended) or SQL server authentication.
![]() Use the same database settings that you entered during the ESM Server installation.
Use the same database settings that you entered during the ESM Server installation.- Enter the fully qualified domain name or IP address of the database Server Name. If your SQL Server uses an instance other than the default, you must also include the instance name in the format <servername>\<instance>.
- Enter the name of the Database Name.
- Select the method of authentication and enter the
account credentials. This account must also be added as a database
owner on the database server (for more information, see Configure
the MS-SQL Server Database).
- Use Windows Authentication to authenticate using a Windows domain user account that has privileges to administer to the database server and enter the Domain\User (for example, mydomain\administrator) and Password.
- Use SQL Server Authentication to authenticate using a local user that has privileges to administer the database and enter the Login and Password.
- To enable secure communication between the ESM Console
and the database using TLS/SSL 1.2:
- Select Secure DB Connection (SSL). This option enables the ESM Console to encrypt communication between the ESM Console and the database.
- For even stricter security, select the option to Validate SQL Server Certificate Signer. This enables the ESM Console to validate that the certificate the database presents matches a specific certificate. For validation to succeed, you must import the database certificate into Trusted Root Certification Authorities.
Secure communication between the ESM Console and the database is supported with only SQL Server Enterprise or SQL Server Standard. - Click Next.
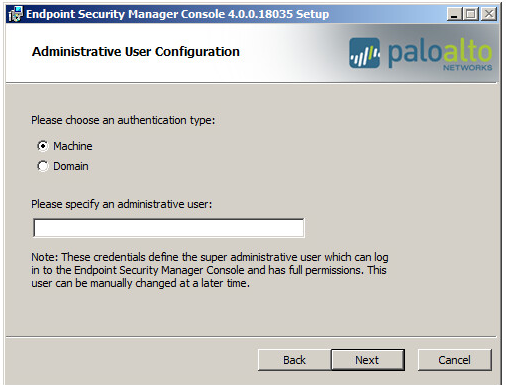
- Configure the settings for the administrative user who
will access the ESM Console.
![]()
- Choose the type of authentication you want
to use:
- Machine —The ESM Console authenticates a user or group on the local machine.
- Domain —The ESM Console authenticates a user or group belonging to the domain of the machine.
- Enter the account name for the user who will administer the server and then click Next.
- Choose the type of authentication you want
to use:
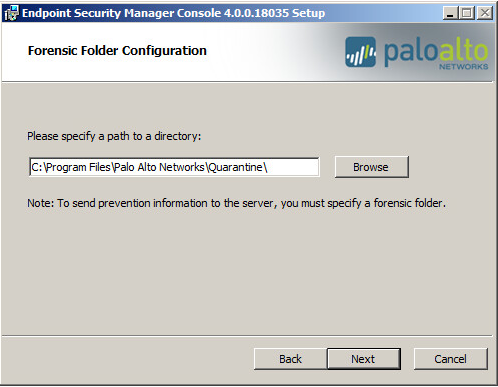
- Specify the forensic folder destination.
![]()
- Keep the default forensic folder path or Browse to
an alternate folder location and click OK.The installer automatically enables BITS for this folder.
- Click Next.
- Keep the default forensic folder path or Browse to
an alternate folder location and click OK.
- Complete the installation.
- Click Install.
- When the installation is complete, click Finish.
- Launch the ESM Console using one of the following methods:
- Double-click the icon on the desktop.
- Open the program from the menu.
- Enter your administrator credentials.If you did not supply your Traps license during the ESM Server installation, the ESM Console is available in read-only mode. To enable read-write access to the ESM Console, you must add a valid Traps license (see Add a Traps License Using the ESM Console).
- Next steps...