Manage Multiple ESM Servers
Table of Contents
Expand all | Collapse all
-
- Set Up the Endpoint Infrastructure
- Activate Traps Licenses
-
- Endpoint Infrastructure Installation Considerations
- TLS/SSL Encryption for Traps Components
- Configure the MS-SQL Server Database
- Install the Endpoint Security Manager Server Software
- Install the Endpoint Security Manager Console Software
- Manage Proxy Communication with the Endpoint Security Manager
- Load Balance Traffic to ESM Servers
-
- Malware Protection Policy Best Practices
- Malware Protection Flow
- Manage Trusted Signers
-
- Remove an Endpoint from the Health Page
- Install an End-of-Life Traps Agent Version
-
-
- Traps Troubleshooting Resources
- Traps and Endpoint Security Manager Processes
- ESM Tech Support File
-
- Access Cytool
- View the Status of the Agent Using Cytool
- View Processes Currently Protected by Traps Using Cytool
- Manage Logging of Traps Components Using Cytool
- Restore a Quarantined File Using Cytool
- View Statistics for a Protected Process Using Cytool
- View Details About the Traps Local Analysis Module Using Cy...
- View Hash Details About a File Using Cytool
Manage Multiple ESM Servers
After installing each ESM Server (see Install
the Endpoint Security Manager Server Software), the ESM Console
displays identifying information about each server on the SettingsESMMulti
ESM page.

You
can modify the settings and status for an ESM Server at any time.
- Configure proxy
communication.This step is required only for ESM Servers that do not have access to the internet. See Manage Proxy Communication with the Endpoint Security Manager.
- (ESM 4.1.2 and later releases) Configure an
ESM Server for deployment in a perimeter network such as a DMZ.If you deploy an ESM Server in a perimeter network and plan to use Active Directory objects as target objects for policy rules, you must ensure the server has connectivity to your LDAP server and perform additional configuration from the ESM Console. This ensures your remote endpoints will receive the latest security policy.
- Select SettingsESMMulti ESM.
- Select the row for the ESM Server deployed in the
perimeter network.The ESM Console displays the settings associated with the server.
- Edit the settings for the ESM
Server in the perimeter network.
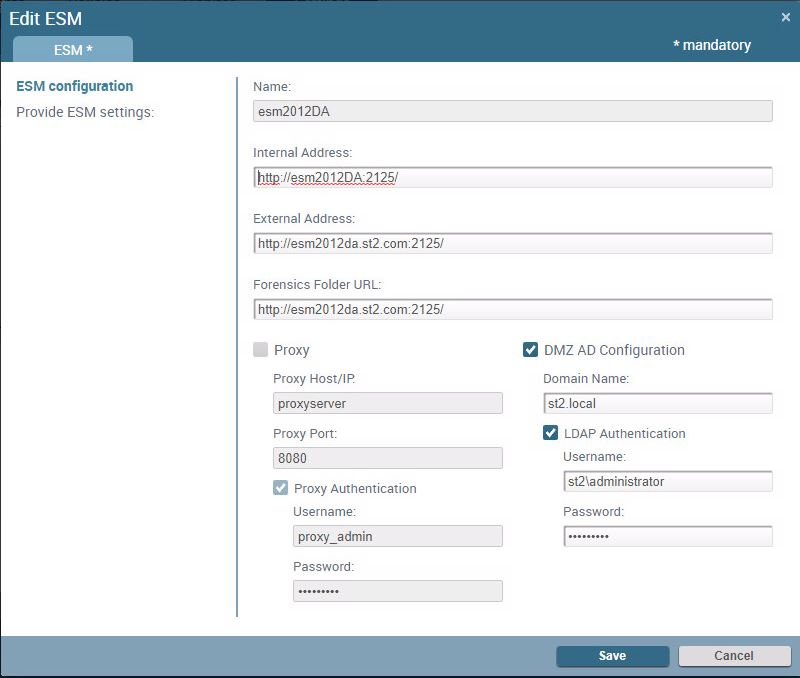
![]()
- Enter the primary Internal Address and an optional secondary External Address for the server.To use a load balancer to manage traffic from your Traps agents, see Load Balance Traffic to ESM Servers.
- (Optional) Configure proxy communication..
- Enable DMZ AD Configuration and enter the Fully-Qualified Domain Name (FQDN) of the LDAP server in the format <domain>.local (for example, st2.local).
- To use Active Directory objects in rules, enable LDAP Authentication and provide the Username in the format <domain>\<Username> and the associated user Password. Do not use the FQDN domain name in the Username. For example, instead of st2.local\administrator, use st2\administrator.
- Save your changes.
- Prioritize the ESM Server deployed in the perimeter
network as a secondary ESM Server to which your agents can connect.
- Identify and copy the external address for the ESM Server deployed in the perimeter network.
- Select the row for an internal ESM Server and Edit the server settings.
- Enter the address of the ESM Server deployed in the perimeter network as the External Address for the internal ESM Server.
- Save your changes.
- Select the checkbox of the ESM Server deployed in the perimeter network.
- From themenu at the top of the page, Disable Selected.
![]()
This enables the Traps agents to prioritize the internal ESM Servers ahead of the ESM Server deployed in the perimeter network. For more information, see What Logic Does the Agent Use When Selecting an ESM Server? - On the ESM Server deployed in the perimeter network, restart the Endpoint Security Manager Service.
- (ESM 4.1.3 and later releases) Secure an external
forensic folder.In ESM 4.1.3, the ESM Console automatically secures the forensic (BITSUpload) folder that your Traps agents use to upload forensic data when you install the ESM Console software. However, if you set up your forensic folder on an external server such as in a perimeter network, you must manually secure the folder to allow the TrapsDownloader account to access it. To secure the external forensic folder:
- On the server on which you host the forensic folder, create local user named TrapsDownloader.
- Assign the user the following password: Traps!D0wnload
- In the IIS settings, open the BitsUploads Application.
- Open Authentication and enable Windows Authentication.
- Open Authorization Rules and set All users to have the following verbs: BITS_POST, HEAD.
- Add the TrapsDownloader user account and do not add any specific verbs.
- Change the status of an ESM Server.
- Select SettingsESMMulti ESM.
- Select the checkbox for the ESM Server whose status you want to change.
- Select an action from the menu at the top of the page.
![]()
- Disable Selected—Temporarily remove the ESM Server from the available server pool of ESM Servers to which the Traps agents can connect; However, if the ESM Server was specified during the Traps installation, the agent retains the ESM Server on its list of available servers. After you select this action, the ESM Console changes the status of the server to Disabled. At a later date, you can reactivate the ESM Server.
- Delete Selected—Permanently remove the ESM Server from the available server pool of ESM Servers to which the Traps agents can connect; As with the Disable Selected option, if the ESM Server was specified during the Traps installation, the agent retains the ESM Server on its list of available servers. After you select this action, you cannot reactive a deleted ESM Server unless you first reinstall the ESM Server software.
- Activate Selected—Return a disabled ESM Server to service and add it back to the available servers pool. After you select this action, the ESM Console changes the status of the server to Active.

