Configure Child Process Protection
Table of Contents
Configure Child Process Protection
The Child Process Protection MPM for Windows
endpoints prevents script-based attacks used to deliver malware
such as ransomware. To prevent these attacks, the MPM is enabled by
default and blocks known targeted processes from launching child
processes commonly used to bypass traditional security approaches.
For
increased flexibility, you can configure the module to operate in
one of two ways:
- Use a whitelist to block all child processes initiated by a process except for those specified in the whitelist.
- Use a blacklist to allow a process to run all child processes except for those specified in the blacklist.
You
can also define whether you want Traps to evaluate a list of child
processes or whether to evaluate a specific argument supplied to
a child process.
To evaluate your child process protection
policy, Traps merges all applicable child process protection rules
into a single policy. User-defined child process protection rules
take precedence over default child process protection rules.
Use
the following workflow to configure enhanced child process protection:
- Configure a new malware protection rule.Select .
- Select Windows as the operating system (child process protection is not supported on Mac endpoints).
- From the action menu , select Add.
![]()
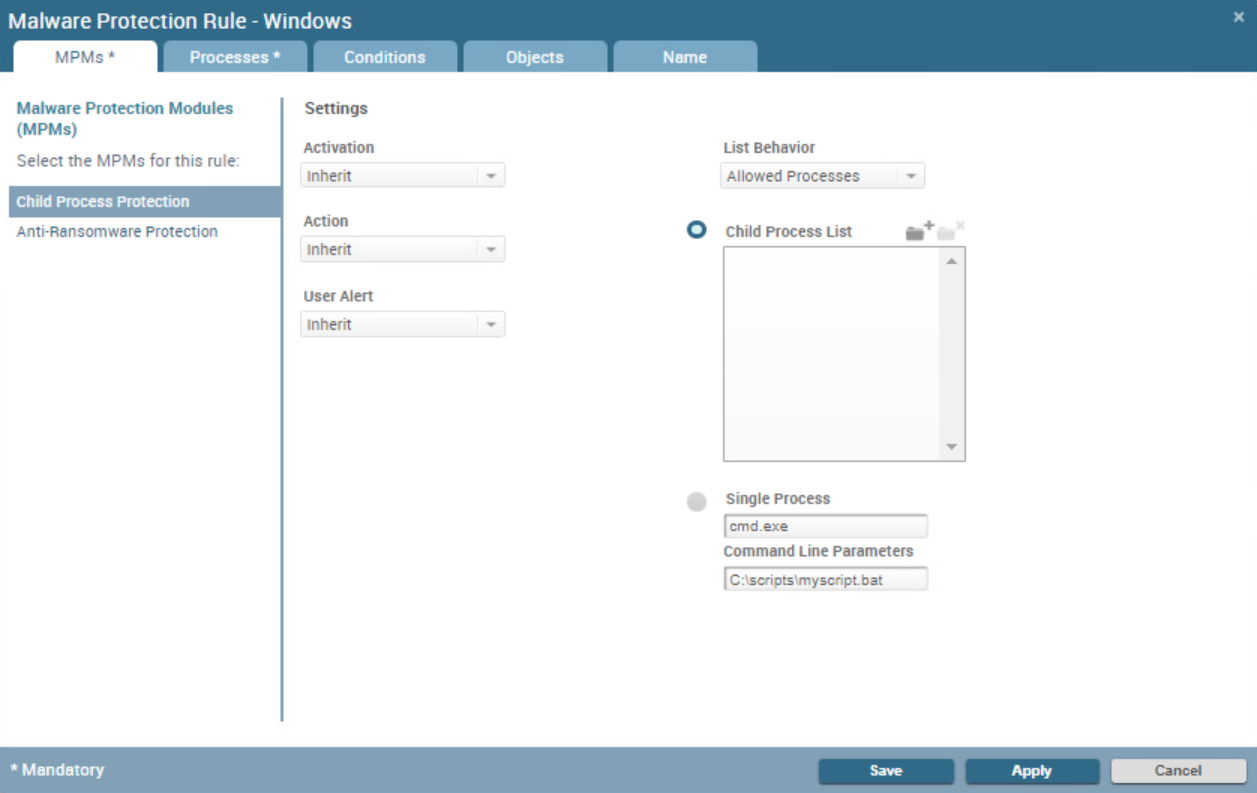
- Select Child Process Protection and
configure the rule settings:
![]()
- Activation—Select On to enable child process protection or Off to disable child process protection.
- Action—Select the action to take when a process attempts to call a child process: Block the child process from running (Prevention), or permit the child process to run and log the issue (Notification). Alternatively, you can choose to Inherit the behavior from the preceding rule in the rule hierarchy.To view additional details about the default policy, select and then select Show Default Rules from the action menu.
- User Alert—Specify the notification behavior when a process attempts to call a child process, either On to notify the user, or Off to suppress notifications. Alternatively, you can choose to Inherit the behavior from the preceding rule in the rule hierarchy.
- Configure the behavior of the module:
- Select the Behavior of the module: Use Allowed Processes to configure a whitelist or Restricted Processes to configure a blacklist.
- Determine how you want Traps to evaluate child processes
initiated by the parent process:
- Child Process List—To allow or block child processes without evaluating command-line arguments, add one or more processes to the Child Process List (one per line). Traps whitelists or blacklists these processes according to the Behavior you selected in the previous step. If you select Restricted Process behavior, Traps adds any child processes you specify to the blacklist which is defined in the content update of your security policy.To block or allow a source process to run all child processes, select Single Process, and leave both fields blank.
- Single Process—To evaluate the command-line parameters of a single child process, enter the child process path (full or partial) and the parameters. If you specify only the process name, Traps evaluates the process run from any path. For example, if you specify cscript.exe with the parameter C:\myorg\myorgscript.bat and a Behavior of Restricted Processes, the parent process (which you define on the Processes tab) will not be allowed to run the child process (in this example, cscript.exe) with the defined parameter. When you have multiple rules for the same parent and child process, Traps merges the command-line parameters for all user and default policy rules.
These options also support the same environment variables and wildcards that you can use in restriction rules. For example, to configure a rule for iexplorer.exe which blocks that process from launching SCR files from the temp folder, you can use environment variables and wildcards to specify %temp%\*.scr. For more information about using environment variables and wildcards, see Wildcards and Variables in Policy Rules.
- Select the Processes tab and Add one or more source processes to which Traps will apply child process protection. As you type, the ESM Console provides auto-completion based the list of processes defined in the ESM Console.
- (Optional)
Add Conditions to
the rule. By default, a new rule does not contain any conditions.To specify a condition, select the Conditions tab, select the condition in the Conditions list, and then Add it to the Selected Conditions list. Repeat this step to add more conditions, as needed. You can also define new Conditions.
- (Optional)
Define the Target
Objects to which to apply the rule.To define a smaller subset of target objects, select the Objects tab, and then enter one or more AD Users, AD Computers, AD Groups, AD Organizational Unit, Existing Endpoints, or Existing Groups in the Include or Exclude areas. The Endpoint Security Manager queries Active Directory to verify the users, computers, groups, or organizational units. The ESM Console also offers autocompletion as you type for existing endpoints and existing virtual groups.
- (Optional)
Review the rule name and description. The ESM Console automatically
generates the rule name and description based on the rule details
but permits you to change these fields, if needed.To override the autogenerated name, select the Name tab, clear the Activate automatic description option, and then enter a rule name and description of your choice.
- Save the malware protection rule.Do either of the following:
- Save the rule without activating it. This option is only available for inactive, cloned, or new rules. When you are ready to activate the rule, select the rule from the page and then click Activate.
- Apply the rule to activate it immediately.
After saving or applying a rule, you can return to the Protection Modules page at any time to Delete or Deactivate the rule.