Set Up Secure Communication with Panorama
Table of Contents
Expand all | Collapse all
-
- Set Up the Endpoint Infrastructure
- Activate Traps Licenses
-
- Endpoint Infrastructure Installation Considerations
- TLS/SSL Encryption for Traps Components
- Configure the MS-SQL Server Database
- Install the Endpoint Security Manager Server Software
- Install the Endpoint Security Manager Console Software
- Manage Proxy Communication with the Endpoint Security Manager
- Load Balance Traffic to ESM Servers
-
- Malware Protection Policy Best Practices
- Malware Protection Flow
- Manage Trusted Signers
-
- Remove an Endpoint from the Health Page
- Install an End-of-Life Traps Agent Version
-
-
- Traps Troubleshooting Resources
- Traps and Endpoint Security Manager Processes
- ESM Tech Support File
-
- Access Cytool
- View the Status of the Agent Using Cytool
- View Processes Currently Protected by Traps Using Cytool
- Manage Logging of Traps Components Using Cytool
- Restore a Quarantined File Using Cytool
- View Statistics for a Protected Process Using Cytool
- View Details About the Traps Local Analysis Module Using Cy...
- View Hash Details About a File Using Cytool
Set Up Secure Communication with Panorama
To set up secure communication, use the following
workflow:
- On your enterprise domain controller, create a DNS A record that points to the IP address of the Panorama log collector (for example, you can use the DNS snap-in available in Windows Administrative Tools to create the DNS record).
- Create the server certificate for the ESM components
to use to trust and verify the identity of Panorama. The certificate
must be generated from a certificate authority (CA) that is trusted
by the ESM. The Common Name of the certificate must also identify
Panorama using the name you specified in the DNS record.There are multiple methods for creating the server certificate:
- Obtain a certificate from an external CA (see Steps 1 and 2 in the procedure and then follow the instructions below to import the certificate)
- Obtain a certificate from your Active Directory CA.
The following procedure describes how to create a certificate from your Active Directory CA:- Open IIS Manager and navigate to the level you want to manage.
- Double-click Server Certificates.
- In the Actions pane, click Create Domain Certificate.
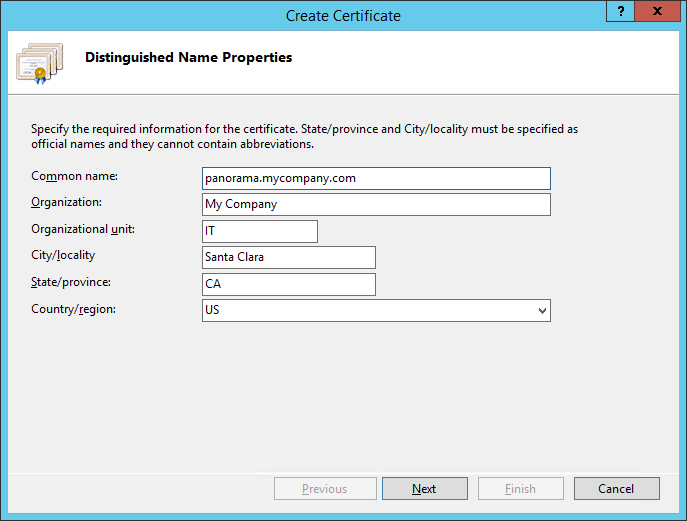
- On the Distinguished Name Properties page
of the Create Certificate Wizard, enter the
information for your certificate. In the Common name field,
make sure to specify Panorama using the name you used to identify
the server in the DNS record.
![]()
- Click Next.
- On the Online Certification Authority page, in the Specify Online Certification Authority box, enter or Select the name of a CA server in your Windows domain.
- Enter a Friendly name for the certificate and then click Finish.
- Export the certificate and private key as a PFX file.
- In Panorama, import the certificate.
- In Panorama, select Certificate ManagementCertificates and then select Import.
- Enter a name to identify the certificate name and browse to the certificate PFX file containing the private key.
- Select the file format as Encrypted Private Key and Certificate (PKCS12).
- Enter the Passphrase you used when creating the certificate and confirm it.
- Click OK. The Device Certificates tab displays the certificate with a Status of valid.
- Click the certificate Name and enable the Certificate for Secure Syslog, then click OK.
- On Panorama, associate the certificate that you configured
for secure communication with the managed collector:
- Select PanoramaManaged Collectors<collector>General.
- Select the Inbound Certificate for Secure Syslog. This is the certificate you created and imported earlier in the workflow.
- Click OK and then Commit your changes.
- Enable communication between the ESM Server and Panorama
to use TLS 1.1 and higher protocols.
- On the ESM Server, open regedit.exe: Click Start, and type regedit in the Run or Search field and press Enter.
- Browse to the following path: HKEY_LOCAL_MACHINE\SOFTWARE\Microsoft\.NETFramework\v4.0.30319\
- Select EditNewDWORD (32-bit) Value.
- Name the value SchUseStrongCrypto.
- Double-click the new value and enter 1 as the value data in Hexadecimal format, then click OK.
- Reboot the ESM Server.
- Configure the ESM to forward logs to Panorama as described in Enable Log Forwarding to Panorama and then verify your connectivity.

