Install the Endpoint Security Manager Server Software
Table of Contents
Expand all | Collapse all
-
- Set Up the Endpoint Infrastructure
- Activate Traps Licenses
-
- Endpoint Infrastructure Installation Considerations
- TLS/SSL Encryption for Traps Components
- Configure the MS-SQL Server Database
- Install the Endpoint Security Manager Server Software
- Install the Endpoint Security Manager Console Software
- Manage Proxy Communication with the Endpoint Security Manager
- Load Balance Traffic to ESM Servers
-
- Malware Protection Policy Best Practices
- Malware Protection Flow
- Manage Trusted Signers
-
- Remove an Endpoint from the Health Page
- Install an End-of-Life Traps Agent Version
-
-
- Traps Troubleshooting Resources
- Traps and Endpoint Security Manager Processes
- ESM Tech Support File
-
- Access Cytool
- View the Status of the Agent Using Cytool
- View Processes Currently Protected by Traps Using Cytool
- Manage Logging of Traps Components Using Cytool
- Restore a Quarantined File Using Cytool
- View Statistics for a Protected Process Using Cytool
- View Details About the Traps Local Analysis Module Using Cy...
- View Hash Details About a File Using Cytool
Install the Endpoint Security Manager Server Software
To install the Endpoint Security Manager (ESM)
Server software:
- Before you begin:
- Verify that the server meets the requirements described in ESM Server Software Requirements.
- Obtain an authorization code from your Palo Alto Networks Account Manager or reseller and Activate Traps Licenses.
- Obtain the software from https://support.paloaltonetworks.com (TOOLSSOFTWARE UPDATESFilter By: Endpoint Security Manager).
- Initiate the ESM Server software installation. You can
also install the ESM Server using Msiexec (see Install
Traps Components Using Windows Msiexec).
- Double click the ESMCore installation file.
- Click Next to begin the setup process.
- On the End User License Agreement dialog, select the I accept the terms in the License Agreement check box and then click Next.
- Keep the default installation folder or click Change to specify a different installation folder and then click Next.
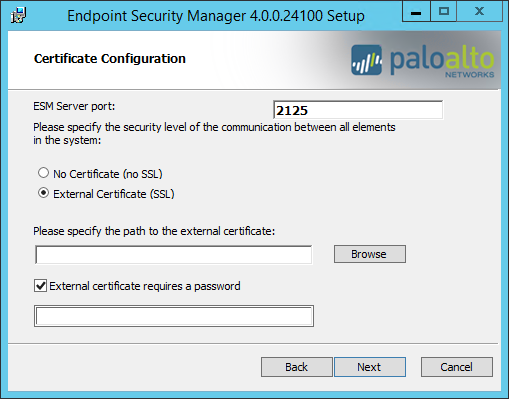
- Specify the security level for communication between
the ESM Server and the Traps agents.To encrypt communication over SSL, use a server-client certificate file (PFX format) and supply the password for decrypting the private key.
![]()
- Specify the ESM Server port to use for access to the server or keep the default setting (2125).
- Select the certificate configuration method:
- External Certificate (SSL)—Encrypt communication between the server and the agents over SSL (default). Then Browse to the server-client certificate and enter the password required to decrypt the private key.
- No Certificate (no SSL)—Do not encrypt communication between the server and the agents (not recommended).
- Click Next.
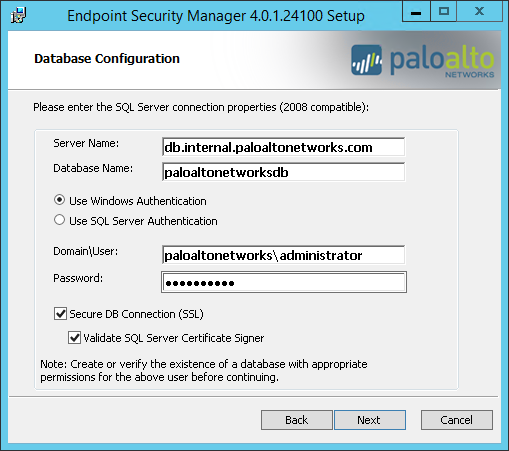
- Configure the settings that enable communication between
the ESM Server and the database.To set up access to the database, you must specify the authentication method and a user that has administrative privileges to administer the database. The username (and password) that you enter depend on the type of authentication method that you select: either Windows authentication (recommended) or SQL server authentication.
![]()
- Enter the fully qualified domain name or IP address of the database Server Name. If your SQL Server uses an instance other than the default, you must also include the instance name in the format <servername>\<instance>.
- Enter the name of the Database Name.
- Select the method of authentication and enter the
account credentials. This account must also be added as a database
owner on the database server (for more information, see Configure
the MS-SQL Server Database).
- Use Windows Authentication to authenticate using a Windows domain user account that has privileges to administer the database server and enter the Domain\User (for example, mydomain\administrator) and Password.
- Use SQL Server Authentication to authenticate using a local user that has privileges to administer the database and enter the Login and Password.
- To enable secure communication between the ESM Server
and the database using TLS/SSL 1.2:
- Select Secure DB Connection (SSL). This option enables the ESM Server to encrypt communication between the ESM Server and the database.
- For even stricter security, select the option to Validate SQL Server Certificate Signer. This enables the ESM Server to validate that the certificate the database presents matches a specific certificate. For validation to succeed, you must import the database certificate into Trusted Root Certification Authorities.
Secure communication between the ESM Server and the database is supported with only SQL Server Enterprise or SQL Server Standard. - Click Next.If one or more ESM Servers already connect to the database, the installer prompts you to join the database cluster of ESM Servers. If you select Yes, the installer obtains the remaining installation settings from the database. Skip to step 7 to complete the installation.
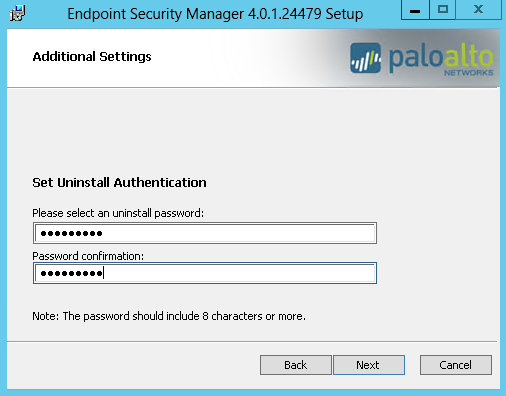
- Set the password to uninstall the Traps software.
![]()
- Enter and then confirm an uninstall password,
which must be eight characters or more. You will be prompted for
this password any time you or a user tries to uninstall Traps software.After installing the ESM Server software, you can Change the Uninstall Password at a later date by creating an agent settings rule using the ESM Console.
- Click Next.
- Enter and then confirm an uninstall password,
which must be eight characters or more. You will be prompted for
this password any time you or a user tries to uninstall Traps software.
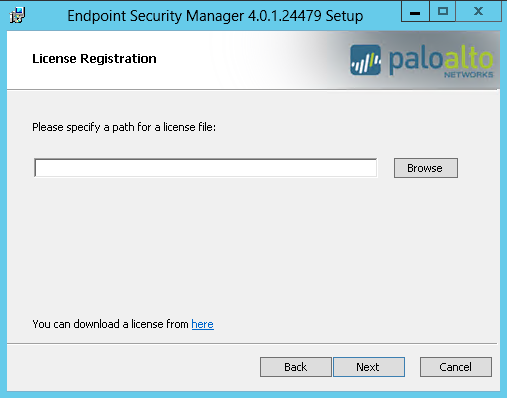
- Import the Traps license. If you choose not provide a
Traps license during installation, you will have read-only access
to the ESM Console until you add a valid Traps license.
![]()
- Browse to the license
file and then click Open. If you do not have
a license, contact your Account Manager, reseller, or go to https://support.paloaltonetworks.com.The installer displays license details for the license file.
- Click Next.
- Browse to the license
file and then click Open. If you do not have
a license, contact your Account Manager, reseller, or go to https://support.paloaltonetworks.com.
- Complete the installation.
- Click Install.
- When the installation is complete, click Finish.


