Manage Proxy Communication with the Endpoint Security Manager
Table of Contents
Expand all | Collapse all
-
- Set Up the Endpoint Infrastructure
- Activate Traps Licenses
-
- Endpoint Infrastructure Installation Considerations
- TLS/SSL Encryption for Traps Components
- Configure the MS-SQL Server Database
- Install the Endpoint Security Manager Server Software
- Install the Endpoint Security Manager Console Software
- Manage Proxy Communication with the Endpoint Security Manager
- Load Balance Traffic to ESM Servers
-
- Malware Protection Policy Best Practices
- Malware Protection Flow
- Manage Trusted Signers
-
- Remove an Endpoint from the Health Page
- Install an End-of-Life Traps Agent Version
-
-
- Traps Troubleshooting Resources
- Traps and Endpoint Security Manager Processes
- ESM Tech Support File
-
- Access Cytool
- View the Status of the Agent Using Cytool
- View Processes Currently Protected by Traps Using Cytool
- Manage Logging of Traps Components Using Cytool
- Restore a Quarantined File Using Cytool
- View Statistics for a Protected Process Using Cytool
- View Details About the Traps Local Analysis Module Using Cy...
- View Hash Details About a File Using Cytool
Manage Proxy Communication with the Endpoint Security Manager
To enable the Endpoint Security Manager (ESM)
to obtain the most up-to-date security policy and leverage WildFire
threat intelligence it is important to enable communication from
the ESM to external resources such as WildFire and the content update
server. In ESM deployments that do not have direct access to the
internet, you can set up a proxy server to facilitate communication with
external resources.
To set up the ESM to forward traffic through
a proxy server, you must configure the proxy configuration for the
ESM Console and each ESM Server independently; However, you can
use the same proxy server for all ESM components, or you can configure
the ESM components to use different proxy servers. For example,
you might want to use different proxy servers for each ESM Server
if your servers are geographically distributed and your proxy servers
are located near the ESM Servers.
The ESM also supports unauthenticated
or authenticated proxy communication.
Perform the following
tasks to manage proxied communication.
After
you enable proxy communication, the ESM components immediately begin
forwarding traffic to the proxy server.
- Configure proxy
communication for the ESM Console.This enables the ESM Console to communicate with the following external resources:
- WildFire—Enables the ESM Console to obtain WildFire reports about executable files.
- Content update server—Enables the ESM Console to identify and download new content updates. To review your content update preferences, see Manage Content Updates.
- From the ESM Console, select SettingsESMSettings.
- Enable Proxy communication.
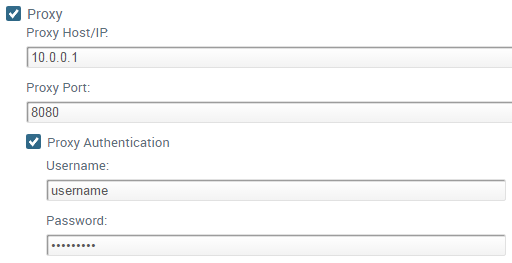
- Configure the proxy server to use for communication
between the ESM Console and external resources.
![]()
- Enter the FQDN or IP address of the proxy server in the Proxy Host/IP field and a Proxy Port number (default is 8080).
- (Optional) To use authenticated proxy communication, enable Proxy Authentication and then enter the Username and Password—using only ISO-8859-1 characters—the ESM Console will use to authenticate with the proxy server.
- Save your changes to the ESM Console Configuration.
- Configure proxy communication for
the ESM Server.This enables the ESM Server to obtain the latest verdicts from WildFire and submit unknown files for analysis.
- Select SettingsESMMulti ESM.
- Select the row for the ESM Server for which you want to configure proxy communication. The ESM Console displays the settings associated with the server.
- Edit the settings for the server.
- Enable Proxy communication.
- Configure the settings for the proxy server to use
for communication between the ESM Server and external resources.
- Enter the FQDN or IP address of the proxy server in the Proxy Host/IP field and a Proxy Port number (default is 8080).
- (Optional) To use authenticated proxy communication, enable Proxy Authentication and then enter the Username and Password—using only ISO-8859-1 characters—the ESM Console will use to authenticate with the proxy server.
- Save your changes to the ESM Server configuration.
- Repeat this process to configure proxy configuration
for other ESM Servers, if desired.You can configure the same proxy settings across multiple ESM Servers, or configure proxy settings that are unique to each server.
For more information, see Manage Multiple ESM Servers.

