Manage Traps Installation Packages
Table of Contents
Expand all | Collapse all
-
- Set Up the Endpoint Infrastructure
- Activate Traps Licenses
-
- Endpoint Infrastructure Installation Considerations
- TLS/SSL Encryption for Traps Components
- Configure the MS-SQL Server Database
- Install the Endpoint Security Manager Server Software
- Install the Endpoint Security Manager Console Software
- Manage Proxy Communication with the Endpoint Security Manager
- Load Balance Traffic to ESM Servers
-
- Malware Protection Policy Best Practices
- Malware Protection Flow
- Manage Trusted Signers
-
- Remove an Endpoint from the Health Page
- Install an End-of-Life Traps Agent Version
-
-
- Traps Troubleshooting Resources
- Traps and Endpoint Security Manager Processes
- ESM Tech Support File
-
- Access Cytool
- View the Status of the Agent Using Cytool
- View Processes Currently Protected by Traps Using Cytool
- Manage Logging of Traps Components Using Cytool
- Restore a Quarantined File Using Cytool
- View Statistics for a Protected Process Using Cytool
- View Details About the Traps Local Analysis Module Using Cy...
- View Hash Details About a File Using Cytool
Manage Traps Installation Packages
To ensure that your endpoints remain secure,
you must download the Traps software and install it on your endpoints.
Before you can install or upgrade Traps for Mac or Linux, you must
download the software from the Support portal and then generate
an installation package from the ESM Console. The installation package
specifies the IP address and port settings the agent will use to
connect to the ESM Server. Windows endpoints to not require a custom
installation package as you specify the ESM Server during installation.
To
generate the installation package you must be assigned a role which
enables the Installation Package privilege.
Otherwise, this feature is disabled (hidden completely from view)
or read-only.
After you create an installation package, you
can then install it directly on an endpoint or you can use a software
deployment tool of your choice to distribute the software to multiple endpoints.
Create a Traps Installation Package
- Download the Traps for Linux software ZIP file
from the Customer Support Portal (https://support.paloaltonetworks.com/).The Traps software version you select must not exceed the current ESM version.
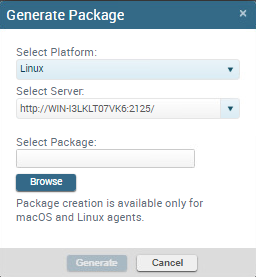
- Generate the installation package. This package specifies
the ESM Servers to which the agent can connect for the first time.
After the first successful connection, the agent receives a list
of all available ESM Servers to use for future connections.
- From the ESM Console, select SettingsAgentInstallation Package.
- From the action menu (), select Generate Package.
![]()
- Select the platform for which you want to generate the package.
- Select the ESM Server to which the Traps agent will
first connect. The ESM Console automatically populates the list
with any enabled ESM Servers (to review your servers, select SettingsESMMulti
ESM).
![]()
- If you use a load balancer to balance traffic from your Traps agents to your ESM Servers, select a server that is configured with the load balancer address as the internal (primary) address. For more information, see Load Balance Traffic to ESM Servers.
- If you use a multi-ESM deployment, we recommend that you select All to include all available ESM Servers with the installation package. This ensures the agent can try other ESM Servers when the primary ESM Server is unreachable.
- If you only use one ESM Server or prefer to force the agent to establish the initial connection with a specific ESM Server (such as in a regional deployment), select the specific ESM Server from the list.
- Browse to the software package you downloaded in the first step.
- Click Generate.When the installation package is available, the ESM Console displays a new record in the Installation Package table indicating the time the package was created and a link to Download the installation package.To view the status of the installation package, you can also filter the ESM logs (MonitorESMLogs) for a Report Type of Installation Package. The log message indicates whether the ESM Console successfully generated the package.
- When the installation package has finished generating,
save the installation package.
- Select SettingsAgentInstallation Package.
- Select the Download link next
to the installation package and save it.
![]()
- Distribute the installation package.Deploy the installation package to your endpoints using a software distribution tool of your choice such as JAMF or SCCM. Or to install Traps manually, refer to the Traps 4.2 Agent Administrator’s Guide for instructions.
Remove a Traps Installation Package
If you no longer need an installation package,
you can delete it from the ESM Console.
- From the ESM Console, select SettingsAgentInstallation Package.
- Select the installation packages you want to delete.
- From the action menu , select the delete icon.
![]()


