Increase the PA-7000 Series Firewall LPC Log Storage Capacity
Table of Contents
Increase the PA-7000 Series Firewall LPC Log Storage Capacity
The PA-7000 Series firewall ships with four
1TB drives installed in the Log Processing
Card (LPC) and each drive pair (A1/A2 and B1/B2) is in a
separate RAID 1 array to provide 2TBs of log storage. You can replace
the 1TB drives with 2TB drives to double the log storage capacity
to 4TBs.
The logs on the 1TB drives
will not be available after upgrading drives on a PA-7000 Series
firewall that is running a PAN-OS 7.0.7 or earlier release. Even
if this is acceptable, we recommend that you perform this upgrade
during a maintenance window.If it is important
to you to retain logs, you must upgrade to Panorama 7.0.8 or a later
release. The following procedure describes both scenarios.
When ordering new drives from Palo Alto
Networks or your reseller, you will receive each AMC and drive as
a single unit. Do not attempt to replace the drive in the AMC with
a third-party drive. Also, do not mix drive models within a RAID
1 array (for example, the drive model must be the same for both
drives in the A1/A2 RAID 1 array). You can, however, mix drive models
in different RAID 1 arrays on the same LPC. For example, the drives
in the A1/A2 array can both be model ST91000640NS and the drives
in the B1/B2 array can both be model ST1000NX0423.
- Put the provided ESD wrist strap on your wrist ensuring that the metal contact is touching your skin. Then attach (snap) one end of the ground cable to the wrist strap and remove the alligator clip from the banana clip on the other end of the ESD grounding cable. Plug the banana clip end into one of the ESD ports located on the front of the chassis before handling ESD sensitive hardware. For details on the ESD port location, see PA-7050 Front Panel (AC) or PA-7080 Front Panel (AC).Verify that the RAID 1 status for the installed drives shows there are at least two functioning RAID 1 arrays. During the upgrade, you will upgrade one RAID 1 array at a time and there must be at least one other RAID 1 array that is available to the firewall. The firewall will show an abort error if you try to remove the only functioning array from the configuration.To view the RAID status, run the following command:
admin@PA-7080> show
system raid detail
For example, the following output from a PA-7080 firewall shows that both drive arrays (S7A and S7B) are Available, each disk is Present, and the status of each disk shows active sync.Disk Pair S7A Available Status clean Disk id A1 Present model : ST91000640NS size : 953869 MB status : active sync card serial : 002901000067 Disk id A2 Present model : ST91000640NS size : 953869 MB status : active sync card serial : 002901000369 Disk Pair S7B Available Status clean Disk id B1 Present model : ST91000640NS size : 953869 MB status : active sync card serial : 002901000237 Disk id B2 Present model : ST91000640NS size : 953869 MB status : active sync card serial : 002901000358IMPORANT: If there is only one functioning RAID 1 array and the other array shows failed drives or has a status other than Available, you must replace at least one of the failed drives in the problem array before you proceed. A RAID 1 array can contain only one drive. In this case, you will see that the RAID details show Available and clean/degraded. For details, see Replace a PA-7000 Series Firewall LPC Drive.Upgrade the drives based on the PAN-OS version running on the firewall:Upgrade the firewall from 1TB to 2TB drives if the firewall is running PAN-OS 7.0.8 or later:- To remove drive A1 from the RAID 1 array, run the following command and enter y when prompted to confirm the request:
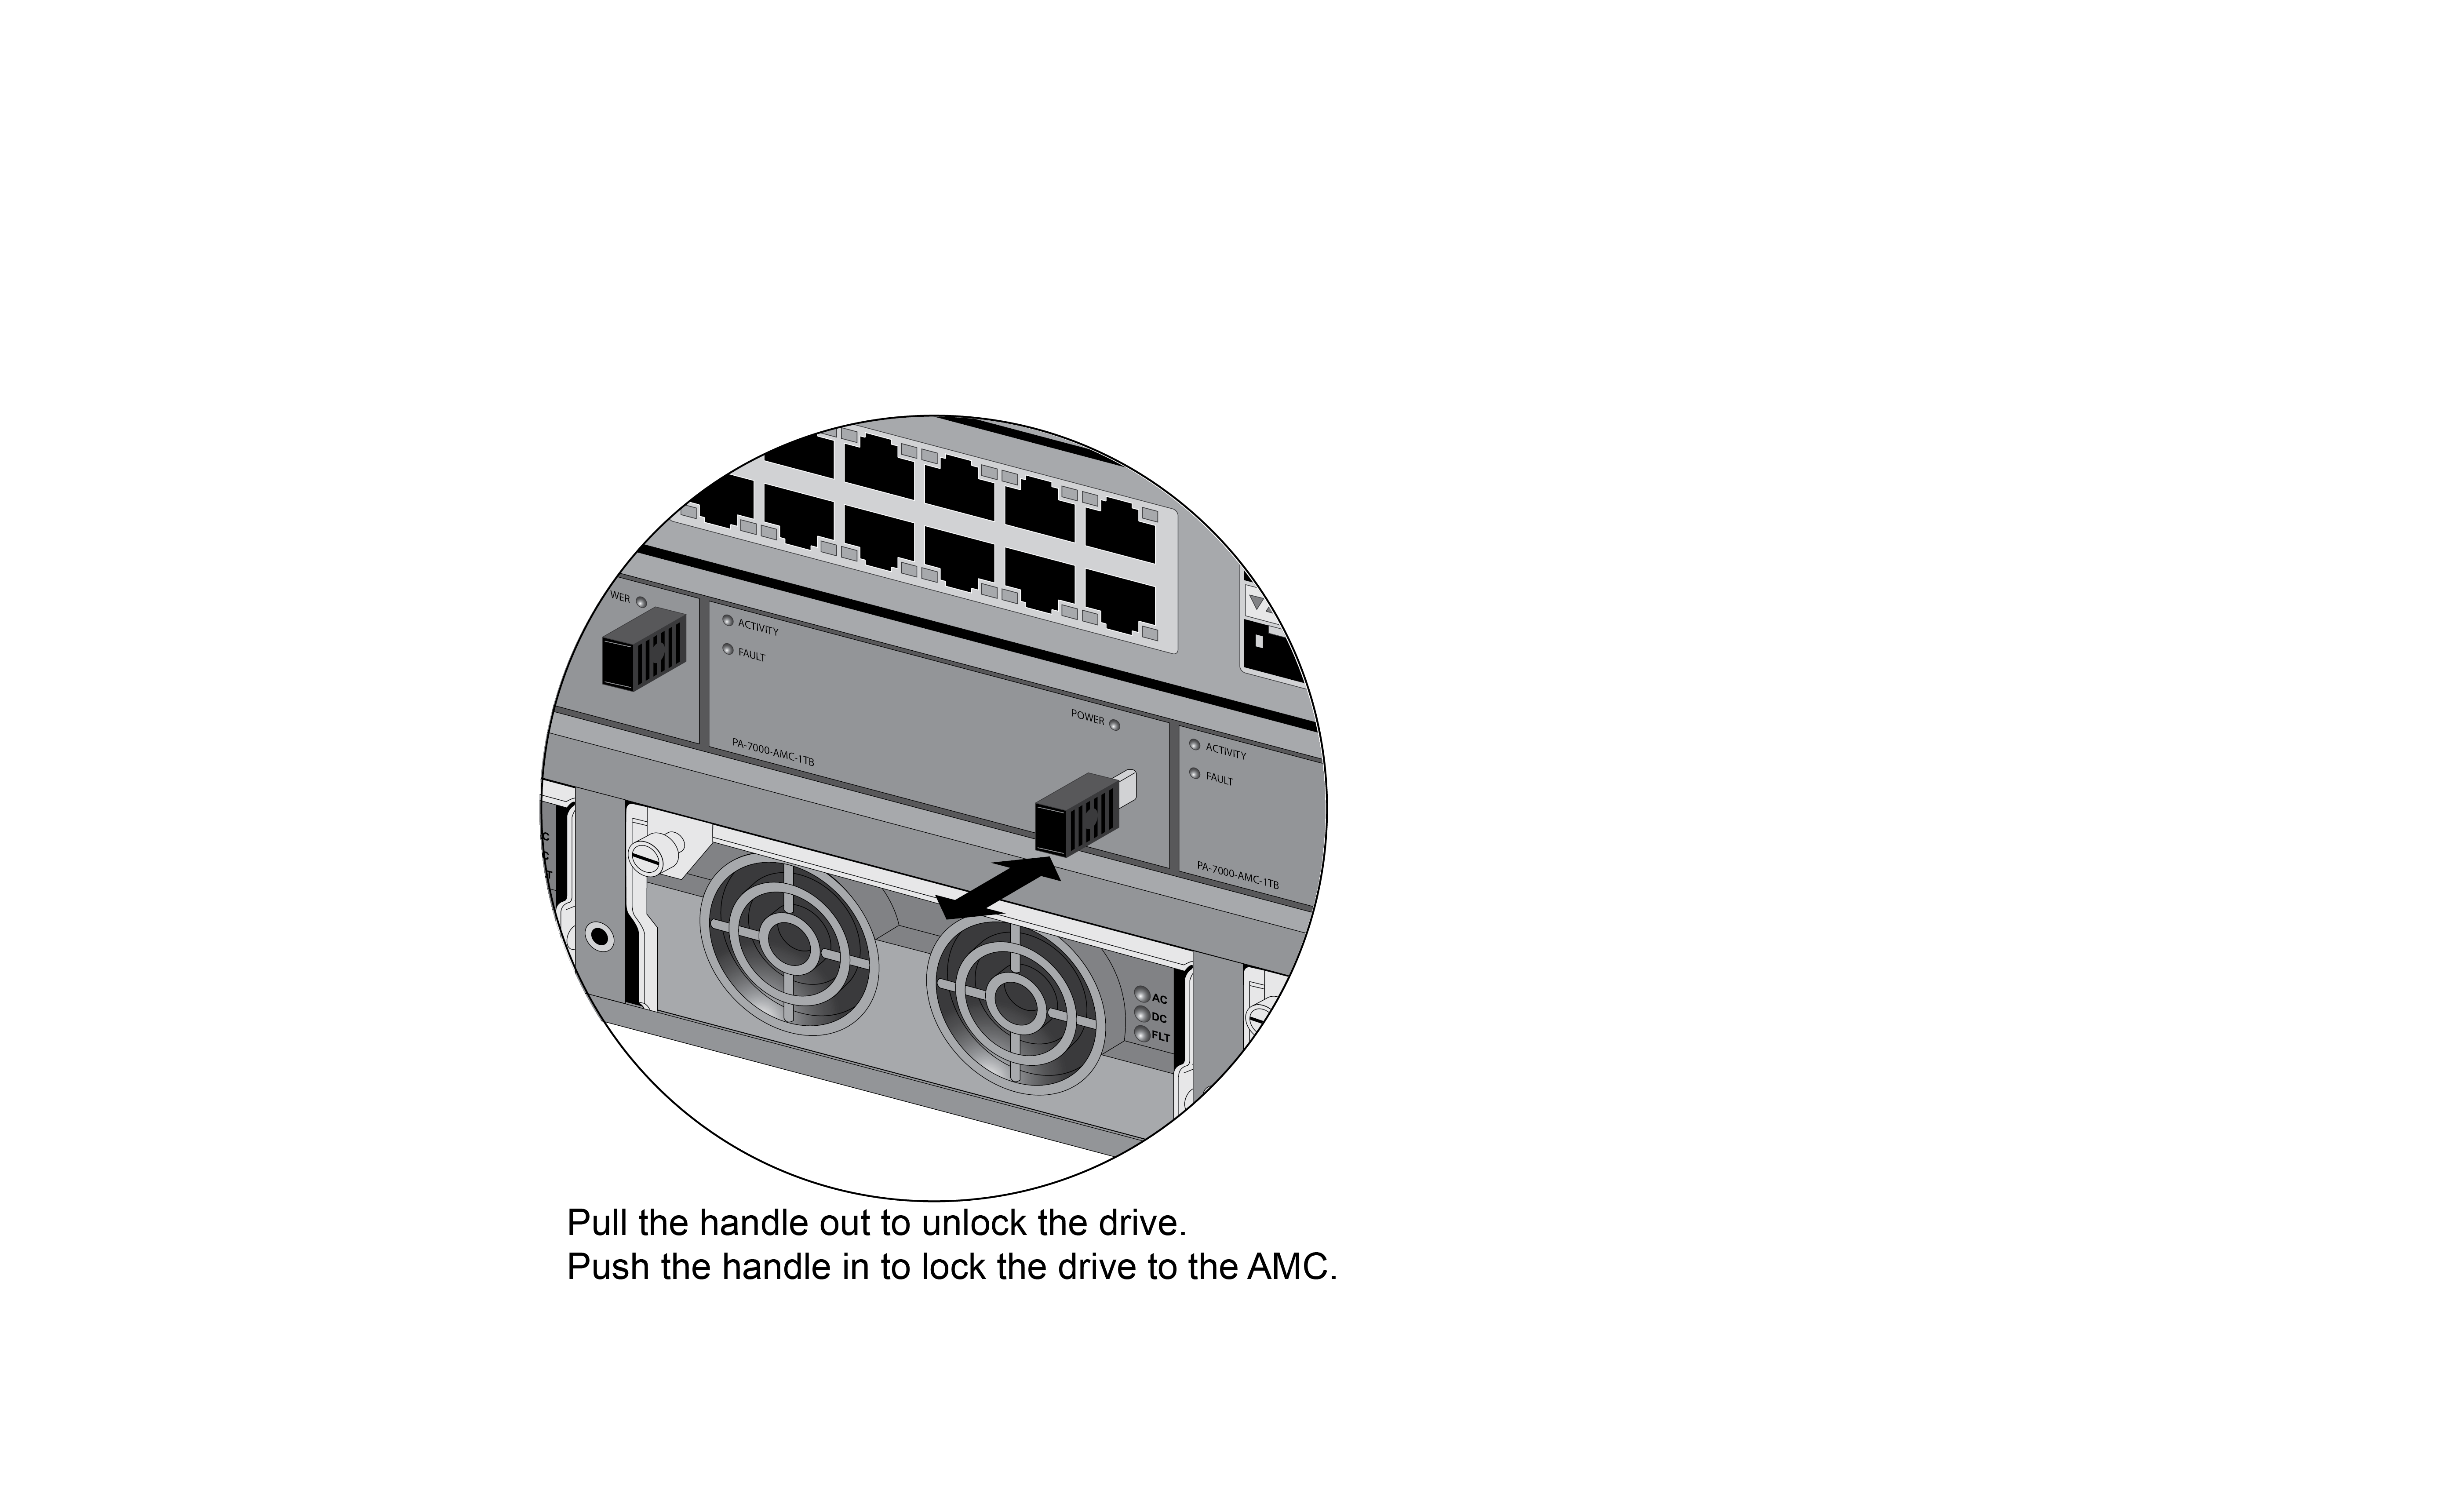
admin@PA-7080> request
system raid slot s7 remove A1
This procedure is based on a PA-7080 firewall where the LPC is installed in slot s7. If you are working on a PA-7050 firewall, the LPC is installed in slot s8. For a PA-7050 firewall, replace slot s7 with slot s8 in those commands that specify the LPC slot number.Gently pull the AMC release handle on drive A1 toward you until it stops to unlock the AMC from the chassis and then completely remove the AMC.![]()
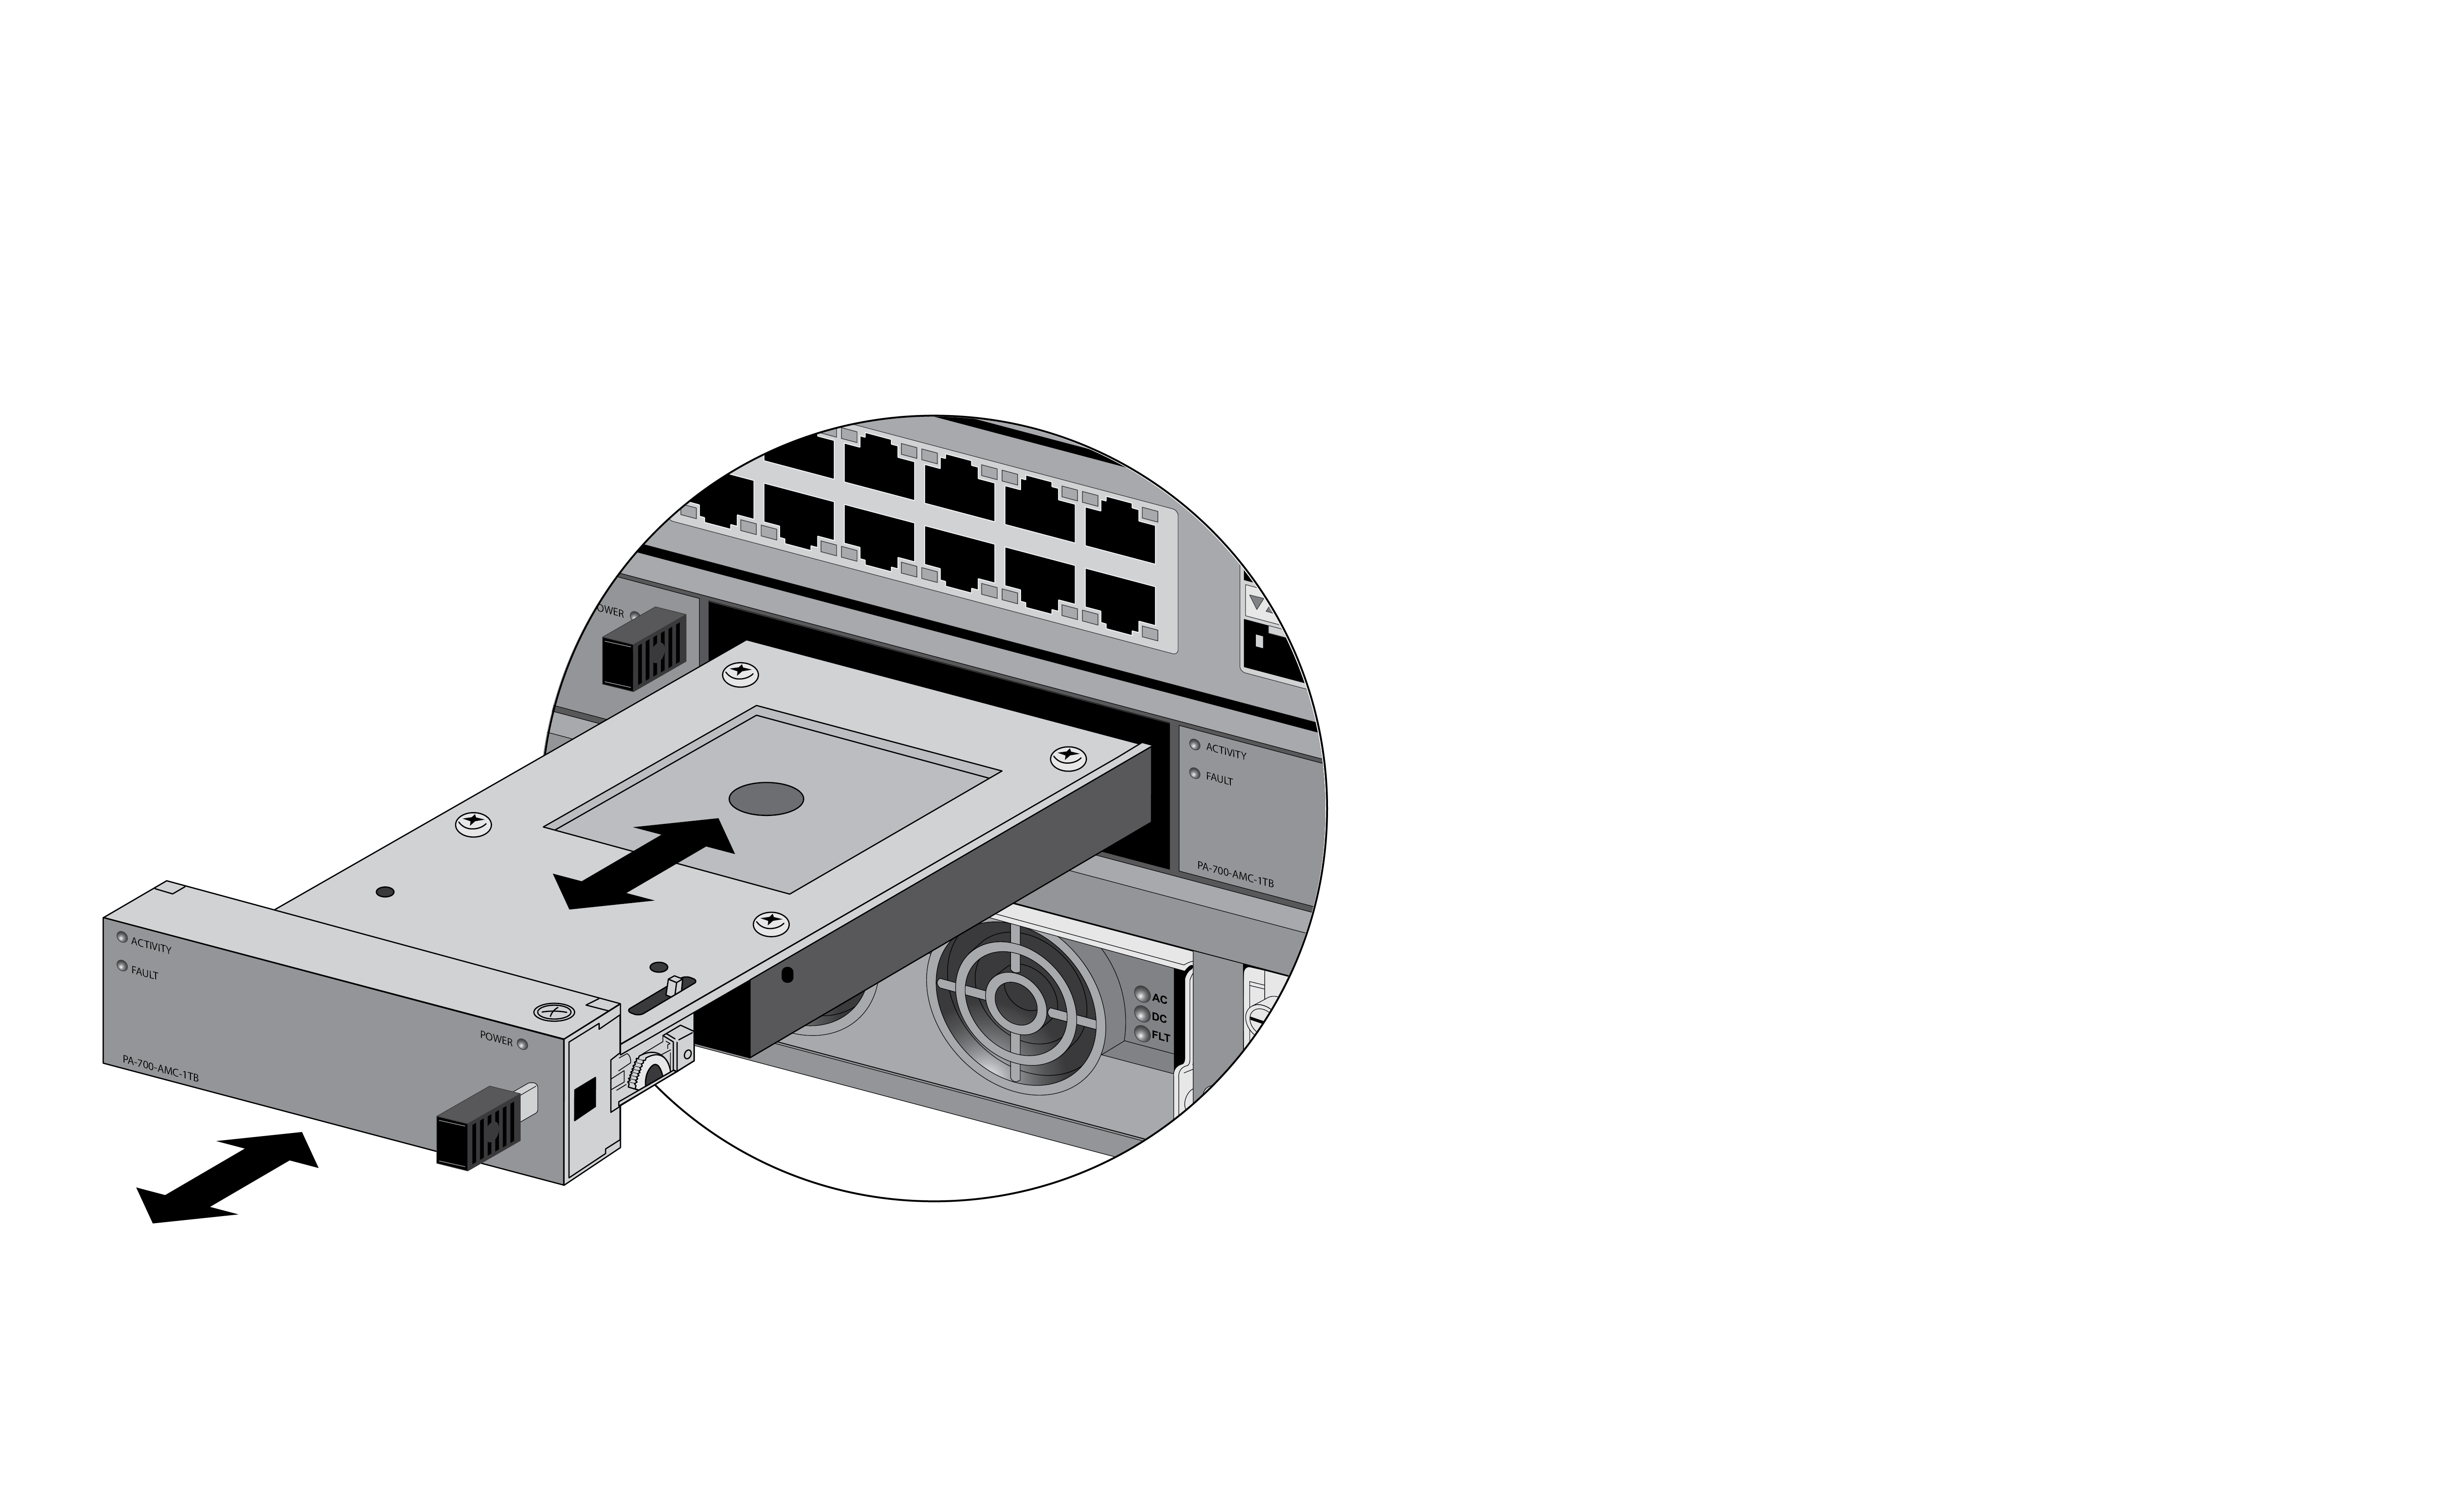
![]() Remove a new 2TB drives from the packaging and pull the AMC handle out to prepare it for installation into the LPC. Install the drive into the empty drive slot (A1 in this example) and then push in the release handle on the AMC to lock it to the chassis.Copy the data from the 1TB (A2) drive to the newly installed 2TB (A1) drive:
Remove a new 2TB drives from the packaging and pull the AMC handle out to prepare it for installation into the LPC. Install the drive into the empty drive slot (A1 in this example) and then push in the release handle on the AMC to lock it to the chassis.Copy the data from the 1TB (A2) drive to the newly installed 2TB (A1) drive:admin@PA-7080> request system raid slot s7 copy from A2 to A1To view the status of the copy process, run the following command:admin@PA-7080> show system raid detailContinue running this command to view the RAID detail output until you see that the array (A1/A2 in this example) shows Available.At this point, drive A2 will show not in use because there is a drive size mismatch.Disk Pair S7A Available Status clean, degraded Disk id A1 Present model : ST2000NX0253 size : 1907738 MB status : active sync card serial : 002901000063 Disk id A2 Present model : ST1000NX0423 size : 953869 MB status : not in use card serial : 002901000067Remove the 1TB drive from the A2 slot and then install a new 2TB drive in the A2 slot.Add drive A2 to the RAID 1 array:admin@PA-7080> request system raid slot s7 add A2The system will copy the data from A1 to A2 to mirror the drives.To view the status of the copy process, run the following command:admin@PA-7080> show system raid detailContinue to view the RAID detail output until you see that the array (S7A in this example) shows Available and both drives show the status active sync.The following output shows that the RAID 1 array is functioning properly:Disk Pair S7A Available Status clean Disk id A1 Present model : ST2000NX0253 size : 1907738 MB status : active sync card serial : 002901000063 Disk id A2 Present model : ST2000NX0253 size : 1907738 MB status : active sync card serial : 002901000064To upgrade the B1/B2 drive array, repeat these procedures replacing the drive designators. For example, replace A1 with B1 and A2 with B2 to upgrade the drives in the B1/B2 RAID 1 array.Upgrade the firewall from 1TB to 2TB drives if the firewall is running PAN-OS 7.0.7 or earlier:The logs on the 1TB drives will not be available after the upgrade. We recommend that you perform this upgrade during a maintenance window.To retain logs, you must upgrade to PAN-OS 7.0.8 and follow the procedure described in Upgrade the firewall from 1TB to 2TB drives if the firewall is running PAN-OS 7.0.8 or later:.- To remove the first two 1TB drives (A1 and A2 in this example) from the RAID 1 array, run the following commands and enter y when prompted to confirm the requests:
admin@PA-7080> request
system raid slot s7 remove A1
:admin@PA-7080> request system raid slot s7 remove A2
This procedure is based on a PA-7080 firewall where the LPC is installed in slot s7. If you are working on a PA-7050 firewall, the LPC would be installed in slot s8. For a PA-7050 firewall, replace slot s7 with slot s8 in those commands that specify the LPC slot number.Gently pull the AMC release handle on drive A1 toward you until it stops to unlock the AMC from the chassis and then completely remove the AMC. Do the same for drive A2.![]()
![]() Remove two 2TB drives from their packaging and pull the AMC handle out on each drive to prepare them for installation into the LPC. Install the drives into the empty slots (A1 and A2) and then push in the release handle on each AMC to lock the AMCs to the chassis.Create a new RAID 1 array for the 2TB drives (using A1 in this example) by running the following command:
Remove two 2TB drives from their packaging and pull the AMC handle out on each drive to prepare them for installation into the LPC. Install the drives into the empty slots (A1 and A2) and then push in the release handle on each AMC to lock the AMCs to the chassis.Create a new RAID 1 array for the 2TB drives (using A1 in this example) by running the following command:admin@PA-7080> request system raid slot s7 add A1View the status of the array configuration to confirm that the new array was created.admin@PA-7080> show system raid detailThe following output shows that the S7A array is Available.At this point, drive A2 will show not in use because you have not added it to the new RAID 1 array configuration.Disk Pair S7A Available Status clean/degraded Disk id A1 Present model : ST2000NX0253 size : 1907738 MB status : active sync card serial : 002901000063 Disk id A2 Present model : ST2000NX0253 size : 1907738 MB status : not in use card serial : 002901000064Add the second drive to the new array (A2 is this example):admin@PA-7080> request system raid slot s7 add A2The system will copy the data from A1 to A2 to mirror the drives.Continue running the show system raid detail command to view the RAID output until the disk pair status shows clean and both disks show active sync.To upgrade the B1/B2 drive array, repeat these procedures replacing the drive designators. For example, replace A1 with B1 and A2 with B2 to upgrade the drives in the B1/B2 RAID 1 array.