Enable DNS Security
Table of Contents
Enable DNS Security
Configure your firewall to enable DNS sinkholing using
the DNS Security service.
To enable DNS sinkholing for domain queries
using DNS security, you must activate your DNS Security subscription,
create (or modify) an Anti-Spyware policy to reference the DNS Security
service, configure the log severity and policy settings for each
DNS signature category, and then attach the profile to a security
policy rule.
- Activate Subscription Licenses.Verify that the paloalto-dns-security App-ID in your security policy is configured to enable traffic from the DNS security cloud security service.If your firewall deployment routes your management traffic though an Internet-facing perimeter firewall configured to enforce App-ID security policies, you must allow the App-IDs on the perimeter firewall; failure to do so will prevent DNS security connectivity.Configure DNS Security signature policy settings to send malware DNS queries to the defined sinkhole.If you use an external dynamic list as a domain allow list, it does not have precedence over the DNS Security domain policy actions. As a result, when there is a domain match to an entry in the EDL and a DNS Security domain category, the action specified under DNS Security is still applied, even when the EDL is explicitly configured with an action of Allow. If you want to add DNS domain exceptions, either configure an EDL with an Alert action or add them to the DNS Domain/FQDN Allow List located in the DNS Exceptions tab (step 8).
- Log in to the firewall and select .Create or modify an existing profile, or select one of the existing default profiles and clone it.Name the profile and, optionally, provide a description.Select the DNS Policies tab.In the Signature Source column, beneath the DNS Security heading, there are individually configurable DNS signature sources, which allow you to define separate policy actions as well as a log severity level.Palo Alto Networks recommends changing your default DNS Policies settings for signature sources to ensure optimum coverage as well as to assist with incidence response and remediation. Follow the best practices for configuring your DNS Security settings as outlined in Best Practices for Securing Your Network from Layer 4 and Layer 7 Evasions.
- Specify the log severity level that is recorded when the firewall detects a domain matching a DNS signature. For more information about the various log severity levels, refer to Threat Severity Levels.
- Select an action to be taken when DNS lookups are made to known malware sites for the DNS Security signature source. The options are allow, block, sinkhole, or default. Verify that the action is set to sinkhole.
- You can fully bypass DNS traffic inspection by configuring your DNS Security Anti-Spyware Profile with the following settings:
- A policy action of Allow with a corresponding log severity of None for each DNS signature source.
- Removal of all DNS Domain/FQDN Allow List entries in the DNS Exceptions tab.
- In the Packet Capture drop-down, select single-packet to capture the first packet of the session or extended-capture to set between 1-50 packets. You can then use the packet captures for further analysis.
In the DNS Sinkhole Settings section, verify that Sinkhole is enabled. For your convenience, the default Sinkhole address (sinkhole.paloaltonetworks.com) is set to access a Palo Alto Networks server. Palo Alto Networks can automatically refresh this address through content updates.If you want to modify the Sinkhole IPv4 or Sinkhole IPv6 address to a local server on your network or to a loopback address, see Configure the Sinkhole IP Address to a Local Server on Your Network.Click OK to save the Anti-Spyware profile.![]() Attach the Anti-Spyware profile to a Security policy rule.
Attach the Anti-Spyware profile to a Security policy rule.- Select .Select or create a Security Policy Rule.On the Actions tab, select the Log at Session End check box to enable logging.In the Profile Setting section, click the Profile Type drop-down to view all Profiles. From the Anti-Spyware drop-down and select the new or modified profile.Click OK to save the policy rule.Test that the policy action is enforced.
- Access the following test domains to verify that the policy action for a given threat type is being enforced:
- DNS Tunneling—test-dnstun.testpanw.com
- Dynamic DNS—test-ddns.testpanw.com
- Malware—test-malware.testpanw.com
- Newly Registered Domains—test-nrd.testpanw.com
- Phishing—test-phishing.testpanw.com
- Grayware—test-grayware.testpanw.com
- Parked—test-parked.testpanw.com
- Proxy Avoidance and Anonymizers—test-proxy.testpanw.com
- Fast Flux—test-fastflux.testpanw.com
- Malicious NRD—test-malicious-nrd.testpanw.com
- NXNS Attack—test-nxns.testpanw.com
- Dangling Domains—test-dangling-domain.testpanw.com
- DNS Rebinding—test-dns-rebinding.testpanw.com
- DNS Infiltration—test-dns-infiltration.testpanw.com
- Wildcard Abuse—test-wildcard-abuse.testpanw.com
- Strategically-Aged Domains—test-strategically-aged.testpanw.com
- Compromised DNS—test-compromised-dns.testpanw.com
- Ad Tracking Domains—test-adtracking.testpanw.com
- CNAME Cloaking—test-cname-cloaking.testpanw.com
To monitor the activity on the firewall:- Select ACC and add a URL Domain as a global filter to view the Threat Activity and Blocked Activity for the domain you accessed.
- Select and filter by (action eq sinkhole) to view logs on sinkholed domains.
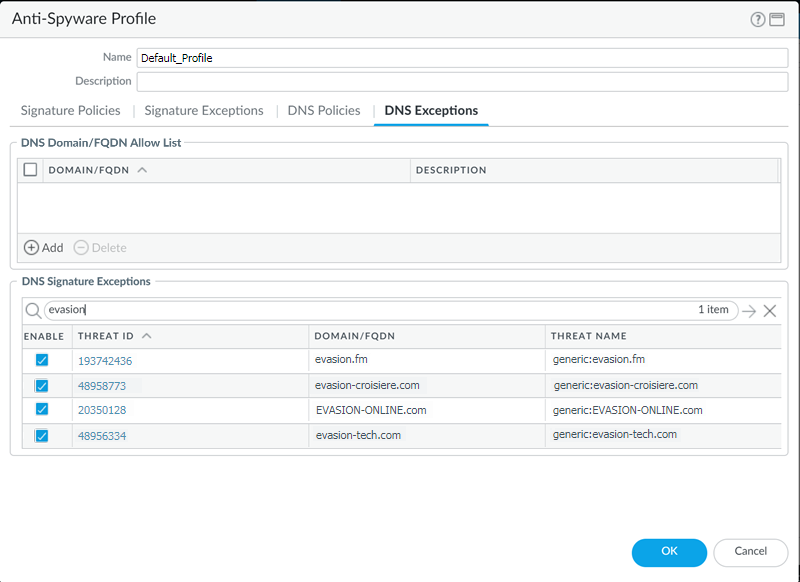
Identify Infected Traffic Hosts in the Traffic Logs(Optional) Add domain signature exceptions in cases where false-positives occur.- Select .Select a profile to modify.Add or modify the Anti-Spyware profile from which you want to exclude the threat signature, and select DNS Exceptions.Search for a DNS signature to exclude by entering the name or FQDN.Select the checkbox for each Threat ID of the DNS signature that you want to exclude from enforcement.Click OK to save your new or modified Anti-Spyware profile.
![]() (Optional) Add an allow list to specify a list of DNS domains / FQDNs to be explicitly allowed.
(Optional) Add an allow list to specify a list of DNS domains / FQDNs to be explicitly allowed.- Select .Select a profile to modify.Add or modify the Anti-Spyware profile from which you want to exclude the threat signature, and select DNS Exceptions.To Add a new FQDN Allow List, provide the DNS domain or FQDN location and a description.Click OK to save your new or modified Anti-Spyware profile.(Optional) Verify your firewall’s connectivity to the DNS Security service. If you cannot reach the service, verify that the following domain is not being blocked: dns.service.paloaltonetworks.com.Use the following CLI command on the firewall to verify your firewall’s connection availability to the DNS Security service.
show dns-proxy dns-signature infoFor example:show dns-proxy dns-signture info Cloud URL: dns.service.paloaltonetworks.com:443 Telemetry URL: io.dns.service.paloaltonetworks.com:443 Last Result: None Last Server Address: Parameter Exchange: Interval 300 sec Allow List Refresh: Interval 43200 sec Request Waiting Transmission: 0 Request Pending Response: 0 Cache Size: 0
(Optional) Retrieve a specified domain’s transaction details, such as latency, TTL, and the signature category.Use the following CLI command on the firewall to review the details about the list.test dns-proxy dns-signature fqdnFor example:test dns-proxy dns-signature fqdn www.yahoo.com DNS Signature Query [ www.yahoo.com ] Completed in 178 ms DNS Signature Response Entries: 2 Domain Category GTID TTL ------------------------------------------------------------------------------------------------- *.yahoo.com Benign 0 86400 www.yahoo.com Benign 0 3600
(Optional) Configure the DNS signature lookup timeout setting. If the firewall is unable to retrieve a signature verdict in the allotted time due to connectivity issues, the request, including all subsequent DNS responses, are passed through. You can check the average latency to verify that the requests fall within the configured period. If the average latency exceeds the configured period, consider updating the setting to a value that is higher than the average latency to prevent requests from timing out.- In the CLI, issue the following command to view the average latency.
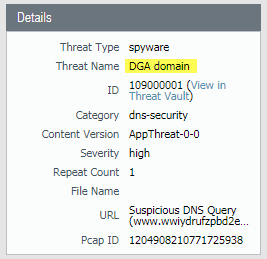
show dns-proxy dns-signature
counters
The default timeout is 100 milliseconds.Scroll down through the output to the latency section under the Signature query API heading and verify that the average latency falls within the defined timeout period. This latency indicates the amount of time it takes, on average, to retrieve a signature verdict from the DNS security service. Additional latency statistics for various latency periods can be found below the averages.Signature query API: . . . [latency ] : max 1870 (ms) min 16(ms) avg 27(ms) 50 or less : 47246 100 or less : 113 200 or less : 25 400 or less : 15 else : 21If the average latency is consistency above the default timeout value, you can raise the setting so that the requests fall within a given period. Select Device > Content-ID and update the Realtime Signature Lookup setting.Commit the changes.To view sinkholed DNS queries, refer to the firewall threat logs (Monitor > Logs, then select the log type from the list): ![]()