SaaS Security
Onboard a Workday App to SSPM
Table of Contents
Expand All
|
Collapse All
SaaS Security Docs
Onboard a Workday App to SSPM
Connect a Workday instance to SSPM to detect posture
risks.
| Where Can I Use This? | What Do I Need? |
|---|---|
|
Or any of the following licenses that include the Data Security license:
|
For SSPM to detect posture risks in your Workday instance, you must onboard your
Workday instance to SSPM. Through the onboarding process, SSPM connects to a Workday
API and, through the API, scans your Workday instance at regular intervals for
misconfigured settings.
SSPM gets access to your Workday instance through OAuth 2.0 authorization. To enable
OAuth 2.0 authorization, you first create an API client application in Workday. In
Workday, you must also create an integration system user and a custom report exposed
as a web service. During onboarding, SSPM will redirect you to log in to Workday.
You will log in to Workday using the credentials for the integration system user
account that you created. To scan Workday for misconfigured settings, SSPM will pull
data from the custom report.
To onboard your Workday instance, you complete the following actions:
During the onboarding process, you will provide SSPM with the following
information:
| Item | Description |
|---|---|
|
Client ID
|
SSPM will access a Workday API through an API client that you
create. Workday generates the Client ID to uniquely identify
this application.
|
|
Client secret
|
SSPM will access a Workday API through an API client that you
create. Workday generates the Client Secret, which SSPM uses
to authenticate to this application.
|
|
Authorization endpoint
|
SSPM will access a Workday API through an OAuth 2.0
application that you create. SSPM uses this endpoint for
authorization requests.
|
|
Token endpoint
|
SSPM will access a Workday API through an OAuth 2.0
application that you create. SSPM uses the token endpoint to
generate an authentication token.
|
|
Custom report web service URL
|
The URL that exposes a custom report as a web service. To
scan for misconfigured settings, SSPM uses this custom
report to pull information from your Workday instance.
|
As you complete the following steps, make note of the values of the items described
in the preceding table. You will enter these values during onboarding to access and
scan your Workday instance from SSPM.
Register an API Client in Workday
To enable SSPM to connect to your Workday instance through OAuth 2.0
authentication, create an API client in Workday.
- From SSPM, get a redirect URL. You will specify this redirect URL in the OAuth 2.0 application that you will create in Workday. To get this information, you will begin the onboarding process in SSPM, but you will not complete the process.
- Log in to Strata Cloud Manager.
- Select ConfigurationSaaS SecurityPosture SecurityApplicationsAdd Application and click the Workday tile.
- Under posture security instances, Add
Instance or, if there is already an instance
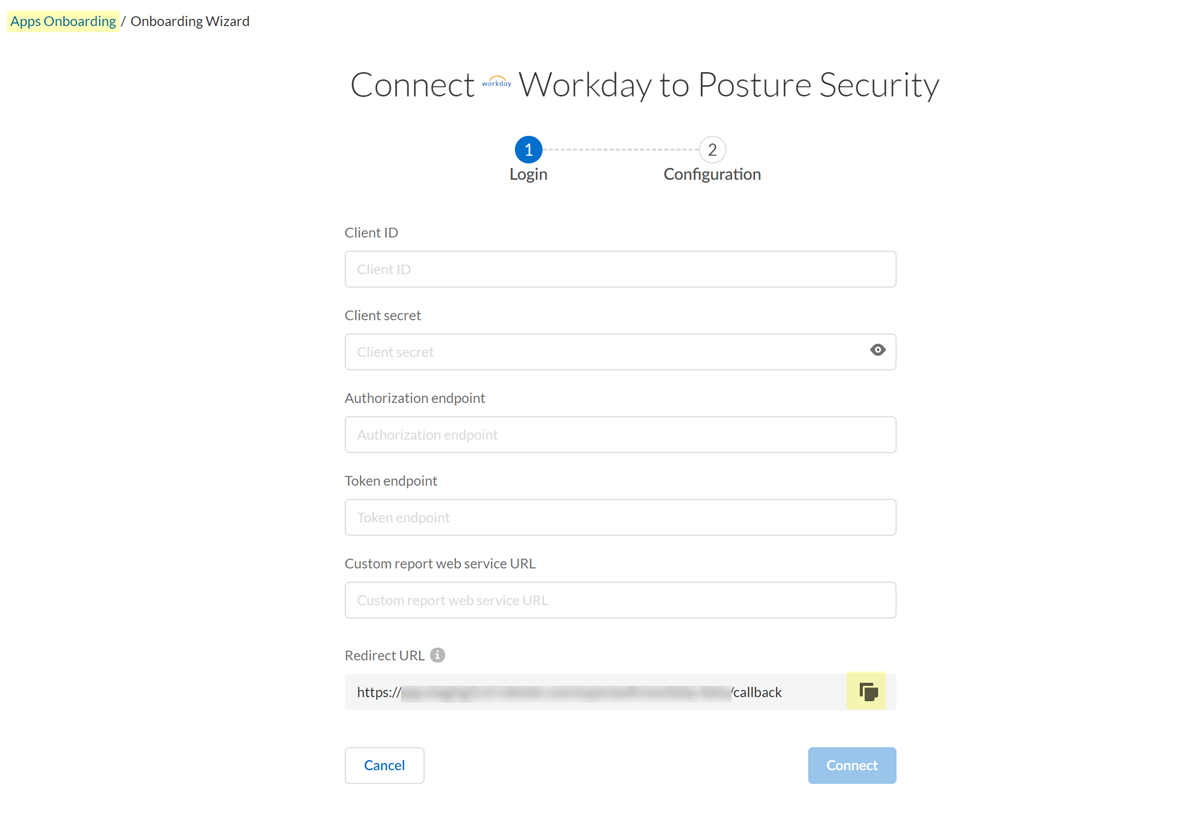
configured, Add New instance. SSPM displays a connection page for onboarding a Workday instance. The Redirect URL field displays the redirect URL value.
- Copy the URL and paste it into a text file.
![]() Don’t continue to the next step unless you have copied the redirect URL. You will need to specify this URL later when you're configuring the API client.
Don’t continue to the next step unless you have copied the redirect URL. You will need to specify this URL later when you're configuring the API client.
Identify the administrator account that you will use to create the API client and the integration system user.Required Permissions: To create an API client and an integration system user, you must have Security Administrator permissions in Workday.Register the API client.- Log in to the Workday console using the Workday Security Administrator account that you identified earlier.
- In the search field, search for Register API Client and select
Register API client from the search
results.Workday displays the Register API Client page.
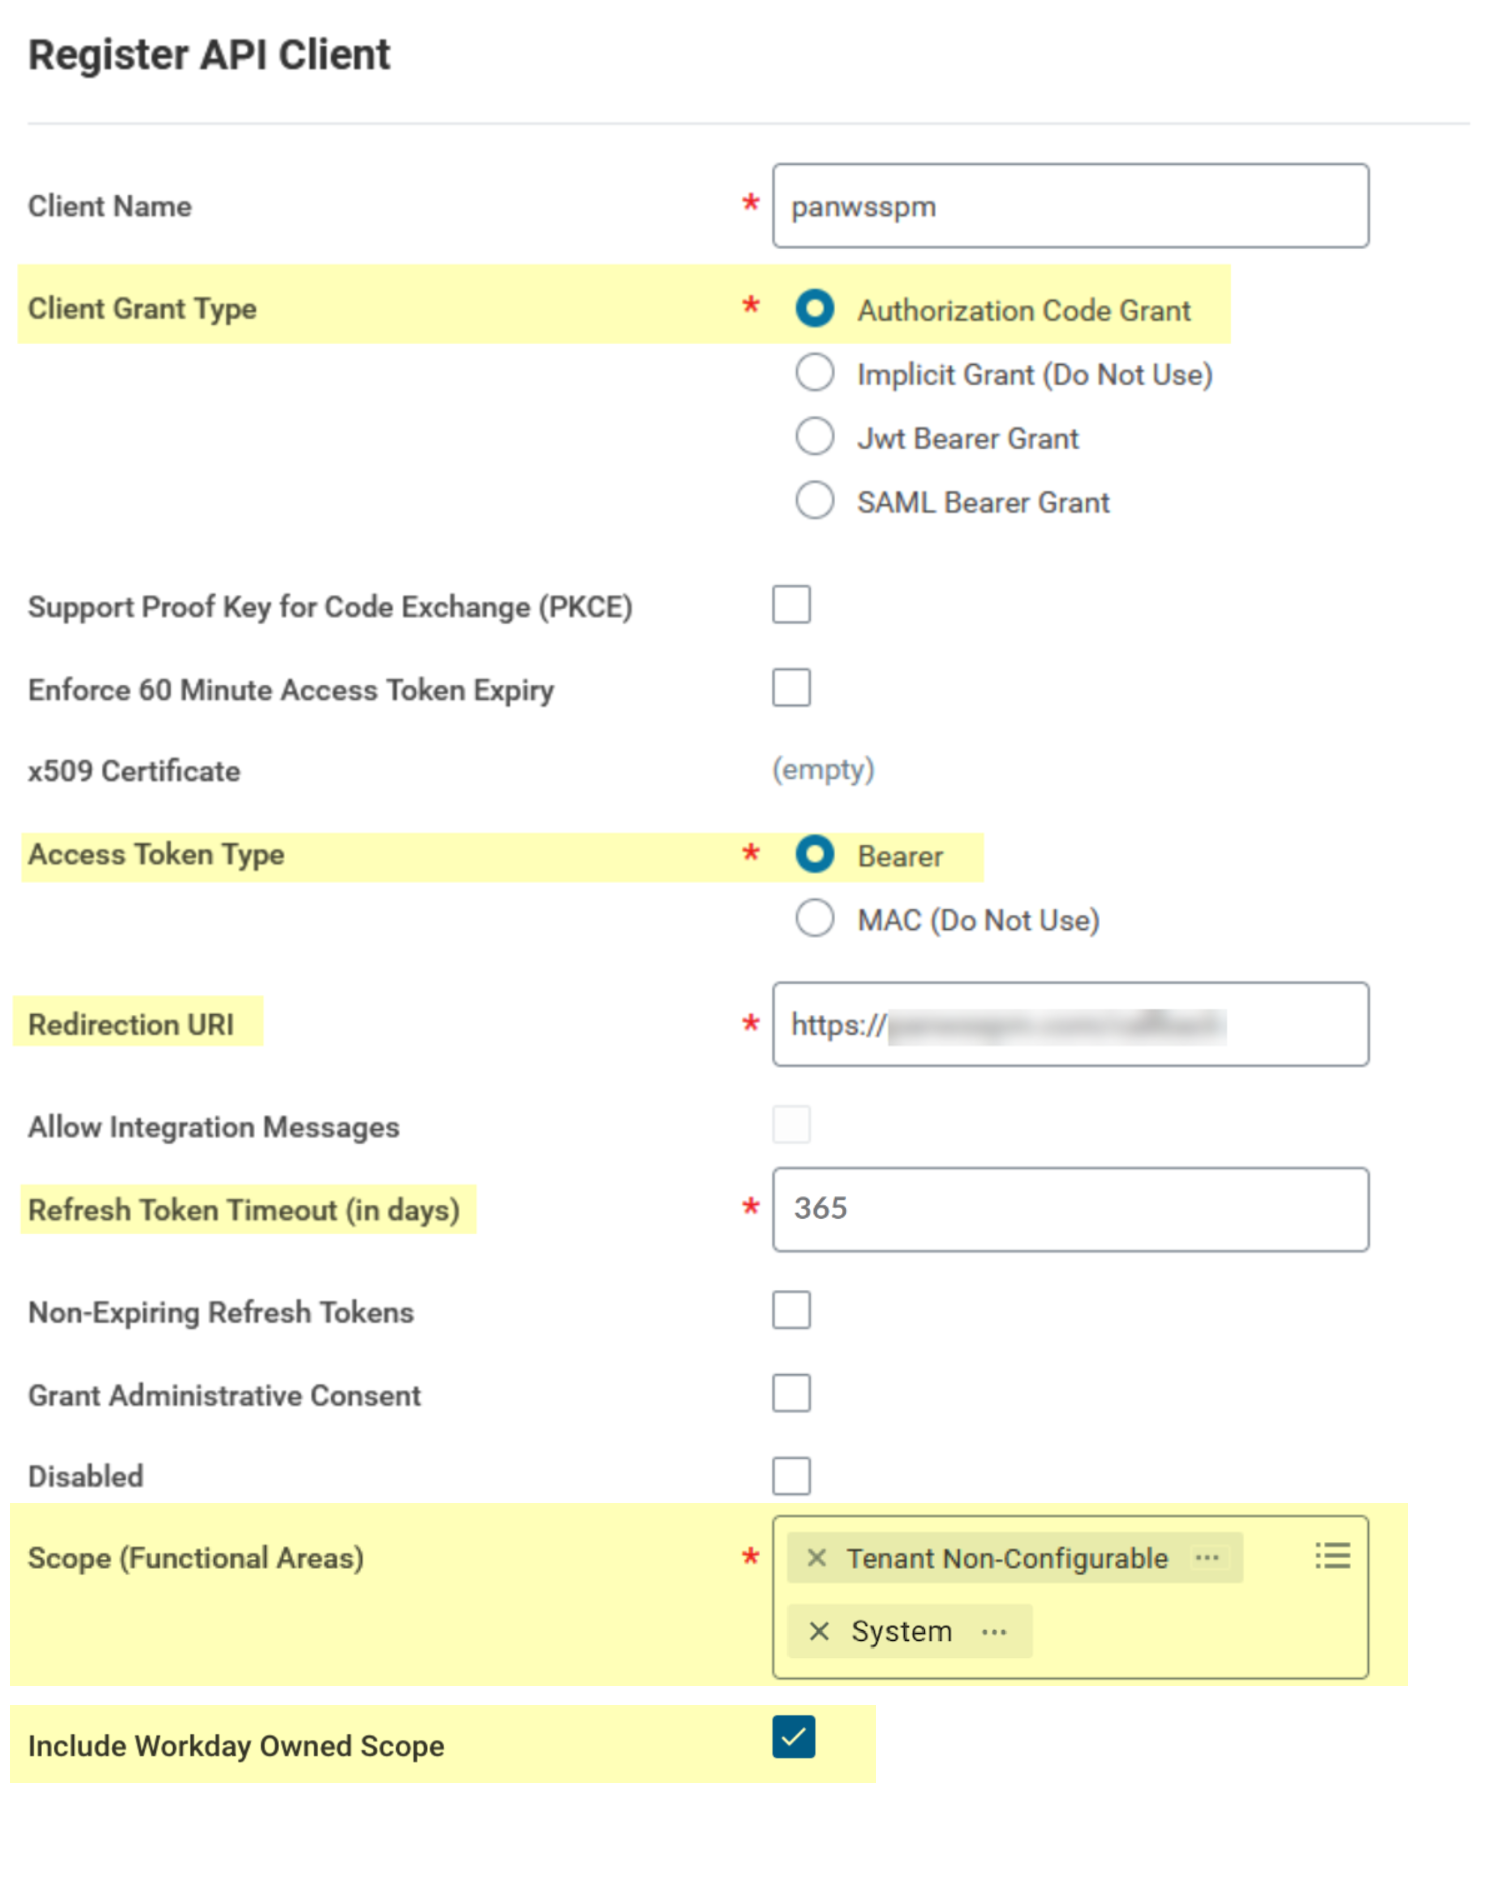
- On the Register API Client page, specify a name for your client and
specify the following information in the fields provided.
Field Value Client Grant TypeAuthorization Code GrantAccess Token TypeBearerRedirection URIThe redirect URL that you copied earlier from SSPM.Refresh Token Timeout (in days)The number of days that the refresh token is valid. For example, 365 days.Scope (Functional Areas)Tenant Non-ConfigurableTo enable identity scans to collect and display user account information for the Identity Security dashboard, also specify the following scope:System - If you specified the System scope to enable
identity scans, select the Include Workday Owned
Scope checkbox.
![]()
- Click OK.Workday registers your new API client and displays the application credentials and endpoints. Copy the following values and paste them into a text file:
- Client ID
- Client Secret
- Authorization Endpoint
- Token Endpoint
Don’t continue to the next step unless you have copied the Client ID, Client Secret, Authorization Endpoint, and Token Endpoint. You will provide this information to SSPM during the onboarding process.
Create an Integration System User
When you onboard Workday, SSPM will redirect you to the Workday login page for OAuth 2.0 authentication through the API client that you registered. At that time, you will log in to Workday using the integration system user account that you will create now. Complete the following steps to create the integration system user account and to configure the account's permissions through a security group.Complete the following steps using the Workday Security Administrator account that you identified earlier.- Create the integration system user.
- Using the Workday console's search field, search for Create Integration System User. Select Create Integration System User from the search results.
- On the Create Integration System User page, specify a user name and password for the account and click OK.
Create a security group for the integration system user.- Using the Workday console's search field, search for Create Security Group and select Create Security Group from the search results.
- On the Create Security Group page, complete the following
actions:
- Locate the Type of Tenanted Security Group field. From the field's drop-down, select Integration System Security Group (Unconstrained).
- Specify a name for the security group and click OK.
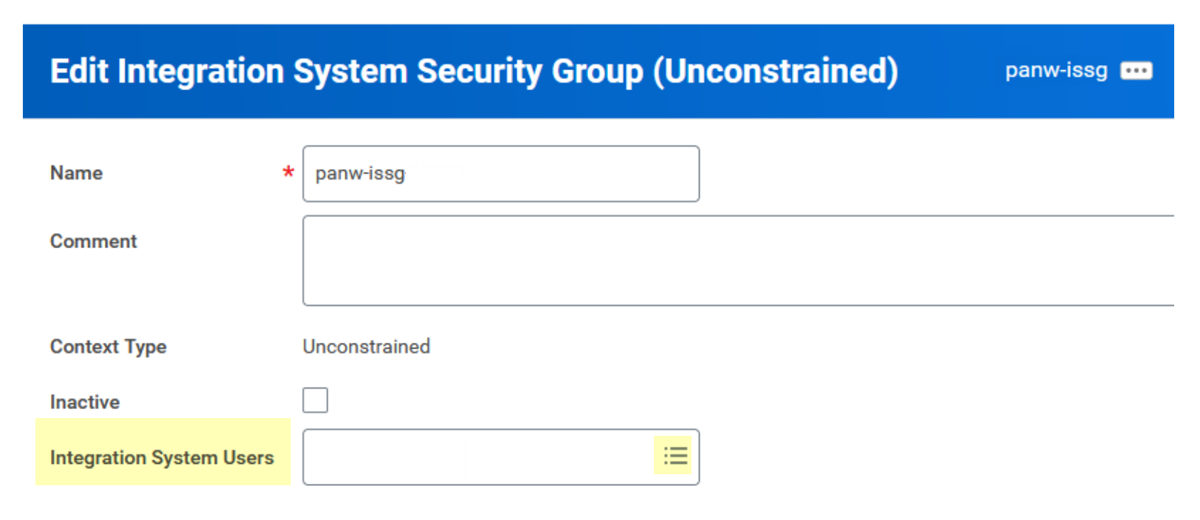
- On the Integration System Security Group (Unconstrained) page,
complete the following actions:
- Locate the Integration System Users field and select the name of the integration system user that you created earlier.
- Click OK.
![]()
Specify domain security policy permissions for the security group.- Using the Workday console's search field, search for Maintain Permissions for Security Group and select Maintain Permissions for Security Group from the search results.
- On the Maintain Permissions for Security Group page, complete the
following actions:
- Locate the Operation field and select the Maintain operation.
- Locate the Source Security Group field and select the name of the security group that you created earlier.
- Click OK. Workday displays a second Maintain Permissions for Security Group page.
- On the Maintain Permissions for Security Group page, complete the
following actions:
- Navigate to the Domain Security Policy Permissions tab.
- Add the following domain security policies with the
following access permissions to the security group. To add a
policy permission, click the plus sign
(+) icon.
Domain Security Policy View/Modify Access Workday AccountsView OnlyWorker Data: Public Worker ReportsView OnlySecurity AdministrationView OnlySecurity ConfigurationView OnlySystem AuditingView Only
Activate Pending Security Policy Changes.- Using the Workday console's search field, search for Activate Pending Security Policy Changes and select Activate Pending Security Policy Changes from the search results.
- On the Activate Pending Security Policy Changes page, type in a
comment describing the security changes you made, and click
OK.Workday displays a second Activate Pending Security Policy Changes page summarizing the changes that you made.
- On the Activate Pending Security Policy Changes page, select the Confirm check box.
- Click OK.
Create a Custom Report
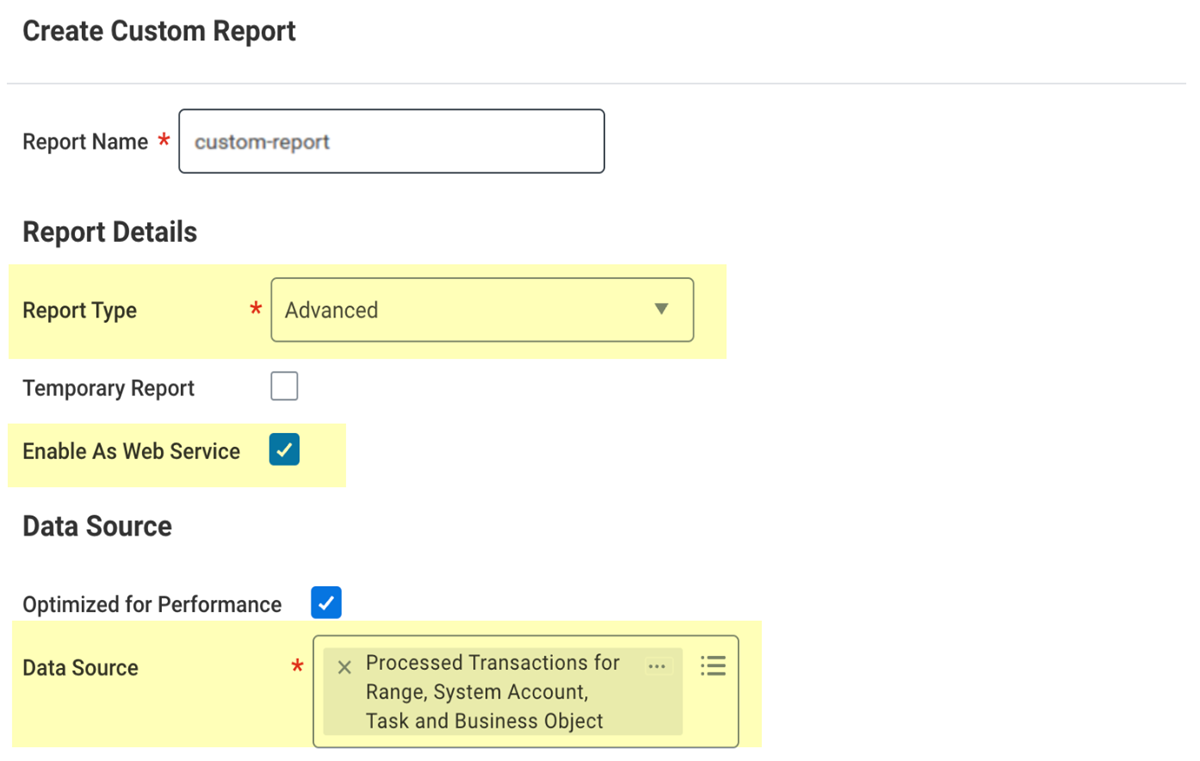
To scan your Workday instance, SSPM pulls data from a custom report that you expose as a web service. To create this report, complete the following steps using the Workday Security Administrator account that you identified earlier.- Using the Workday console's search field, search for Create Custom Report and select Create Custom Report from the search results.On the Create Custom Report page, complete the following actions:
- In the Report Name field, specify a name for your report.
- From the Report Name list, select Advanced.
- Select the Enable As Web Service check box.
- In the Data Source field, specify Processed Transactions for Range, System Account, Task and Business Object.
- Click OK.
![]() Workday displays the Edit Custom Report page, where you can define the information that your report will collect.On the Edit Custom Report page, in the Additional Info section, select the Columns tab and add the following columns to the report.
Workday displays the Edit Custom Report page, where you can define the information that your report will collect.On the Edit Custom Report page, in the Additional Info section, select the Columns tab and add the following columns to the report.Business Object Field Column Heading Override Column Heading Override XML Alias Processed Transaction Classes Updated Classes_Updated Processed Transaction Instances Updated Instances_Updated Processed Transaction Secured Task Executed Task_Behavior Processed Transaction Entry Moment date changed Entry_Moment Processed Transaction Secured Task Executed task Secured_Task_Executed Processed Transaction Processed Transaction Processed_Transaction Processed Transaction System Account System_Account Attibutes that Changed Changed Attribute Changed_Attribute Attributes that Changed Previous Value Previous_Value Attributes that Changed Value Value Under the Group Column Headings section, add the following business object to the report.Business Object Group Column Heading XML Alias Attributes that Changed Attributes_that_Changed_group In the Additional Info section, select the Filter tab and specify the following filters using the fields provided.Adding these filters limits the information that the report collects to only the information that SSPM requires. Limiting the report collection in this way improves performance.And/Or Field Operator Comparison Type Comparison Value Or Task Behavior exact match with the selection list Value specified in this filter Edit Tenant Setup - Business Processes Or Task Behavior exact match with the selection list Value specified in this filter Edit Tenant Or Task Behavior exact match with the selection list Value specified in this filter Edit Tenant Setup - HCM Or Task Behavior exact match with the selection list Value specified in this filter Edit Tenant Setup - Global Or Task Behavior exact match with the selection list Value specified in this filter Edit Tenant Setup - Security Or Task Behavior exact match with the selection list Value specified in this filter Edit Tenant Setup - System Or Task Behavior exact match with the selection list Value specified in this filter Edit Tenant Setup - Reporting and Analytics Or Task Behavior exact match with the selection list Value specified in this filter Edit Tenant Setup - Recruiting Or Task Behavior exact match with the selection list Value specified in this filter Edit Tenant Setup - Payroll Or Task Behavior exact match with the selection list Value specified in this filter Edit Tenant Setup - Integrations In the Additional Info section, select the Share tab and specify the following sharing options using the fields provided.Field Value Report Definition Sharing OptionsShare with specific authorized groups and users.Authorized GroupsThe name of the security group that you created for the integration system user.Authorized UsersThe name of the security integration user that you created earlier.To save the report, click OK.Get the web service URL for the custom report.- Locate the options menu for your custom report. The options menu is
the ellipsis (…) located next to the name of the custom report in
the banner of the Create Custom Report page. Select ...Web ServiceView URLs.Workday displays the View URLs Web Service page, which lists the various data formats that are available. SSPM requires the JSON data format.
- On the View URLs Web Service page, locate the JSON area. Copy the
URL destination for the JSON link, and paste the URL into a text
file.Don’t continue to the next step unless you have copied the web service URL for the JSON data format. You will provide this information to SSPM during the onboarding process.
Connect SSPM to Your Workday Instance
By adding a Workday app in SSPM, you enable SSPM to connect to your Workday instance.- Sign out of all Workday accounts.During onboarding, SSPM will redirect you to log in to Workday and to grant SSPM the access to Workday that it requires. You must log in by using the integration system user account that you created. Some browsers can automatically log you in by using saved credentials. To ensure that the browser does not automatically log you in to the wrong account, you can turn off any automatic log-in option or clear your saved credentials. Alternatively, you can prevent the browser from using saved credentials by opening the Cloud Management Console in an incognito window.From the Add Application page (ConfigurationSaaS SecurityPosture SecurityApplicationsAdd Application), click the Workday tile.On the Posture Security tab, Add New instance.Log in with Credentials.Enter the application credentials (Client ID and Client Secret), the authorization and token endpoints, and the custom report web service URL.Connect.SSPM redirects you to the Workday login page.Log in to Workday using the login credentials for the integration system user that you created.Workday displays a consent form that details the access permissions that SSPM requires.Review the consent form and allow access.


