Prisma Access
Configure Forwarding Profiles to Manage Agent Traffic for Dynamic Privilege Access Agents
Table of Contents
Expand All
|
Collapse All
Prisma Access Docs
-
- 6.1 Preferred and Innovation
- 6.0 Preferred and Innovation
- 5.2 Preferred and Innovation
- 5.1 Preferred and Innovation
- 5.0 Preferred and Innovation
- 4.2 Preferred
- 4.1 Preferred
- 4.0 Preferred
- 3.2 Preferred and Innovation
- 3.1 Preferred and Innovation
- 3.0 Preferred and Innovation
- 2.2 Preferred
-
-
- 4.0 & Later
- Prisma Access China
-
-
Configure Forwarding Profiles to Manage Agent Traffic for Dynamic Privilege Access Agents
Forwarding profiles is a feature that provides a streamlined and unified method for
enforcing traffic from your endpoints.
| Where Can I Use This? | What Do I Need? |
|---|---|
|
|
Forwarding Profiles provides a single pane-of-glass to configure and
manage traffic forwarding rules and traffic enforcement, such as setting up
split tunnel settings and managing traffic outside of the tunnel connection.
Forwarding profiles improves on the disjointed configuration of traffic policies
experienced with other mobile access agents, and greatly extends the limit on
how many rules and entries that you can configure. By simplifying the related
configurations and improving clarity, you can focus on how you want endpoint
traffic to be routed and enforced.
The forwarding profile is a profile type that contains several logical and
ordered sections. These sections illustrate the various phases a connection
passes before the agent determines how the connection should be steered. This
organizational structure can help you understand why traffic is being routed a
certain way by presenting the ordered entries in each section. Within each
section, you can add, edit, remove, or reorder entries.
Once you set up the forwarding profiles, you can assign them to users or user
groups in the Agent Settings page.
Traffic forwarding rules are applied from the top down in the forwarding profile.
Therefore, configure the forwarding profile in a top-down manner, such as
configuring the most specific rules first and the least specific rules last.
Forwarding Rules
A forwarding profile consists of a set of traffic forwarding
rules that specify what source application or destination domain and destination IP
address traffic goes through the tunnel or outside the tunnel, whether to split DNS
traffic, and what traffic enforcement is in effect. Traffic that matches a rule is
forwarded to Prisma Access according to the traffic forwarding specifications.
The specifications in a forwarding rule are organized into the following
sections:
- Source Applications—Specifies the private or SaaS apps for which the rule applies to. When traffic from an endpoint matches the source app, the traffic is routed according to the forwarding rule.
- Destinations—Specifies the domains and IP addresses that the rule applies to. When traffic matches the destinations (specified as FQDNs or IP addresses), the traffic is routed according to the forwarding rule.
Traffic Enforcement
Each forwarding profile also contains traffic enforcement settings that allow you
to:
- Block all outbound traffic that does not match any forwarding rules
- Block outbound LAN access when the agent is connected to the tunnel
- Block inbound access when the agent is connected to the tunnel
To configure a forwarding profile, complete the following steps:
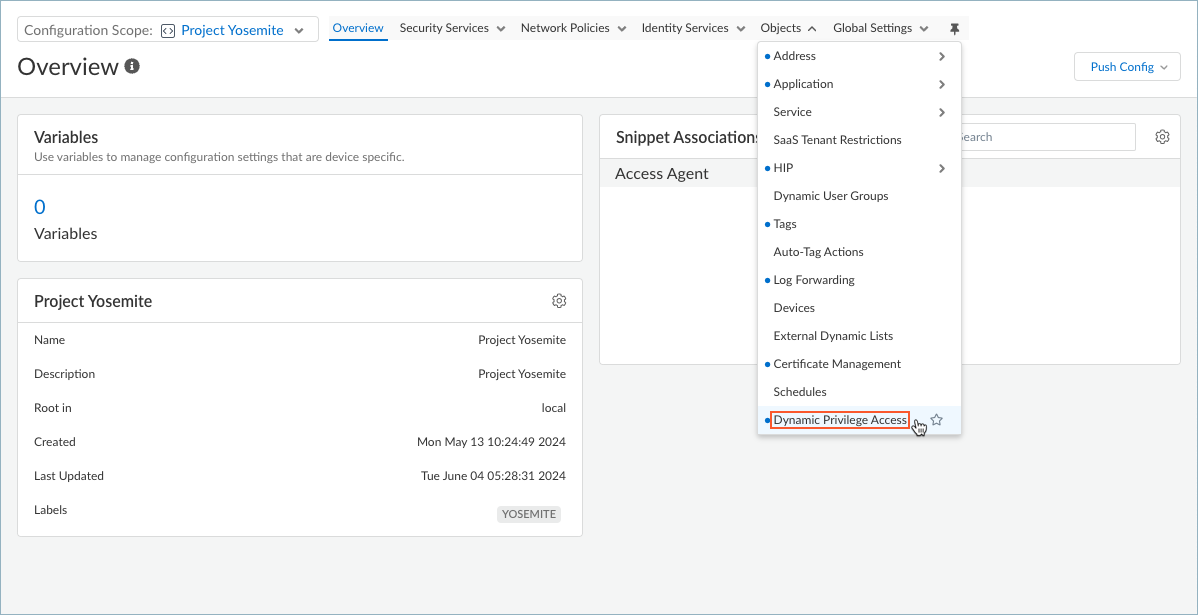
- Log in to Strata Cloud Manager as the Project Admin.Select ConfigurationNGFW and Prisma AccessOverview and expand the Configuration Scope to view the Snippets.
![]() Select the snippet that the Superuser admin assigned to you.You can also view the snippets that are not assigned to you, but you cannot interact with them, such as to change the configuration.Select ObjectsDynamic Privilege Access to open the Dynamic Privilege Access settings.
Select the snippet that the Superuser admin assigned to you.You can also view the snippets that are not assigned to you, but you cannot interact with them, such as to change the configuration.Select ObjectsDynamic Privilege Access to open the Dynamic Privilege Access settings.![]() Select Forwarding Profiles and edit the Forwarding Profiles Setup.
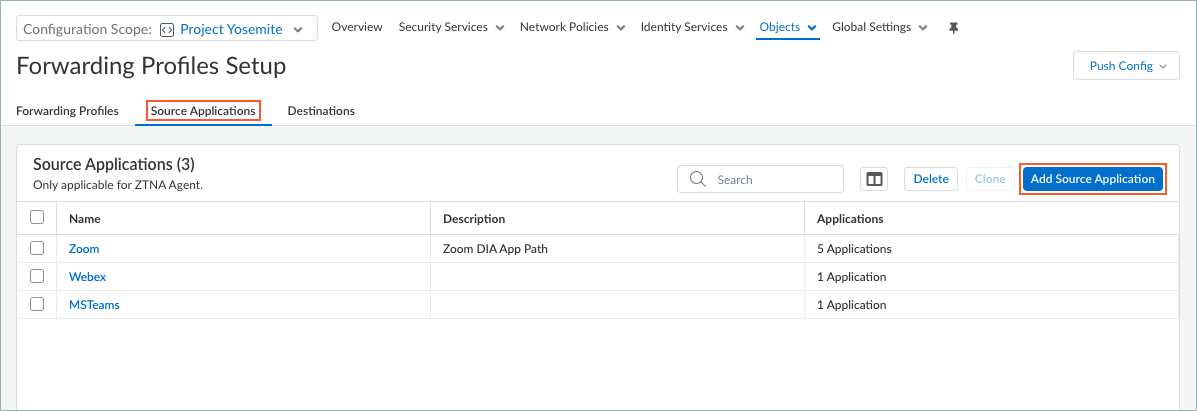
Select Forwarding Profiles and edit the Forwarding Profiles Setup.![]() Set up Source Applications if you want to create split tunnels based on the SaaS or public cloud application name.
Set up Source Applications if you want to create split tunnels based on the SaaS or public cloud application name.- In the Forwarding Profiles Setup page, select Source ApplicationsAdd Source Application.
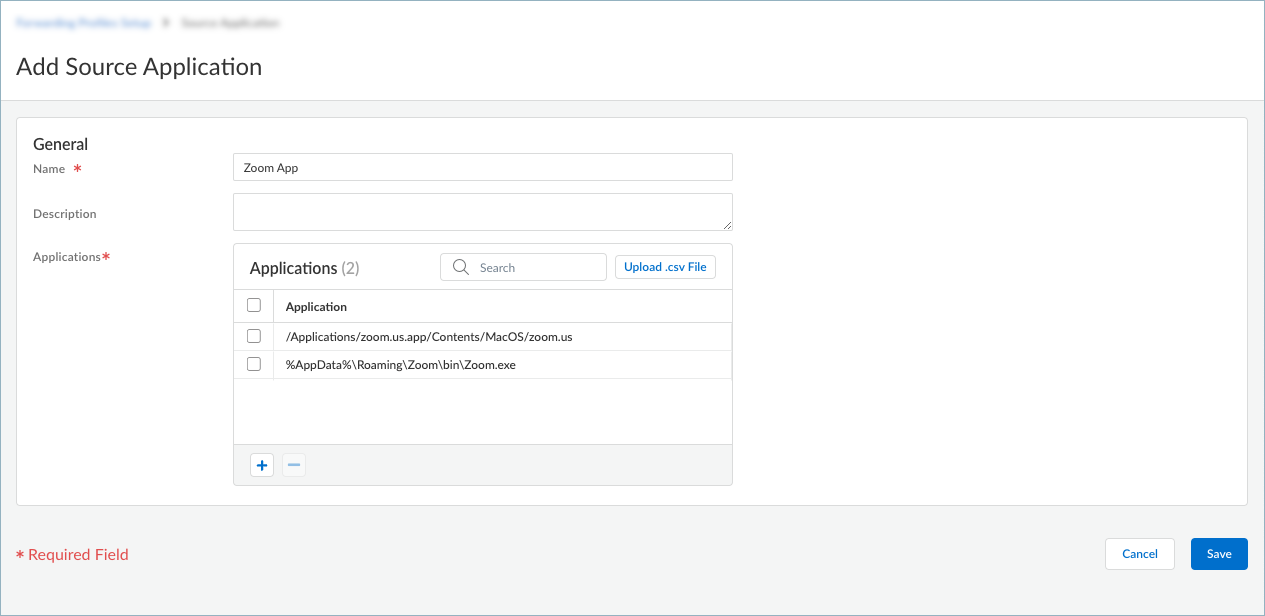
![]() Enter a meaningful Name for the application that you want to add.Click + in the Applications table and enter the complete path of the application. You can add one or more applications to manage whether to exclude or include the application traffic in the tunnel.If you choose to exclude application traffic (by selecting Direct connectivity in the forwarding rule), traffic from these applications is sent through the physical adapter on the endpoints rather than the tunnel (the virtual adapter).If you choose to include application traffic (by selecting Tunnel connectivity in the forwarding rule), traffic from these applications is routed to Prisma Access, even if it meets the exclude traffic criteria.
Enter a meaningful Name for the application that you want to add.Click + in the Applications table and enter the complete path of the application. You can add one or more applications to manage whether to exclude or include the application traffic in the tunnel.If you choose to exclude application traffic (by selecting Direct connectivity in the forwarding rule), traffic from these applications is sent through the physical adapter on the endpoints rather than the tunnel (the virtual adapter).If you choose to include application traffic (by selecting Tunnel connectivity in the forwarding rule), traffic from these applications is routed to Prisma Access, even if it meets the exclude traffic criteria.![]() For example, to manage traffic from the Zoom application, add the following complete paths:
For example, to manage traffic from the Zoom application, add the following complete paths:- Windows endpoints: %AppData%\Roaming\Zoom\bin\Zoom.exe
- macOS endpoints: /Applications/zoom.us.app/Contents/MacOS/zoom.us
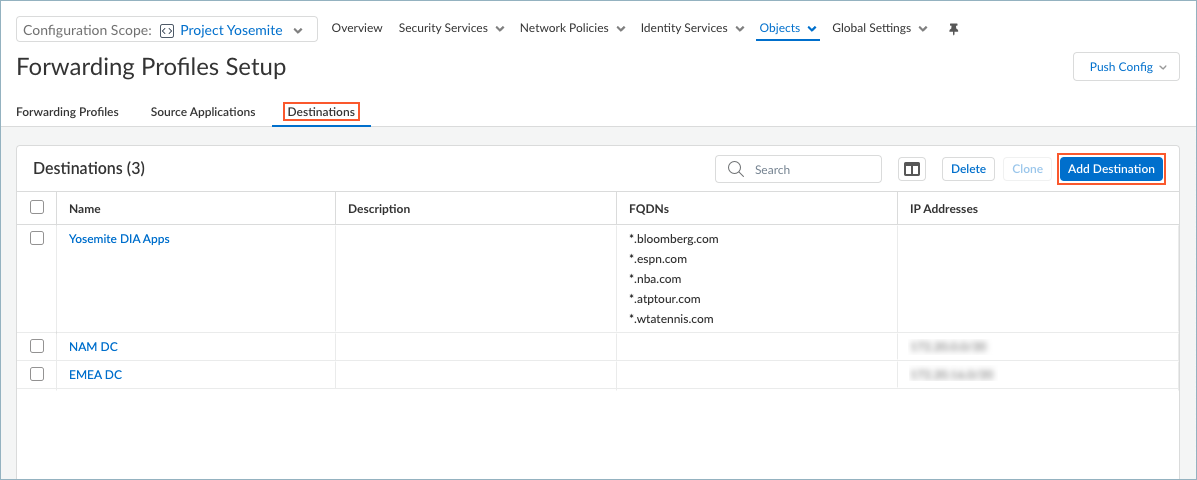
If you have a list of applications in a text file in comma-separated values format (.csv), you can Upload .csv File.Save the source application.Repeat these steps to add more source applications.Set up Destinations if you want to create split tunnels based on the destination domain or access routes.- In the Forwarding Profiles Setup page, select DestinationsAdd Destination.
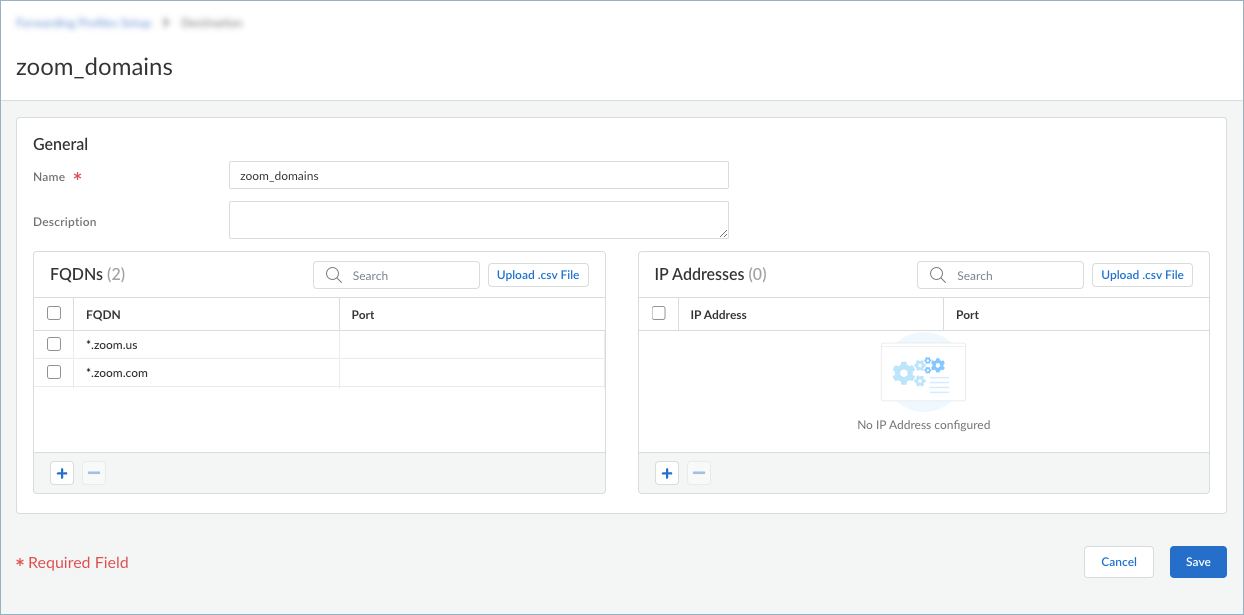
![]() Enter a meaningful Name for the destination that you want to add.Add a destination by specifying the domain name, access route, or both.
Enter a meaningful Name for the destination that you want to add.Add a destination by specifying the domain name, access route, or both.- To add a destination domain, click + in
the FQDNs table and enter the FQDN for
the destination domain. You can optionally add a port. If you do
not specify a port, all ports for the specified domain are
subjected to the forwarding rule. You can add one or more
domains for traffic management.If you choose to exclude traffic based on the domain name (by selecting Direct connectivity in the forwarding rule), traffic from the domain is sent through the physical adapter on the endpoints rather than the tunnel (the virtual adapter).If you choose to include traffic based on the domain name (by selecting Tunnel connectivity in the forwarding rule), traffic from the domain is routed to Prisma Access, even if it meets the exclude traffic criteria.
![]()
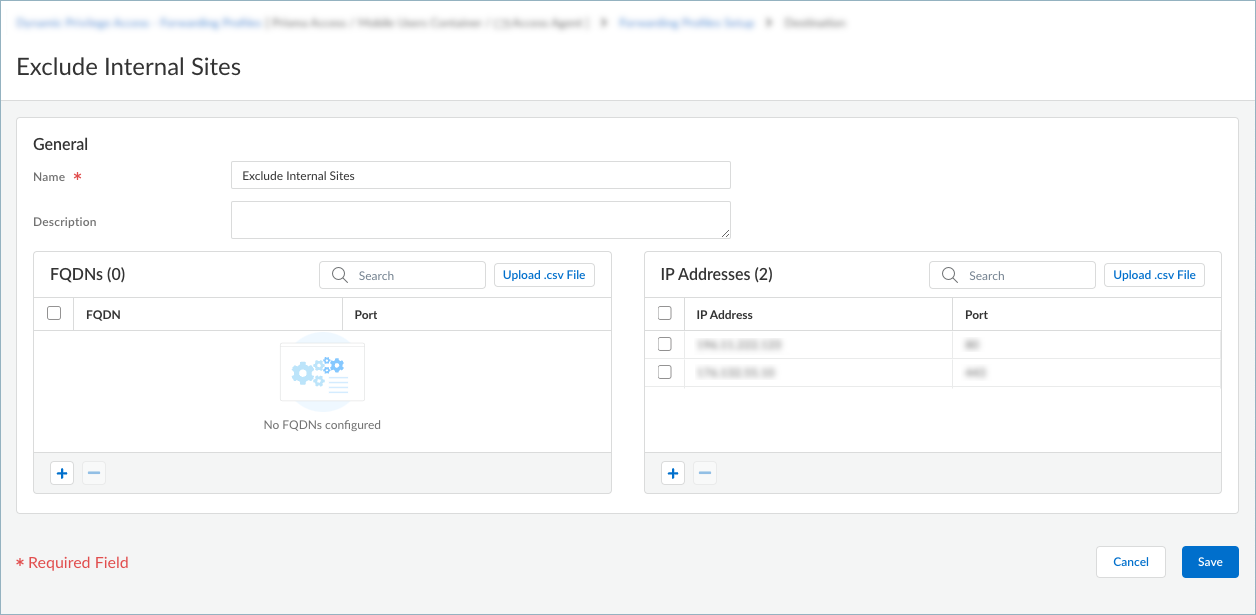
- To add an access route, click + in the
IP Addresses table and enter a
destination subnet. You can add one or more access routes for
traffic management. Do not include wildcard characters in the IP address. Wildcards in IP addresses are not supported in forwarding profiles.If you do not include or exclude routes or applications, every request is routed through the tunnel (without a split tunnel). Also, all traffic is inspected and subjected to policy enforcement whenever users connect to Prisma Access.When you define split tunnel traffic to exclude access routes (by selecting Direct connectivity in the forwarding rule), these routes are sent through the physical adapter on the endpoint instead of being sent through the tunnel via the virtual adapter (the tunnel). By excluding split tunnel traffic by access routes, you can send latency-sensitive or high-bandwidth traffic outside of the tunnel, while all other traffic is routed through the tunnel for inspection and policy enforcement by the gateway.When you define split tunnel traffic to include access routes (by selecting Tunnel connectivity in the forwarding rule), the gateway pushes these routes to the remote users’ endpoints to specify what traffic these endpoints can send through the tunnel.Specify excluded routes that are more specific than included routes; otherwise, you might exclude more traffic than intended.If you have a list of IP addresses in a text file in .csv format, you can Upload .csv File.
![]()
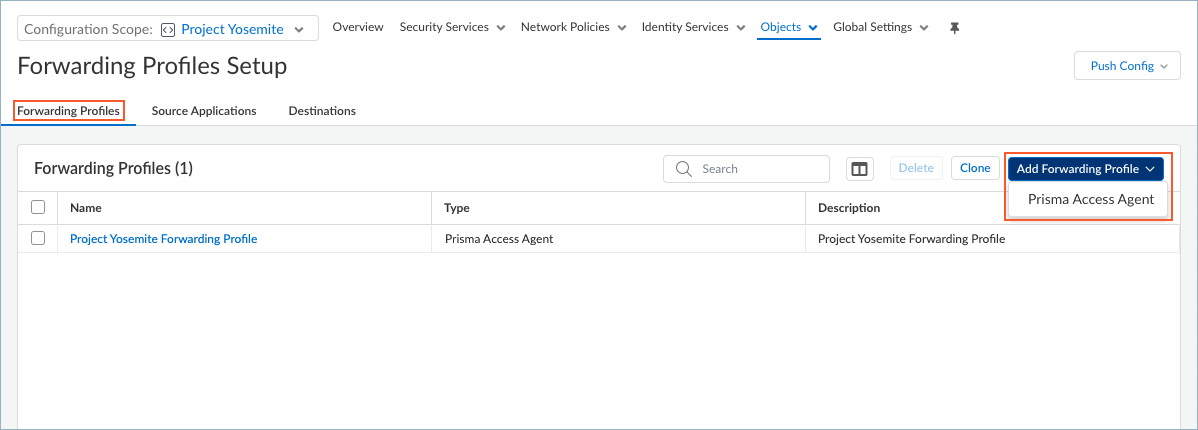
Save the destinations.Repeat these steps to add more destinations.Create a forwarding profile that allows or excludes traffic based on the source applications or destinations that you configured.- To add a forwarding profile, select Forwarding ProfilesAdd Forwarding ProfilePrisma Access Agent.
![]() To edit a forwarding profile, select the name of the profile in the Forwarding Profiles table.Enter a meaningful Name for the forwarding profile.Add a forwarding rule.
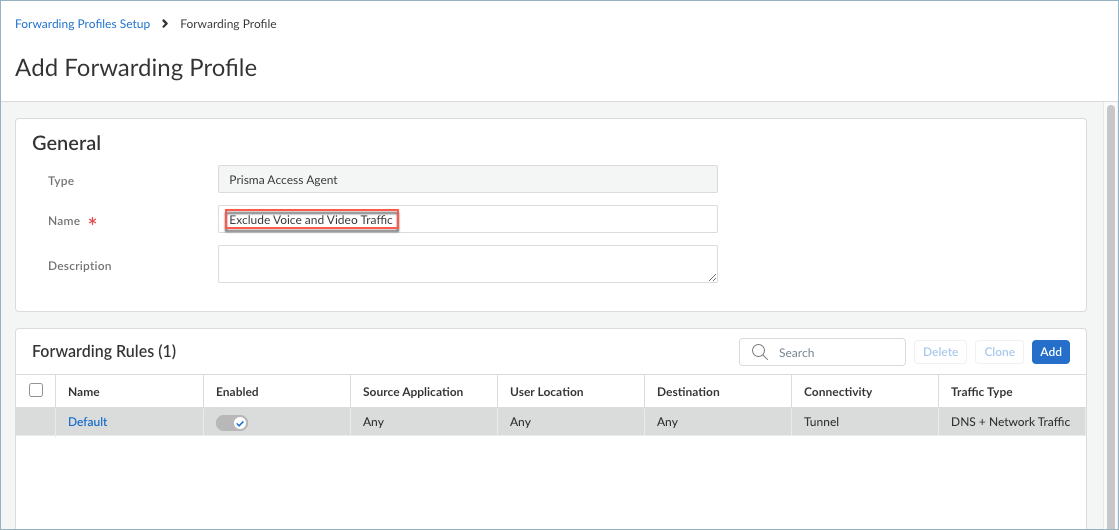
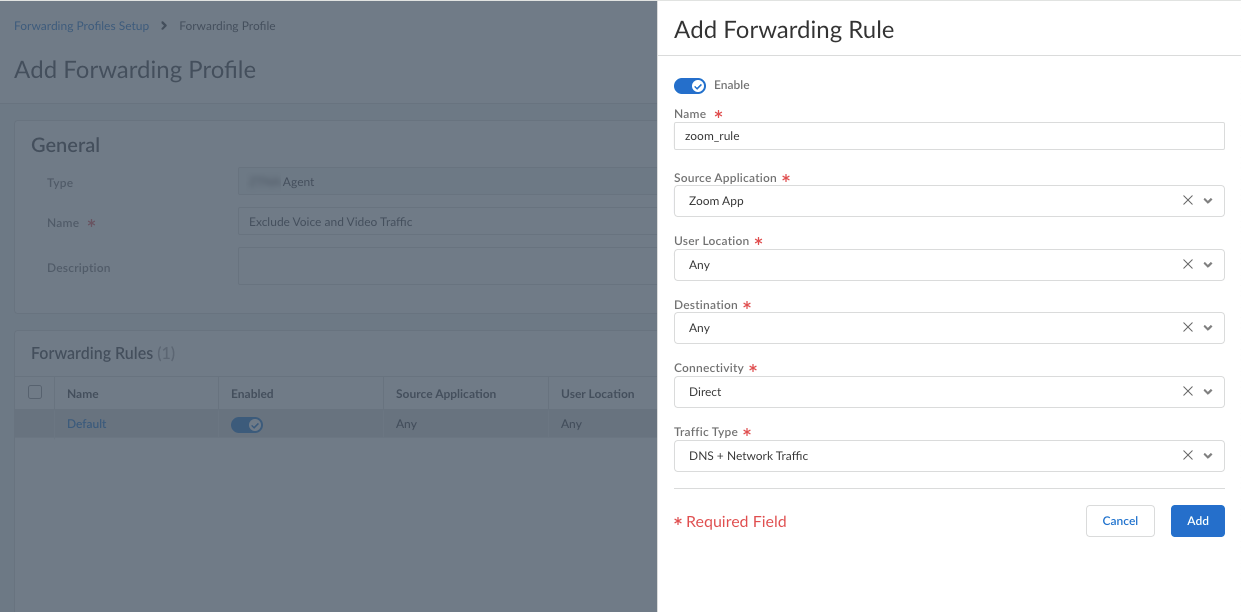
To edit a forwarding profile, select the name of the profile in the Forwarding Profiles table.Enter a meaningful Name for the forwarding profile.Add a forwarding rule.![]() The Forwarding Rules table shows the rules that make up the forwarding profile. All forwarding profiles contain the Default forwarding rule, which sends all DNS and network traffic through the tunnel. Any new rules that you add are placed above the default rule. You cannot delete or move the default forwarding rule, but you can change its Connectivity setting.Enter the specifications for the forwarding rule.
The Forwarding Rules table shows the rules that make up the forwarding profile. All forwarding profiles contain the Default forwarding rule, which sends all DNS and network traffic through the tunnel. Any new rules that you add are placed above the default rule. You cannot delete or move the default forwarding rule, but you can change its Connectivity setting.Enter the specifications for the forwarding rule.![]()
- Enable the rule.
- Enter a Name for the rule.
- Select the Source Application that you
defined previously. If you select Any,
the forwarding rule will apply to traffic from any source
applications.The rule will match only if the connection is made by the specified source application.
- Select a User Location. If you did not
set up a user location or if you allow the rule to match any
user location, select Any. (Does not
apply to Dynamic Privilege
Access enabled agents.)The rule will match only if an endpoint is connected to the user location that you specify.
- Select a Destination that you defined
previously. If you select Any, the
forwarding rule will apply to traffic from any destination
domain or IP address.The rule will match only if the connection destination matches the specified destination domain or IP address.
- Select the Connectivity:
- Direct—Sends the traffic outside of the tunnel. All traffic for the selected application or destination is sent directly to the physical adapter on the endpoint without inspection.
- Tunnel—Sends the traffic through the tunnel. All traffic going to the selected application or destination is sent through the tunnel to Prisma Access for inspection and policy enforcement.
- Select the Traffic Type:Specify whether to use split DNS to allow users to direct their DNS queries for applications and resources over the tunnel or outside the tunnel in addition to network traffic.
- DNS + Network Traffic—Ensures that the split tunnel based on the destination domain you specified for inclusions or exclusions are applied to the DNS traffic and the associated network application traffic for that domain.
- Network Traffic—Includes or excludes rules that are applied only to network application traffic and not to DNS traffic. All DNS traffic goes through the tunnel regardless of the split tunnel based on the destination domain that you specified for inclusions or exclusions.
For Windows agents, the DNS + Network Traffic split tunnel option is not supported for application-based split tunnel rules. If you set up split tunneling to include or exclude traffic from the tunnel based on application names and select DNS + Network Traffic, DNS query packets for excluded and included apps will not honor the split tunnel rule.
Add the forwarding rule.The rule is added to the Forwarding Rules table. You can add multiple rules to the forwarding profile.![]() Configure the Traffic Enforcement options to determine how you want traffic to be enforced.
Configure the Traffic Enforcement options to determine how you want traffic to be enforced.![]() Be sure that to deselect all these options as they are not recommended for Dynamic Privilege Access.
Be sure that to deselect all these options as they are not recommended for Dynamic Privilege Access.- Block all other unmatched outbound connections—When enabled, blocks all connections that do not match any of the forwarding rules. The traffic will not be sent through the tunnel.
- Block outbound LAN access when connected to the
tunnel—When enabled, blocks direct access to the local
network when the agent is connected to the tunnel. Blocking access to your local network causes all traffic from being sent to the local adapter. In addition, your users won't be able to access resources on the local subnet, such as printers. Split tunnel traffic based on access route, destination domain, and application still works as expected.If you disable this option, your end users can access local resources without requiring them to first connect to Prisma Access using the Prisma Access Agent.
- Block inbound access when connected to the tunnel—When enabled, blocks all inbound connections from the tunnel.
Save your forwarding profile.Push the configuration by selecting Push ConfigPush. This action will make your forwarding profile available for selection in the Agent Settings page.


