Prisma Access
Retrieve User-ID Group Mappings for Prisma Access
Table of Contents
Expand All
|
Collapse All
Prisma Access Docs
-
- 6.1 Preferred and Innovation
- 6.0 Preferred and Innovation
- 5.2 Preferred and Innovation
- 5.1 Preferred and Innovation
- 5.0 Preferred and Innovation
- 4.2 Preferred
- 4.1 Preferred
- 4.0 Preferred
- 3.2 Preferred and Innovation
- 3.1 Preferred and Innovation
- 3.0 Preferred and Innovation
- 2.2 Preferred
-
-
- 4.0 & Later
- Prisma Access China
-
-
Retrieve User-ID Group Mappings for Prisma Access
Use Cloud Identity Engine or a master device to get User-ID group information for
security policy rules.
| Where Can I Use This? | What Do I Need? |
|---|---|
|
|
After you configure User-ID mapping in Prisma Access, you need to be able to retrieve
the current username-to-user group information for mobile users and users at remote
networks. While configuring Group Mapping in the Cloud Identity Engine
performs username-to-user group mapping, those user groups are not selectable in
security policy rules. You can populate the groups to allow them to be selected in
security policy rule drop-down lists by either configuring a next-generation firewall as a Master
Device or configuring the Cloud Identity Engine to do
so.
Cloud Identity Engine
In addition to using the Cloud Identity Engine to retrieve user and group information, you can
use the Cloud Identity Engine to populate user group names in security policy rules.
This integration eliminates the need to configure an on-premises or VM-series
next-generation firewall as a Master Device for this purpose; however,
Master Devices are still supported.
You
can also use Cloud Identity Engine to populate group names in Panorama
Managed multi-tenant deployments,
which is not possible when using a Master Device.
To enable
the Cloud Identity Engine to populate group names in security policy
rules, complete the following steps.
- In the Cloud Identity Engine, activate the Cloud Identity Engine and add an on-premises or cloud-based directory, if you have not already done so.Configure the Cloud Identity Engine as a mapping source.
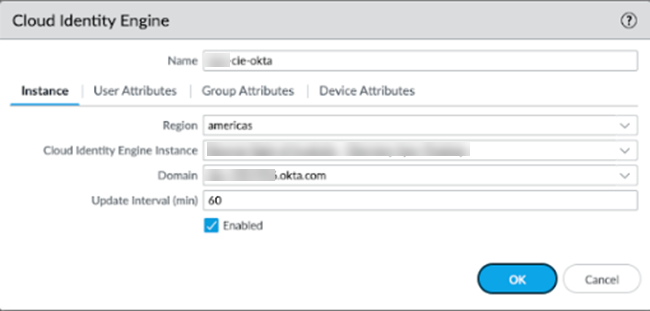
- From the Panorama that manages Prisma Access, select PanoramaUser IdentificationCloud Identity Engine and Add a profile.For the Instance, specify the following parameters:
- Region—Select the regional endpoint for your tenant.The region you select must match the region you select when you activated your Cloud Identity Engine tenant.
- Cloud Identity Engine Instance—Select the Cloud Identity Engine instance to associate with the profile.
- Domain—Select the domain that contains the directories you want to use.
- Update Interval (min)—Enter the number of minutes that you want Panorama to wait between updates from the Cloud Identity Engine app to Panorama (also known as a refresh interval). The default is 60 minutes and the range is 5—1440.
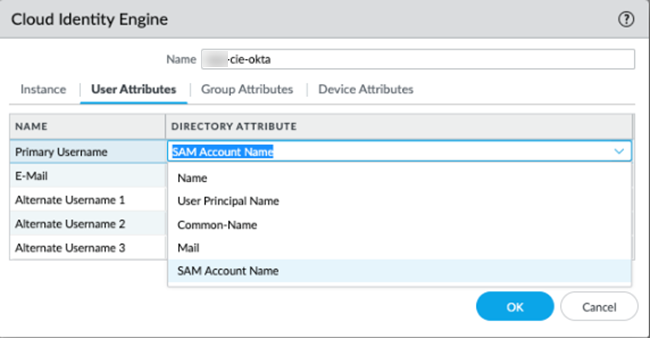
Verify that the profile is Enabled.![]() For the User Attributes, select the format for the Primary Username. You can optionally select the formats for the E-Mail and an Alternate Username. You can configure up to three alternate username formats if your users log in using multiple username formats.When you view users in security policy rules, the username displays in the primary username format you select here.
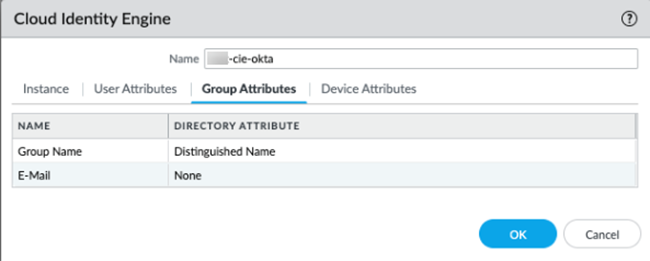
For the User Attributes, select the format for the Primary Username. You can optionally select the formats for the E-Mail and an Alternate Username. You can configure up to three alternate username formats if your users log in using multiple username formats.When you view users in security policy rules, the username displays in the primary username format you select here.![]() For the Group Attributes, select the format for the Group Name.
For the Group Attributes, select the format for the Group Name.![]() Leave the Device Attributes as None.
Leave the Device Attributes as None.![]() Click OK then Commit and Push your changes.Attach your profile to your Prisma Access configuration.
Click OK then Commit and Push your changes.Attach your profile to your Prisma Access configuration.- Go to the Settings for the deployment you are adding.
- For a Mobile Users—GlobalProtect deployment, select PanoramaCloud ServicesConfigurationMobile Users—GlobalProtect and click the gear to edit the Settings.
- For a Mobile Users—Explicit Proxy deployment, select PanoramaCloud ServicesConfigurationMobile Users—Explicit Proxy and click the gear to edit the Settings.
- For a Mobile Users—Remote Networks deployment, select PanoramaCloud ServicesConfigurationMobile Users—Remote Networks and click the gear to edit the Settings.
Select Cloud Identity Engine.Select the Cloud Identity Engine profile you created.![]() Select CommitCommit to Panorama and Commit your changes.Verify that Prisma Access has the mapping information from the Cloud Identity Engine.
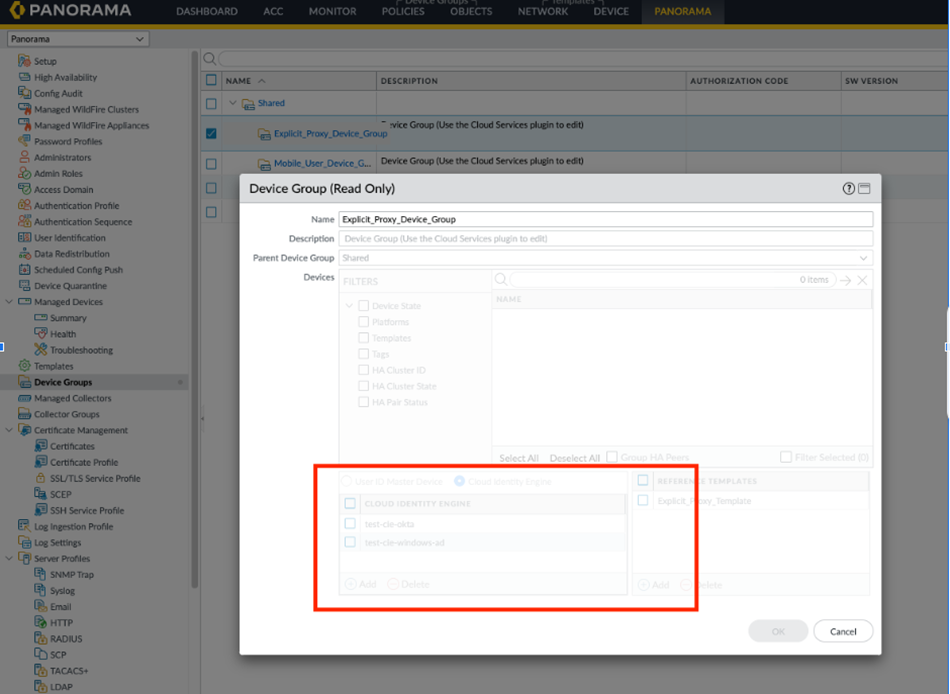
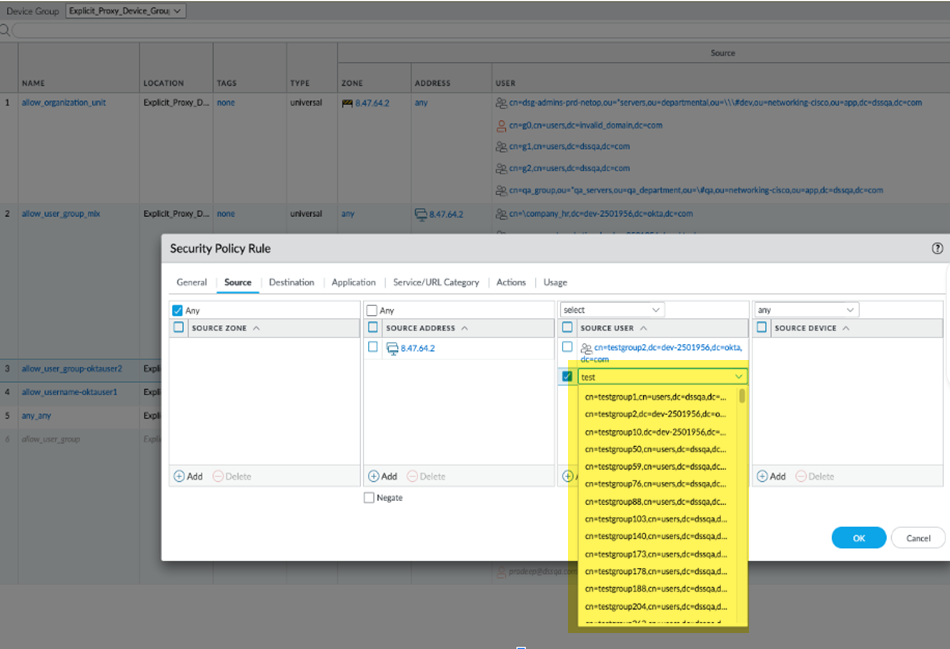
Select CommitCommit to Panorama and Commit your changes.Verify that Prisma Access has the mapping information from the Cloud Identity Engine.- Select PanoramaDevice Groups<template-name>, where <template-name> is the template for the deployment you are configuring, and verify that the Cloud Identity Engine profile is attached to the device group.The following example shows that the device group is successfully attached to the Explicit_Proxy_Device_Group.
![]() Select ObjectsSecurityPre Rules, Add a security policy rule, and verify that the groups are populated in the user area.
Select ObjectsSecurityPre Rules, Add a security policy rule, and verify that the groups are populated in the user area.![]()
Master Device
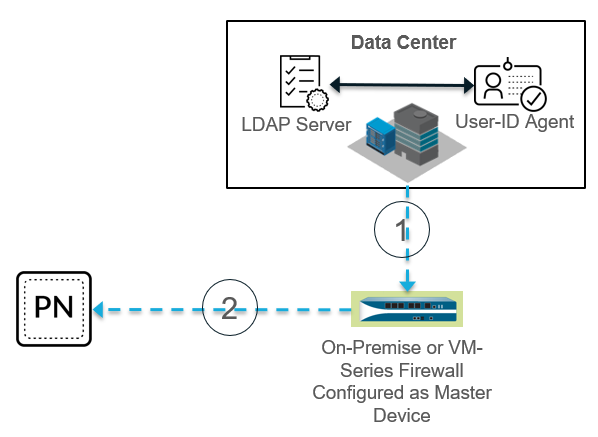
Use a next-generation or VM-series firewall as a Master Device to add group names to security policy rules in a Panorama Managed Prisma Access deployment.While configuring Group Mapping in the Cloud Identity Engine performs username-to-user group mapping, those usernames and user groups do not populate to security policies. To simplify the creation or modification of user- and group-based policies, you can use a Master Device to add the group names to drop-down lists in security policy rules. You need to designate a firewall as a Master Device for each device group. After you add a Master Device, the device group inherits all policies defined on the master device; for this reason, it should be a standalone, dedicated device to be used for that device group.To allow selection of group names in drop-down lists in security policies, Palo Alto Networks recommends that you designate a Master Device for each device group. You can configure either an on-premises firewall or a VM-series firewall as a master device.The following figure shows a User-ID deployment where the administrator has configured an on-premises device as a Master Device. Callouts in the figure show the process.- A next-generation on-premises or VM-series firewall that the administrator has configured as a Master Device retrieves the latest username-to-user group mapping from the LDAP server and User-ID agent in the data center.
- Panorama gets the username-to-user group mapping from the Master Device.Panorama uses this mapping only for the purposes of populating the group names in drop-down lists in security policies, thus simplifying the creation of policies based on groups.
![]()
Configure an on-premises or VM-Series Firewall as a Master Device
Use the following procedure to configure an on-premises or VM-series firewall as a Master Device.You can only use one Master Device per device group; if you need to configure a Master Device for different device groups, you need to create a separate Master Device for each device group.- Make sure that the device you want to use as a Master Device is managed by the same Panorama that manages Prisma Access.You can check your managed devices under PanoramaManaged Devices.Add the master device to your Prisma Access mobile user or remote network deployment.
-
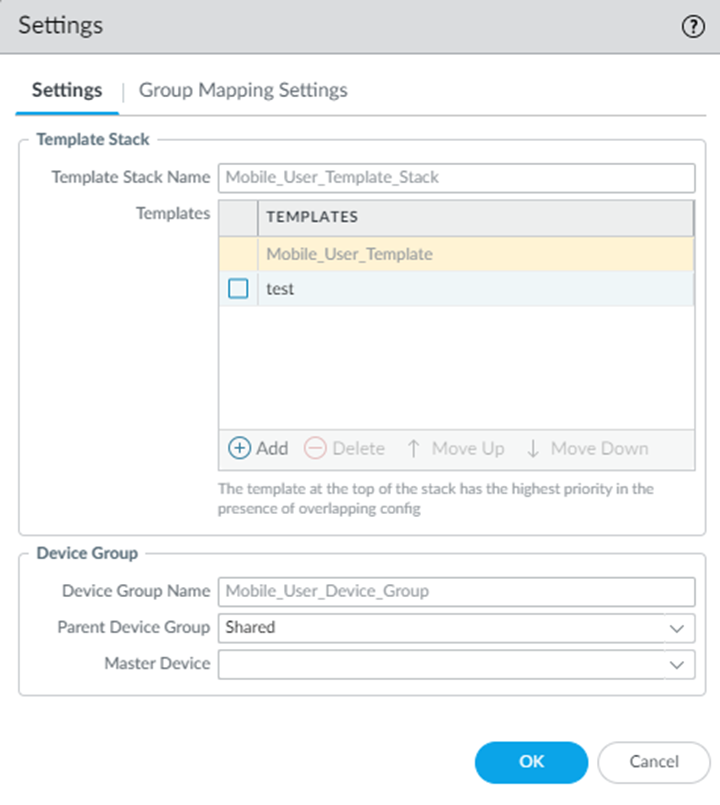
For a Mobile Users—GlobalProtect deployment, select PanoramaCloud ServicesConfigurationMobile Users—GlobalProtect, click the gear icon in the Settings, and select the on-premise firewall you want to specify as a Master Device.If you use the default Device Group Name (Mobile_User_Device_Group in this case) and Parent Device Group (Shared in this case), any devices that are not associated with another device group display in the drop-down choices. If you have associated the master device with another device group, select the Parent Device Group associated with that device group have it display in the drop-down.
![]()
-
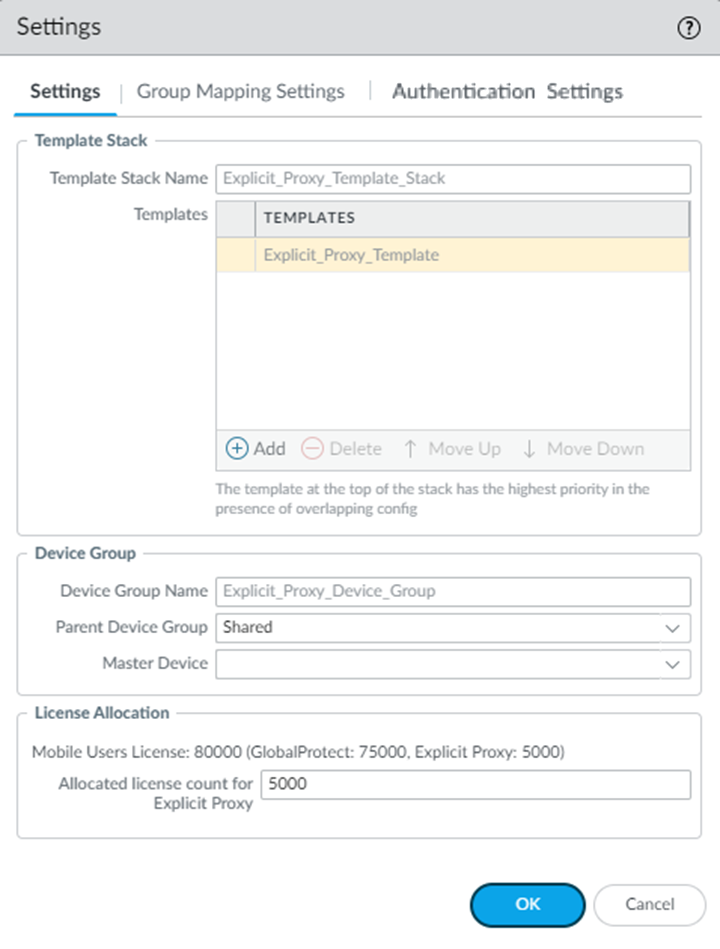
For a Mobile Users—Explicit Proxy deployment, select PanoramaCloud ServicesConfigurationMobile Users—Explicit Proxy, click the gear icon in the Settings, and select the Master Device you created.
![]()
-
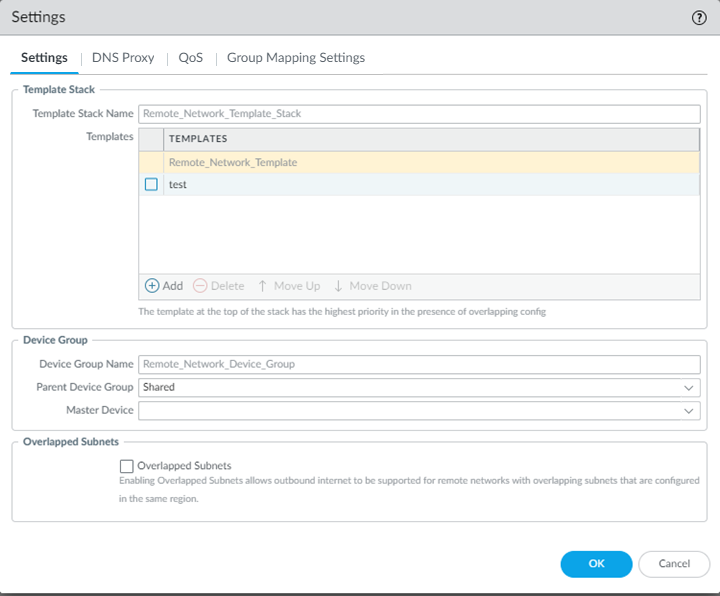
For remote network deployments, the device group with a remote network connection, select PanoramaCloud ServicesConfigurationRemote Networks, click the gear icon in the Settings, and select the Master Device you created.
![]()
Prisma Access automatically populates username-to-user group mapping for the device group that is associated with the master device only. For this example, the auto-population would occur only in the Remote_Network_Device_Group device group and would not populate to any other device groups.Click OK.
Long- or Short-Form Distinguished Name Entries
Use long- or short-form distinguished name (DN) entries in Strata Cloud Manager and Panorama.If you have not configured a next-generation firewall as a master device or configured a Cloud Identity Engine to populate users and groups in security policy rules, you can use long- or short-form distinguished name (DN) entries in Strata Cloud Manager and Panorama instead. Prisma Access uses the DN entries to evaluate the User-ID-based policies you have configured in Strata Cloud Manager and Panorama.Example formatsLong DN Name format: cn=admin,ou=standard,ou=groups,ou=productionad,dc=paloaltonetworks,dc=comCommon Name/Short Name format: paloaltonetworks.com\adminFor example, given a User named Bob Alice who works in IT and is located on the first floor, a matching security policy may have cn=first_floor, ou=it_staff, dc=dev, dc=example, dc=com if the policy is to be applied to all IT staff on the first floor, or cn=Bob Alice, ou=it_staff, dc=dev, dc=example, dc=com if the policy is only to be applied to Bob Alice.

