Prisma Access
Configure Third-Party Device-ID in Prisma Access
Table of Contents
Expand All
|
Collapse All
Prisma Access Docs
-
- 6.1 Preferred and Innovation
- 6.0 Preferred and Innovation
- 5.2 Preferred and Innovation
- 5.1 Preferred and Innovation
- 5.0 Preferred and Innovation
- 4.2 Preferred
- 4.1 Preferred
- 4.0 Preferred
- 3.2 Preferred and Innovation
- 3.1 Preferred and Innovation
- 3.0 Preferred and Innovation
- 2.2 Preferred
-
-
- 4.0 & Later
- Prisma Access China
-
-
Configure Third-Party Device-ID in Prisma Access
Use Prisma Access and the Cloud Identity Engine to configure third-party Device-ID
for third-party IoT devices.
| Where Can I Use This? | What Do I Need? |
|---|---|
If you'd like to use this feature in your Prisma Access environment,
get in touch with your account team to learn more.
|
|
You can use the Cloud Identity Engine along with Prisma Access to apply information from
third-party IoT detection sources to simplify the task of identifying and closing
security gaps for devices in your network. After you set up Third-Party Device-ID in the
Cloud Identity Engine using an API, you can set up a device object and a Security policy rule in
Prisma Access to obtain and use information from third-party IoT visibility
solutions through the Cloud Identity Engine for device visibility and control.
To configure Third-Party Device-ID for mobile users, you must configure the
policy rules in Prisma Access (Managed by Panorama).
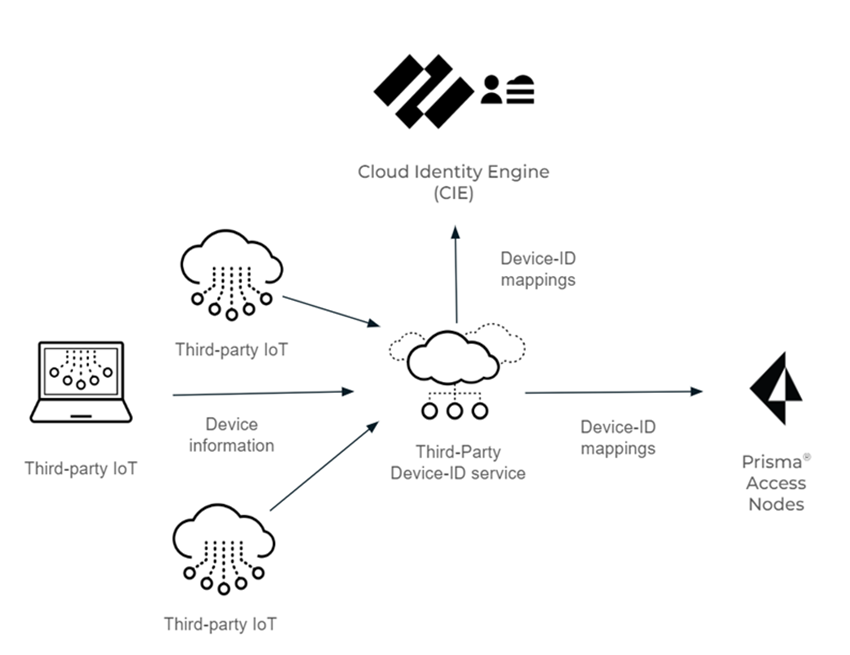
In the following figure, the Third-Party Device-ID service receives the device
information from the third-party IoT solutions, which it then transmits as IP
address-to-device mappings to the Cloud Identity Engine and the Prisma Access Security
Processing Nodes (SPNs).
Configure Third-Party Device-ID in Prisma Access (Strata Cloud Manager)
Allow third-party IoT device vendors to retrieve their device IDs using the Cloud
Identity Engine and Prisma Access.
To configure third-party Device-ID, complete the following task.
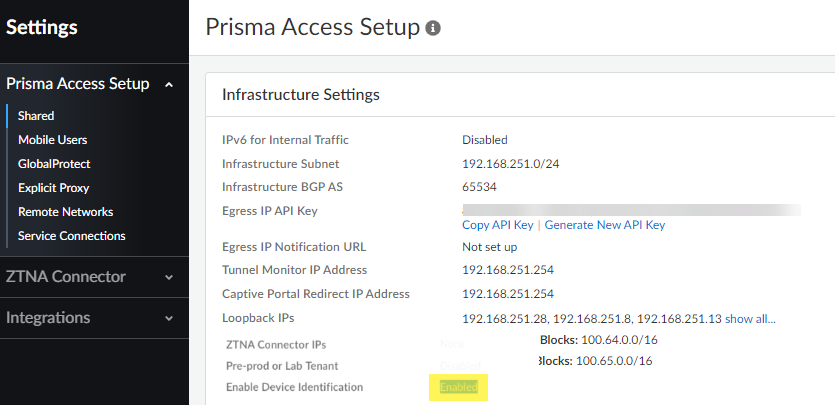
- Activate Third-Party Device-ID in the Cloud Identity Engine.This procedure includes uploading a signed certificate and using that with an API to communicate with, and download Device-ID information from, the third-party IoT vendor.Activate Third-Party Device-ID in Prisma Access by going to SettingsPrisma Access SetupShared or ConfigurationNGFW and Prisma AccessConfiguration ScopePrisma Access Infrastructure and set Enable Device Identification to Enabled.
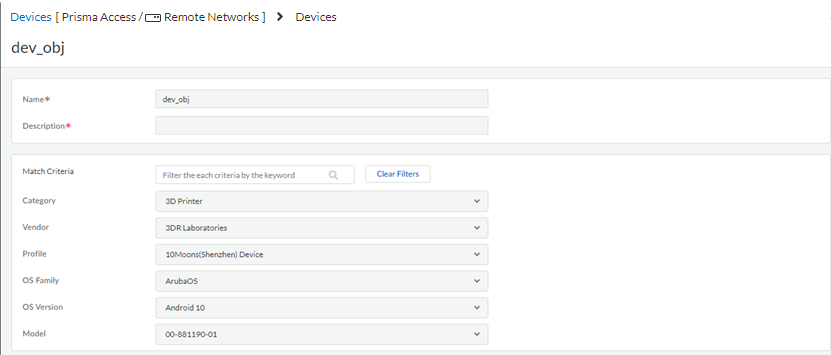
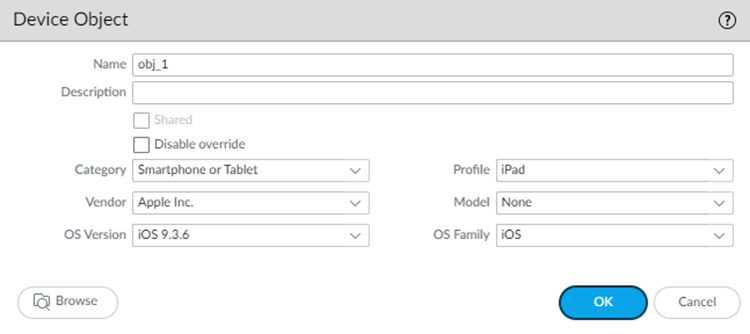
![]() Configure a device object and enter device attributes. Go to ConfigurationNGFW and Prisma Access, set the configuration scope to Remote Networks, and select ObjectsDevices and Add Devices. Be sure that you are in the Remote Networks device group.
Configure a device object and enter device attributes. Go to ConfigurationNGFW and Prisma Access, set the configuration scope to Remote Networks, and select ObjectsDevices and Add Devices. Be sure that you are in the Remote Networks device group.- Add a device object that matches attributes for the third-party objects.The Cloud Identity Engine Mappings area displays the attributes of the third-party devices; you can use any attributes retrieved from there.
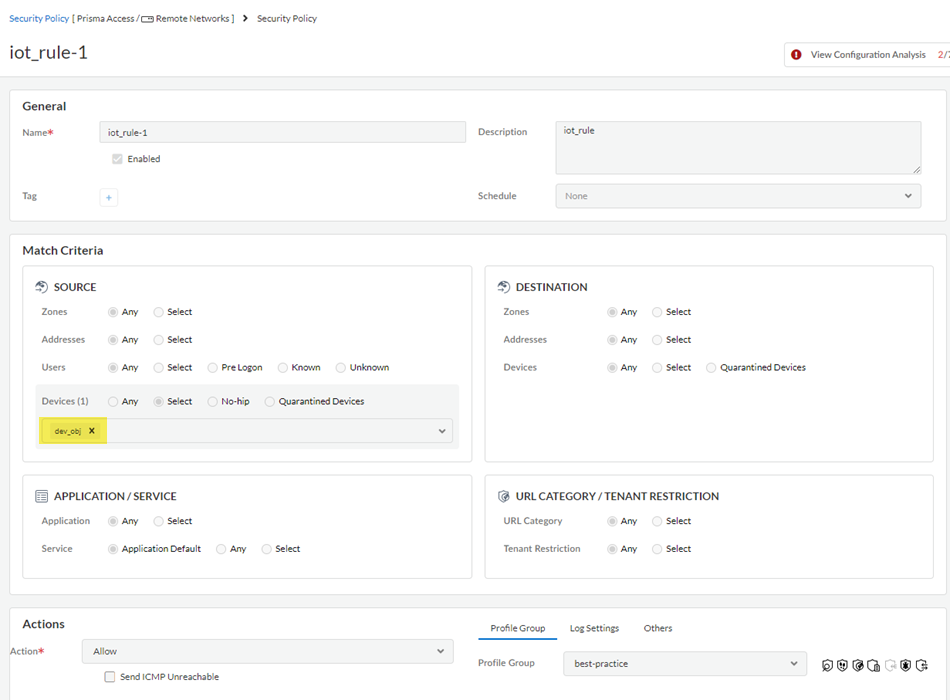
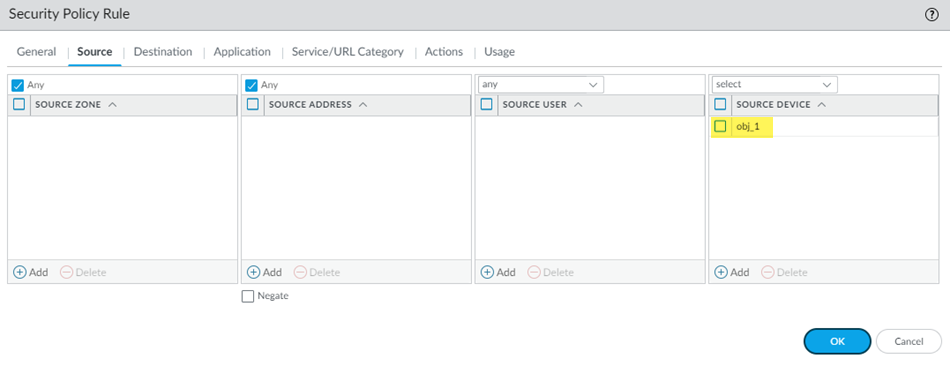
![]() Go to ConfigurationNGFW and Prisma Access, set the configuration scope to Remote Networks, select Security ServicesSecurity Policy, and Add a security policy, adding the device objects you created in the Devices area.
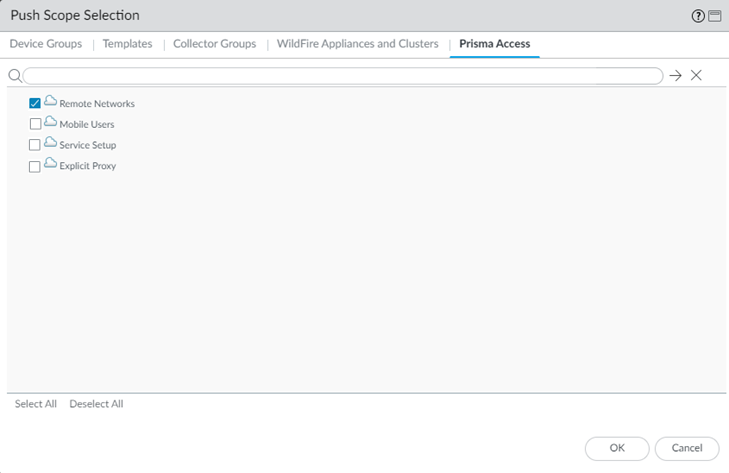
Go to ConfigurationNGFW and Prisma Access, set the configuration scope to Remote Networks, select Security ServicesSecurity Policy, and Add a security policy, adding the device objects you created in the Devices area.![]() Push Config to save your changes to the Prisma Access configuration, making sure to select Remote Networks in the push scope.Verify that Prisma Access is receiving the Device-ID logs by going to Incidents & AlertsLog Viewer, selecting Firewall/Traffic, and searching for traffic under the rule you created by entering rule_matched = rulename, where rulename is the security policy rule you created for the third-party IoT devices.The Device-ID to IP address mappings display in the logs.
Push Config to save your changes to the Prisma Access configuration, making sure to select Remote Networks in the push scope.Verify that Prisma Access is receiving the Device-ID logs by going to Incidents & AlertsLog Viewer, selecting Firewall/Traffic, and searching for traffic under the rule you created by entering rule_matched = rulename, where rulename is the security policy rule you created for the third-party IoT devices.The Device-ID to IP address mappings display in the logs.![]()
Configure Third-Party Device-ID in Prisma Access (Panorama)
Allow third-party IoT device vendors to retrieve their device IDs using the Cloud Identity Engine and Prisma Access.To configure third-party Device-ID, complete the following task.- Activate Third-Party Device-ID in the Cloud Identity Engine.This procedure includes uploading a signed certificate and using that with an API to communicate with, and download Device-ID information from, the third-party IoT vendor.Activate Third-Party Device-ID in Prisma Access.
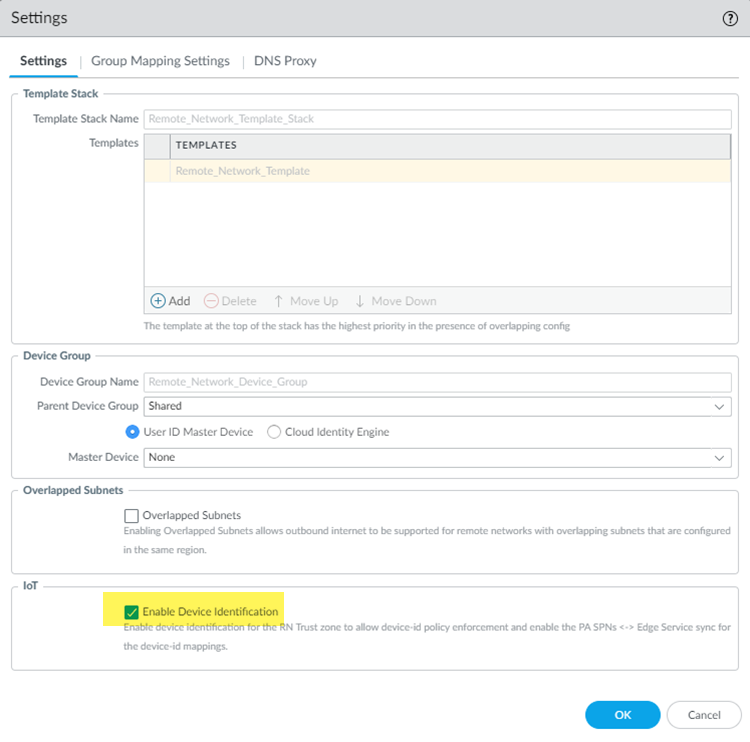
- Go to PanoramaCloud ServicesConfiguration.Select Mobile Users or Remote Networks, depending on where you want to use third-party Device-ID.In the Settings panel, click the gear icon to edit the Settings, and select Enable Device Identification.If you don't see the Enable Device Identification option, contact your account team to enable Third-Party Device-ID.
![]() Configure a device object and enter device attributes.
Configure a device object and enter device attributes.- Go to ObjectsDevices and Add a device object that matches all the Device-ID attributes.Be sure that you're in the Mobile_User_Device_Group, Remote_Network_Device_Group, or the Shared device group.Add a device object that matches attributes for the third-party objects.The Cloud Identity Engine Mappings area displays the attributes of the third-party devices; you can use any attributes retrieved from there.
![]() Go to PoliciesSecurityPre Rules and Add a Security policy rule.Be sure that you're in the Mobile_User_Device_Group, Remote_Network_Device_Group, or the Shared device group.If you're configuring a Security policy rule for a remote network or shared device group, you can add the device objects you created to SourceSource Device or to DestinationDestination Device.If you're configuring a Security policy rule for mobile users, you can only use device objects for destination devices. Add the device objects you created to DestinationDestination Device.
Go to PoliciesSecurityPre Rules and Add a Security policy rule.Be sure that you're in the Mobile_User_Device_Group, Remote_Network_Device_Group, or the Shared device group.If you're configuring a Security policy rule for a remote network or shared device group, you can add the device objects you created to SourceSource Device or to DestinationDestination Device.If you're configuring a Security policy rule for mobile users, you can only use device objects for destination devices. Add the device objects you created to DestinationDestination Device.![]() Commit and push your changes, making sure that you select Mobile Users or Remote Networks in the Push Scope.
Commit and push your changes, making sure that you select Mobile Users or Remote Networks in the Push Scope.- Click CommitCommit and Push.Edit Selections and, in the Prisma Access tab, make sure that you select Mobile Users or Remote Networks in the Push Scope, then click OK.
![]() Click Commit and Push.Verify that Prisma Access is receiving the Device-ID logs by going to MonitorLogs, and searching the Traffic logs for traffic under the rule you created by entering rule_matched = rulename, where rulename is the Security policy rule you created for the third-party IoT devices.The Device-ID to IP address mappings appear in the logs.
Click Commit and Push.Verify that Prisma Access is receiving the Device-ID logs by going to MonitorLogs, and searching the Traffic logs for traffic under the rule you created by entering rule_matched = rulename, where rulename is the Security policy rule you created for the third-party IoT devices.The Device-ID to IP address mappings appear in the logs.![]()

