Prisma Access
Integrate Prisma Access with Cisco Meraki SD-WAN (Manual Integration)
Table of Contents
Integrate Prisma Access with Cisco Meraki SD-WAN (Manual Integration)
Secure a Meraki SD-WAN with Prisma Access (Managed by Strata Cloud Manager).
| Where Can I Use This? | What Do I Need? |
|---|---|
|
|
To secure a Meraki SD-WAN with Prisma Access (Managed by Strata Cloud Manager), complete the following
steps.
- Onboard a remote network to use with the Meraki SD-WAN in Cloud Managed Prisma Access.
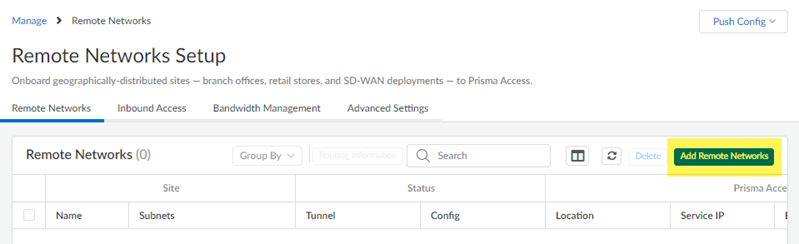
- If you have not already, allocate bandwidth for the remote network.You allocate bandwidth by selecting bandwidth for the remote network’s compute location. Go to and select an Assigned Bandwidth for the remote network’s compute location.Go to and Add Remote Networks.
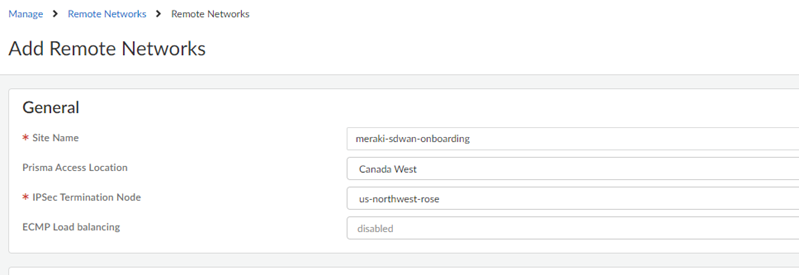
![]() Give the remote network a descriptive Site Name.Select the Prisma Access Location for the remote network.Select the IPSec Termination Node to use for the remote network.Don’t enable ECMP Load Balancing; BGP routing isn’t supported with Meraki integrations. The Meraki SD-WAN can’t share traffic between several different links and you can only have one operational tunnel to the Meraki SD-WAN. However, you can optionally use a secondary tunnel using another WAN as a standby.
Give the remote network a descriptive Site Name.Select the Prisma Access Location for the remote network.Select the IPSec Termination Node to use for the remote network.Don’t enable ECMP Load Balancing; BGP routing isn’t supported with Meraki integrations. The Meraki SD-WAN can’t share traffic between several different links and you can only have one operational tunnel to the Meraki SD-WAN. However, you can optionally use a secondary tunnel using another WAN as a standby.![]() Set up the IPSec tunnel to use with the Meraki SD-WAN.
Set up the IPSec tunnel to use with the Meraki SD-WAN.- Set Up the primary tunnel.
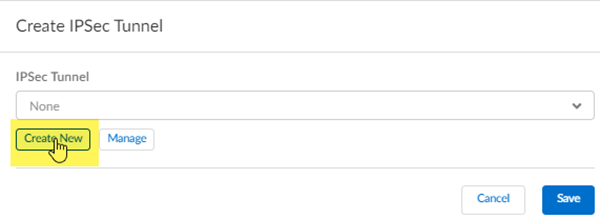
![]() Select an existing tunnel, or select Create New to create a new tunnel.
Select an existing tunnel, or select Create New to create a new tunnel.![]() Give the tunnel a descriptive Name.In the Branch Device Type, select Other Devices.Specify a Pre-Shared Key or a Certificate to use for authentication.This example uses a pre-shared key (PSK) for authentication.Specify an IKE Peer Identification method.If you select a Branch Device IP Address of Dynamic, you must select an IKE peer identification. This example has IKE Peer Identification set up and uses a method of User FQDN (email address). Be sure that you select the same email address on the Meraki SD-WAN side of the IPSec tunnel.Specify a Branch Device IP Address of either Static IP or Dynamic IP.Setting up an IKE Peer Identification is required if you use a dynamic IP address. If you select Static IP, enter a static IP address.Don’t enter Proxy ID information.Meraki creates a crypto map with routing and you don’t need to configure proxy IDs.
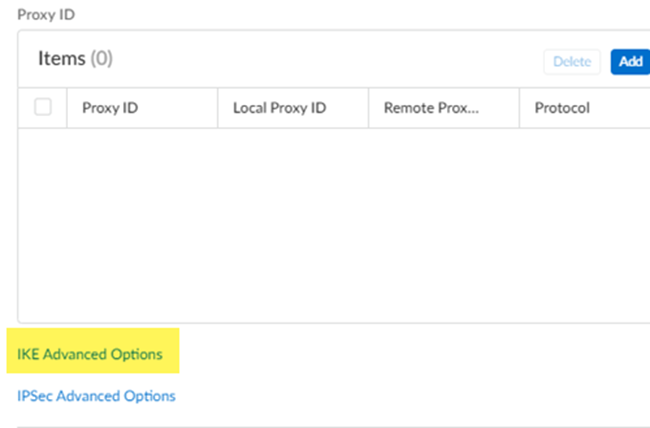
Give the tunnel a descriptive Name.In the Branch Device Type, select Other Devices.Specify a Pre-Shared Key or a Certificate to use for authentication.This example uses a pre-shared key (PSK) for authentication.Specify an IKE Peer Identification method.If you select a Branch Device IP Address of Dynamic, you must select an IKE peer identification. This example has IKE Peer Identification set up and uses a method of User FQDN (email address). Be sure that you select the same email address on the Meraki SD-WAN side of the IPSec tunnel.Specify a Branch Device IP Address of either Static IP or Dynamic IP.Setting up an IKE Peer Identification is required if you use a dynamic IP address. If you select Static IP, enter a static IP address.Don’t enter Proxy ID information.Meraki creates a crypto map with routing and you don’t need to configure proxy IDs.![]() Select IKE options for the remote network IPSec tunnel.
Select IKE options for the remote network IPSec tunnel.- Select IKE Advanced Options.
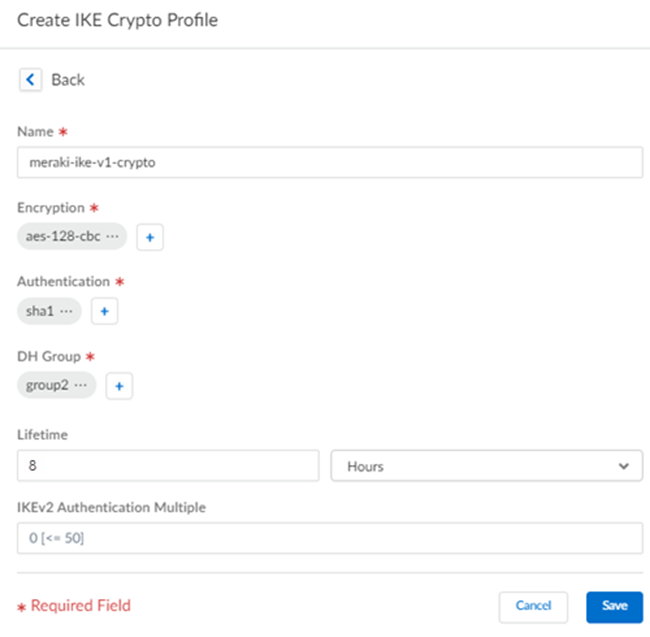
![]() Select an IKE Protocol Version.The IKE version depends on what the Meraki SD-WAN supports. Meraki SD-WAN devices with a firmware version of 15.12 or later support IKEv2 options. If you don’t know which version the Meraki device supports, select ikev2-preferred-mode; in this mode, Prisma Access selects the IKE version to use, with IKEv2 being preferred.(IKEv1 or IKEv2 Preferred Deployments Only) Select an existing IKEv1 Crypto Profile or specify Create New to create one.If you create a new profile, specify a descriptive Name for it.Specify the following IKEv1 options:
Select an IKE Protocol Version.The IKE version depends on what the Meraki SD-WAN supports. Meraki SD-WAN devices with a firmware version of 15.12 or later support IKEv2 options. If you don’t know which version the Meraki device supports, select ikev2-preferred-mode; in this mode, Prisma Access selects the IKE version to use, with IKEv2 being preferred.(IKEv1 or IKEv2 Preferred Deployments Only) Select an existing IKEv1 Crypto Profile or specify Create New to create one.If you create a new profile, specify a descriptive Name for it.Specify the following IKEv1 options:- Encryption—Specify the encryption algorithm used in the IKE SA negotiation. The Meraki SD-WAN device supports the following encryption types:
- aes-128-cbc
- aes-128-gcm
- aes-192-cbc
- aes-256-cbc
- aes-256-gcm
- 3DES
You can specify multiple encryption types in a single profile. - Authentication—Specify the authentication algorithm used in the IKE SA negotiation. The Meraki SD-WAN device supports the md5, sha1, or sha256 algorithm. You can specify multiple authentication types.
- DH Group—Specify the Diffie-Hellman (DH) groups used to generate symmetrical keys for IKE in the IKE SA negotiation. The Meraki SD-WAN device supports the group1, group2, group5, group14 groups. You can specify multiple DH group types.For the strongest security, select the group with the highest number. If you don’t want to renew the key that Prisma Access creates during IKE phase 1, select no-pfs (no perfect forward secrecy). If you select this option, Prisma Access reuses the current key for the IPSec SA negotiation.
- Lifetime—Specify the unit and amount of time for which the IKE Phase 1 key is valid (default is 8 hours).For IKEv1, the security association (SA) isn’t actively re-keyed before the key lifetime expires. The IKEv1 Phase 1 re-key triggers only when the SA expires. For IKEv2, the SA must be re-keyed before the key lifetime expires. If the SA isn’t re-keyed upon expiration, the SA must begin a new Phase 1 key.
![]() Save your changes.(IKEv2 or IKEv2 Preferred Deployments only) Select an existing IKEv2 Crypto Profile and select Create New to create one.If you create a new profile, specify a descriptive Name for it.Specify the following IKEv2 options:
Save your changes.(IKEv2 or IKEv2 Preferred Deployments only) Select an existing IKEv2 Crypto Profile and select Create New to create one.If you create a new profile, specify a descriptive Name for it.Specify the following IKEv2 options:- Encryption—Specify one or more of the following encryption algorithms:
- aes-128-cbc
- aes-128-gcm
- aes-192-cbc
- aes-256-cbc
- aes-256-gcm
- 3DES
You can specify multiple encryption algorithms in a single profile. - Authentication—Specify md5, sha1, or any combination of these authentication algorithms.
- DH Group—Specify group1, group2, group5, group14, or any combination of these DH group types.
- Lifetime—Enter the phase 1 lifetime in hours or seconds (default is 8 hours).
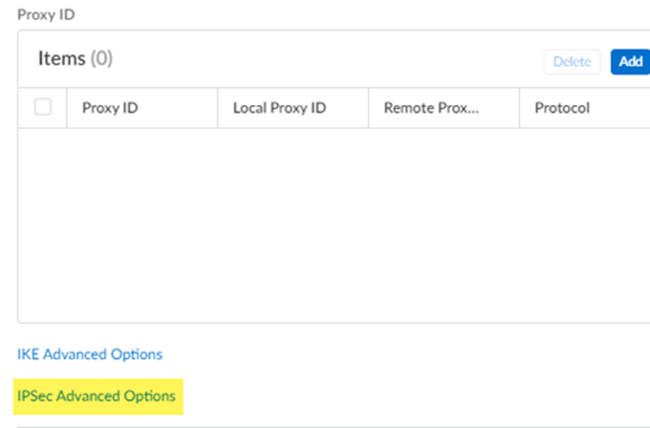
Select IPSec advanced options for the remote network IPSec tunnel.- Select IPSec Advanced Options.
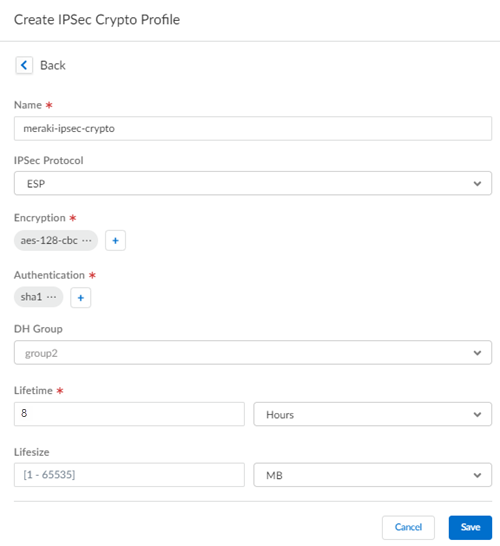
![]() Select an existing IPSec Crypto Profile and select Create New to create one.If you create a new profile, specify a descriptive Name for it.Specify the following IPSec crypto options:
Select an existing IPSec Crypto Profile and select Create New to create one.If you create a new profile, specify a descriptive Name for it.Specify the following IPSec crypto options:- Encryption—Specify one or more or the following encryption algorithms:
- aes-128-cbc
- aes-128-gcm
- aes-192-cbc
- aes-256-cbc
- aes-256-gcm
- 3DES
- Authentication—Specify md5, sha1, sha256, or any combination of these authentication algorithms.
- DH Group—Specify group1, group2, group5, group14, or any combination of these DH group types.
- Lifetime—Enter the phase 1 lifetime in hours or seconds (default is 8 hours).
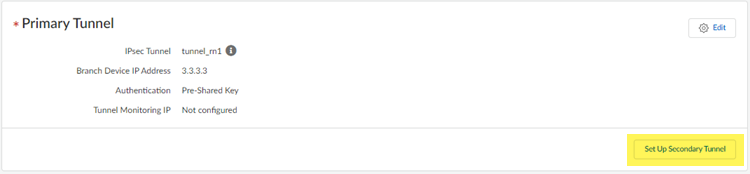
![]() Save your changes.(Optional) If you want to use a standby (secondary) tunnel, go to , select Set Up Secondary Tunnel, and repeat step 2 through step 4 for the secondary tunnel.When both tunnels are up, the primary tunnel takes priority over the secondary tunnel. If the primary tunnel for a remote network site goes down, the remote network falls back to the secondary tunnel until the primary tunnel comes back up. It can take at least 30-40 seconds before the secondary tunnel comes up after a failover.
Save your changes.(Optional) If you want to use a standby (secondary) tunnel, go to , select Set Up Secondary Tunnel, and repeat step 2 through step 4 for the secondary tunnel.When both tunnels are up, the primary tunnel takes priority over the secondary tunnel. If the primary tunnel for a remote network site goes down, the remote network falls back to the secondary tunnel until the primary tunnel comes back up. It can take at least 30-40 seconds before the secondary tunnel comes up after a failover.![]() Configure routing for the remote network.
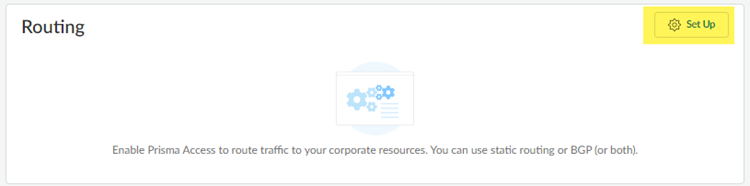
Configure routing for the remote network.- Return to and Set Up routing for the remote network.
![]() Add the IP subnets or IP addresses that you want to secure at the branch. If you make any changes to the IP subnets on your branch, you must manually update the static routes.Dynamic (BGP) routing isn’t supported for use with Meraki SD-WAN devices.
Add the IP subnets or IP addresses that you want to secure at the branch. If you make any changes to the IP subnets on your branch, you must manually update the static routes.Dynamic (BGP) routing isn’t supported for use with Meraki SD-WAN devices.![]() Save your changes.Push your configuration changes.
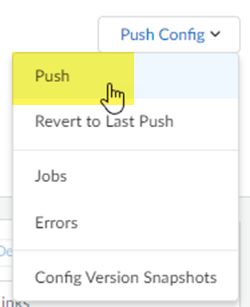
Save your changes.Push your configuration changes.- Return to and select .
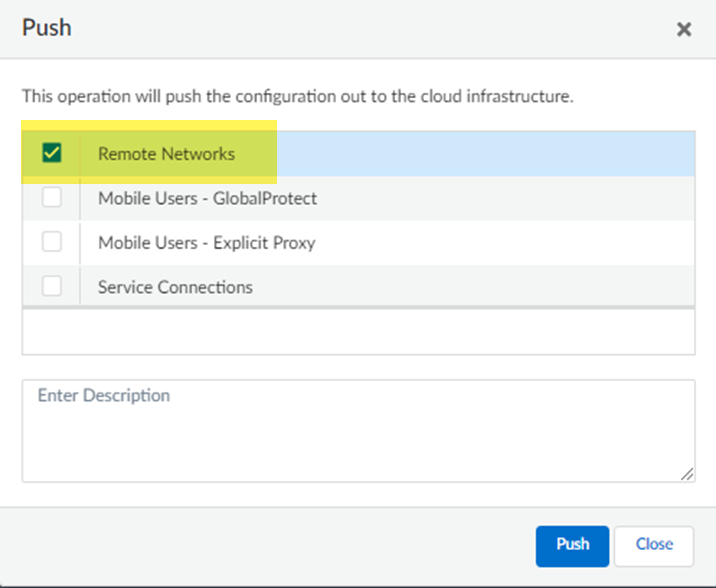
![]() Select Remote Networks.
Select Remote Networks.![]() Push your changes.Find the IP address used on the Prisma Access side of the IPSec tunnel.
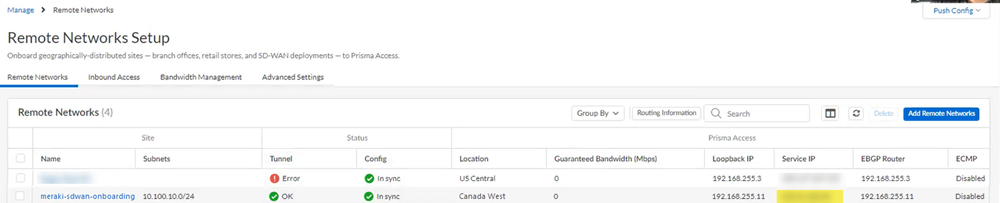
Push your changes.Find the IP address used on the Prisma Access side of the IPSec tunnel.- Go to and make a note of the Service IP address.You use this IP address as the peer address when you set up the IPSec tunnel on the Meraki SD-WAN.
![]() Set up the Meraki SD-WAN device.
Set up the Meraki SD-WAN device.- From the Meraki SD-WAN device, Go to .Find the Organization-wide settings area.Under Non-Meraki VPN peers, Add a peer.Create a peer for Prisma Access.Specify the IKE Version and make sure that it matches the version you specified in Prisma Access.(Optional) If required, select Custom in the IPSec Policies area and make sure that the Phase 1 and Phase 2 IPSec tunnel settings match with the IPSec tunnel settings you entered in Prisma Access.
![]() Enter the Service IP address from Prisma Access as the Public IP / Hostname.(Optional) if you’re used an IKE Peer Identification of User FQDN (email address) in Prisma Access, enter the same email address as the Local ID.If you’re using a static IP address in the branch, this field will be blank.Enter the Private subnets that will be sent through the IPSec tunnel.Palo Alto Networks recommends that you enter an all-zeros (default) route.(Optional) If you’re using PSKs for the IPSec tunnel, enter a Preshared secret that matches the Pre-Shared Key you entered in Prisma Access.Verify that the IPSec tunnel is up and running.
Enter the Service IP address from Prisma Access as the Public IP / Hostname.(Optional) if you’re used an IKE Peer Identification of User FQDN (email address) in Prisma Access, enter the same email address as the Local ID.If you’re using a static IP address in the branch, this field will be blank.Enter the Private subnets that will be sent through the IPSec tunnel.Palo Alto Networks recommends that you enter an all-zeros (default) route.(Optional) If you’re using PSKs for the IPSec tunnel, enter a Preshared secret that matches the Pre-Shared Key you entered in Prisma Access.Verify that the IPSec tunnel is up and running.- Check the IPSec tunnel status from Prisma Access.
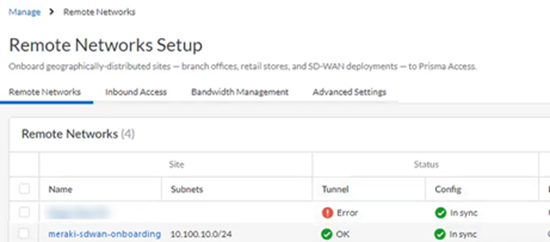
- Go to and check the Status of the tunnel.It might take some time (10 minutes or longer) for the IPSec tunnel to come up, especially if you’re using the cloud version of the Meraki web interface to configure Meraki.
![]()
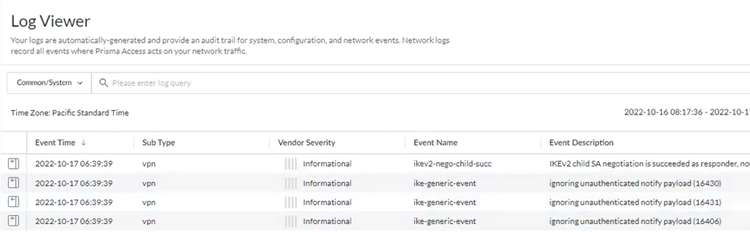
- Go to and check the Common/System logs for IPSec- and IKE-related messages.The following message ignoring unauthenticated notify payload indicates that the route has not been added in the crypto map on the other side of the IPSec tunnel after the IPSec negotiation has already occurred.
![]()
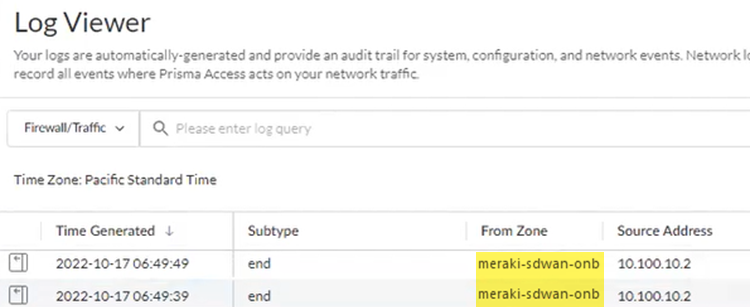
- Check the Firewall/Traffic logs and view the messages that are coming from the zone that has the same name as the remote network.In the logs, the remote network name is used as the source zone.
![]()
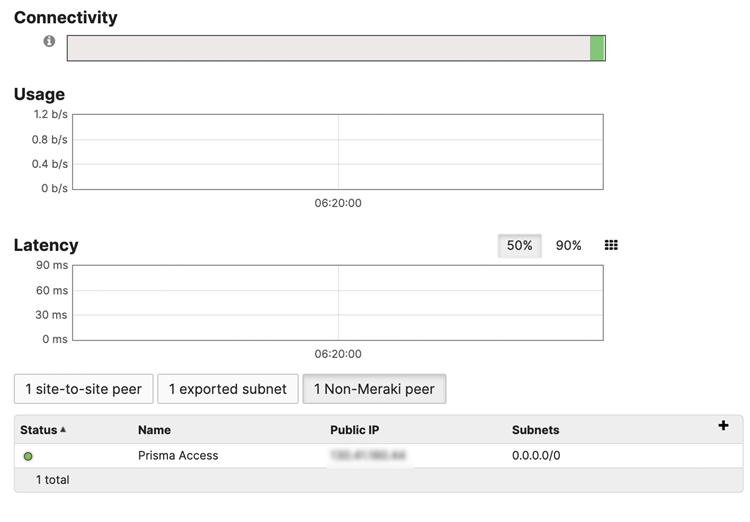
From the Meraki web interface, check the status of the non-Meraki VPN and view its Status.![]()