Prisma Access
Connect the Dynamic Privilege Access Enabled Prisma Access Agent to a Different Server
Table of Contents
Expand All
|
Collapse All
Prisma Access Docs
-
- 6.1 Preferred and Innovation
- 6.0 Preferred and Innovation
- 5.2 Preferred and Innovation
- 5.1 Preferred and Innovation
- 5.0 Preferred and Innovation
- 4.2 Preferred
- 4.1 Preferred
- 4.0 Preferred
- 3.2 Preferred and Innovation
- 3.1 Preferred and Innovation
- 3.0 Preferred and Innovation
- 2.2 Preferred
-
-
- 4.0 & Later
- Prisma Access China
-
-
Connect the Dynamic Privilege Access Enabled Prisma Access Agent to a Different Server
You can connect to a different Prisma Access server if you need to access the
network and resources through that server.
| Where Can I Use This? | What Do I Need? |
|---|---|
|
|
An instance of the Prisma Access server is also known as a tenant. If your
administrators set up multiple Prisma Access servers, you can connect to a
different server to access the network or the resources through that server.
For example, you need to work on a different project, but that project is only
accessible on a different server. You will need to connect to that server before you
can change to that project.
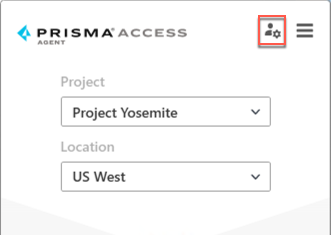
- Launch the Prisma Access Agent by clicking the Prisma Access Agent iconfrom the macOS menu bar or Windows taskbar.
![]() Edit the server settings by selecting the server management icon.
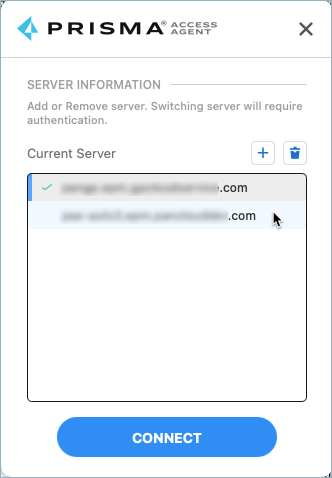
Edit the server settings by selecting the server management icon.![]() The server information appears showing the server that you're connected to. If other servers are listed, you can select one and Connect to it.
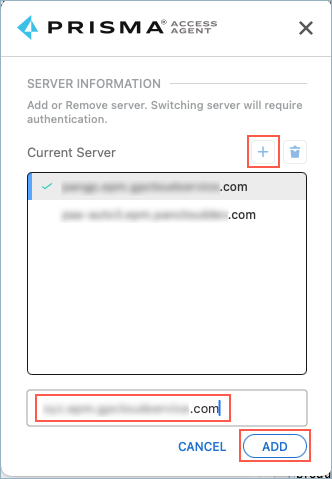
The server information appears showing the server that you're connected to. If other servers are listed, you can select one and Connect to it.![]() If you need to add a server, and if your administrator permits it, complete the following steps:
If you need to add a server, and if your administrator permits it, complete the following steps:- Click the + sign.Enter the new server name (provided by your administrator) and Add it.The format of the server name is <xxx>.epm.gpcloudservice.com without the https://. The maximum length of the server name is 256 characters. The maximum number of servers allowed on this page is 20.
![]() After adding the server, select it and click Connect.When the Confirmation window appears, click Yes to disconnect from the current server and connect to the other server. You will need to provide your sign-on credentials again.When prompted, log in to the new server by providing the project name (if applicable).
After adding the server, select it and click Connect.When the Confirmation window appears, click Yes to disconnect from the current server and connect to the other server. You will need to provide your sign-on credentials again.When prompted, log in to the new server by providing the project name (if applicable).


