Prisma Access
SAML Authentication for Explicit Proxy
Table of Contents
Expand All
|
Collapse All
Prisma Access Docs
-
- 6.1 Preferred and Innovation
- 6.0 Preferred and Innovation
- 5.2 Preferred and Innovation
- 5.1 Preferred and Innovation
- 5.0 Preferred and Innovation
- 4.2 Preferred
- 4.1 Preferred
- 4.0 Preferred
- 3.2 Preferred and Innovation
- 3.1 Preferred and Innovation
- 3.0 Preferred and Innovation
- 2.2 Preferred
-
-
- 4.0 & Later
- Prisma Access China
-
-
SAML Authentication for Explicit Proxy
Learn how Prisma Access Explicit Proxy works.
| Where Can I Use This? | What Do I Need? |
|---|---|
|
|
Learn about how Explicit Proxy
with SAML works and how to configure it.
How Explicit Proxy with SAML Processes Traffic
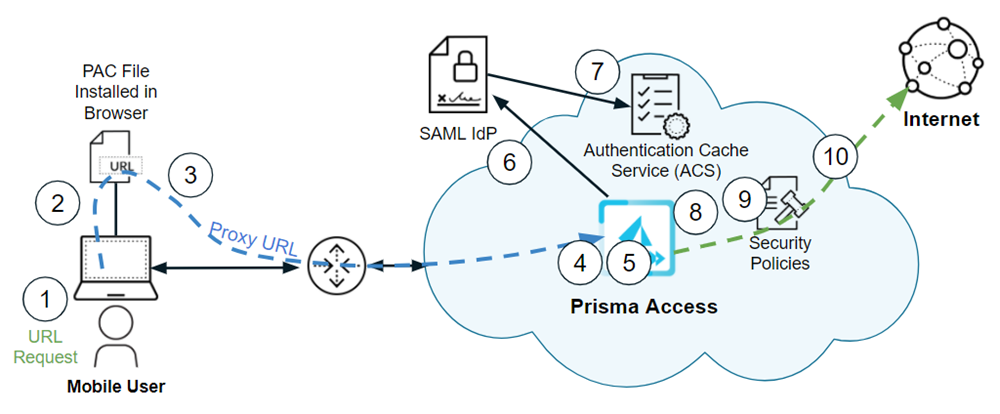
Here’s how Explicit Proxy with SAML works. Follow along to see the path traffic
takes:

- The mobile user browses the internet or accesses the SaaS application by entering the URL or IP address using a web browser.The browser on the mobile users’ endpoint checks for the PAC file.This PAC file specifies that the URL or SaaS request should go to Prisma Access explicit proxy.The HTTPS client (the browser on the mobile user’s endpoint) forwards the URL request to the proxy URL.The traffic redirects to the explicit proxy, and the proxy decrypts the traffic.The proxy inspects the traffic and checks for the authentication cookie set up by the Prisma Access explicit proxy.The cookie contains information that identifies the mobile user, and uses the cookie to authenticate the user.If, upon inspection of the cookie, Prisma Access determines that the user is not authenticated, it redirects the user for authentication.After the IdP authenticates the user, Prisma Access stores the authentication state of the user in the Authentication Cache Service (ACS). The validity period of the authentication is based on the Cookie Lifetime value you specify during explicit proxy configuration.The explicit proxy checks for the presence and validity of our cookie. If the cookie is not present or is invalid, the user is redirected to ACS. After ACS confirms the authentication of the user, the user is redirected back to the explicit proxy with a token. The proxy then validates that token and sets the cookie for that domain for that user.Prisma Access applies security enforcement based on the Security policy rules that the administrator has configured.If the URL is not blocked by Security policy rules, Prisma Access sends the URL request to the internet.(Optional) Configure Explicit Proxy Connectivity in GlobalProtect for Always-On Internet Security. Enable this functionality to achieve always-on security for the internet traffic, while providing on-demand access to private apps through GlobalProtect or a third-party VPN.
Configure Explicit Proxy with SAML
Follow these steps to configure Explicit Proxy with SAML authentication.Configure Explicit Proxy with SAML (Strata Cloud Manager)
This is how you configure Prisma Access Explicit Proxy with SAML on Strata Cloud Manager- Set up Explicit Proxy.(Optional) Configure Cloud Identity Engine authentication for Explicit Proxy.Configure security policy rules.
- Select ConfigurationNGFW and Prisma AccessConfiguration ScopeExplicit ProxySecurity ServicesSecurity Policy.Customize the default policy rules according to your needs and internet gateway security policy best practices.With Prisma Access 5.1 and a dataplane of PAN-OS 10.2.10 or a later version, you will need only the Allow Web Access to Known Users security policy rule.
Configure Explicit Proxy with SAML (Panorama)
This is how you configure Prisma Access Explicit Proxy with SAML on Panorama.- Set up Explicit Proxy.(Optional) Configure Cloud Identity Engine authentication for Explicit Proxy.Depending on your Prisma Access version and your dataplane version, configure either a single policy rule or several.
Version Requirements Configuration Prisma Access 5.1 or a later version and a dataplane of PAN-OS 10.2.10 or a later version. Configure a security policy rule for pre-authentication user traffic.- Select the Explicit_Proxy_Device_Group.
- Create an application filter using the Web App tag.
- Select PoliciesPre RulesAdd.
- Create the rule.
- Add the rule.
- Give it a descriptive name.For example, allow-pre-auth
- Under the Application tab, Add the Web App application filter.
- Under the Source tab, Add known-user.
All other Prisma Access and dataplane versions. Configure security policy rules according to your needs and internet gateway security policy best practices. Commit the configuration.
