Prisma Access
Cloud Management
Table of Contents
Expand All
|
Collapse All
Prisma Access Docs
-
- 6.1 Preferred and Innovation
- 6.0 Preferred and Innovation
- 5.2 Preferred and Innovation
- 5.1 Preferred and Innovation
- 5.0 Preferred and Innovation
- 4.2 Preferred
- 4.1 Preferred
- 4.0 Preferred
- 3.2 Preferred and Innovation
- 3.1 Preferred and Innovation
- 3.0 Preferred and Innovation
- 2.2 Preferred
-
-
- 4.0 & Later
- Prisma Access China
-
-
Cloud Management
Set up explicit proxy in a Prisma Access (Managed by Strata Cloud Manager) deployment.
Set up an explicit proxy connection for mobile users or for headless devices; with
explicit proxy, a proxy auto-config (PAC) file on endpoint redirects proxy aware
(HTTP and HTTPS) traffic to Prisma Access.
Before you begin, make sure you review the explicit proxy guidelines.
- Enable explicit proxy and allocate usersGo to Configuration NGFW and Prisma AccessConfiguration ScopePrisma AccessMobile Users to start setting up explicit proxy.
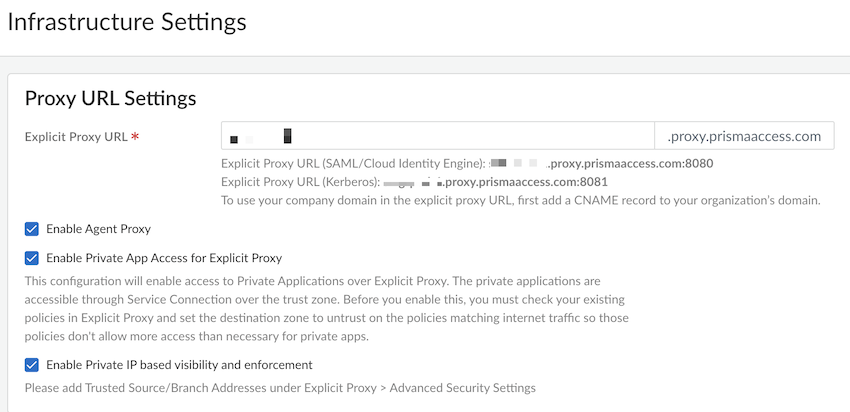
![]() With site-based license, only Explicit Proxy Connection is available.Add the proxy settings which mobile users will use to connect to Prisma AccessGo to the Infrastructure Settings.
With site-based license, only Explicit Proxy Connection is available.Add the proxy settings which mobile users will use to connect to Prisma AccessGo to the Infrastructure Settings.![]()
- Specify an explicit proxy URL.By default, the name is proxyname.proxy.prismaaccess.com, where proxyname is the subdomain you specify, and uses port 8080. To use your company domain in the explicit proxy URL, add a CNAME record to your organization’s domain.You can use SAML or Kerberos authentication types to authenticate mobile users.(Optional) Enable the following options as per your configuration requirement. These options are available only with Mobile User license.
- Enable Agent Proxy to enable the
agent-based proxy functionality.
- Enable Private App Access for Explicit Proxy to enable access to private applications over explicit proxy.
- Enable Private IP based visibility and enforcement to enable the private IP visibility.
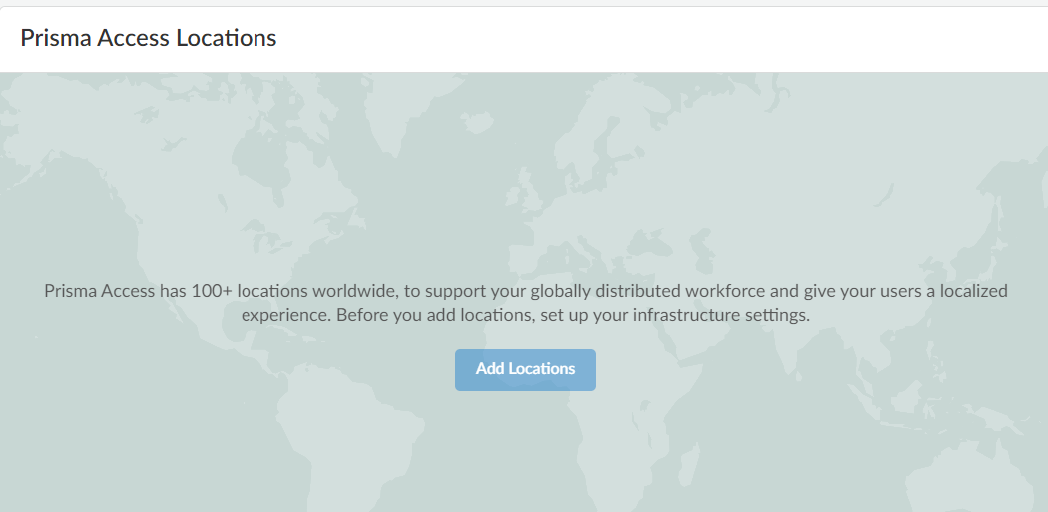
Choose the Prisma Access location to which your mobile users will connectAdd the Prisma Access locations where you want to support mobile users.![]() The map displays the Prisma Access locations.For the best user experience, if you are limiting the number of locations, choose locations that are closest to your users or in the same country as your users. If a location is not available in the country where your mobile users reside, choose a location that is closest to your users for the best performance.You should enable explicit proxy locations in at least two regions to ensure regional redundancy.Authenticate mobile usersSet up User Authentication so that only legitimate users have access to your services and applications.SAML and Kerberos are the supported authentication protocols for PAC based deployments. Prisma Access supports PingOne, Azure AD, and Okta as SAML authentication providers, but you should be able to use any vendor that supports SAML 2.0 as a SAML identity provider (IdP). Learn more on how to Enable Mobile Users to Authenticate to Prisma Access.Review the best practice security rules that are turned on by defaultPrisma Access enforces best practice security policy rules by default. These rules allow your users to securely browse to general internet sites. Users are:
The map displays the Prisma Access locations.For the best user experience, if you are limiting the number of locations, choose locations that are closest to your users or in the same country as your users. If a location is not available in the country where your mobile users reside, choose a location that is closest to your users for the best performance.You should enable explicit proxy locations in at least two regions to ensure regional redundancy.Authenticate mobile usersSet up User Authentication so that only legitimate users have access to your services and applications.SAML and Kerberos are the supported authentication protocols for PAC based deployments. Prisma Access supports PingOne, Azure AD, and Okta as SAML authentication providers, but you should be able to use any vendor that supports SAML 2.0 as a SAML identity provider (IdP). Learn more on how to Enable Mobile Users to Authenticate to Prisma Access.Review the best practice security rules that are turned on by defaultPrisma Access enforces best practice security policy rules by default. These rules allow your users to securely browse to general internet sites. Users are:- Blocked from visiting known bad websites based on URL
- Blocked from uploading or downloading files that are known to be malicious
- Protected from unknown, never-before-seen threats
- Protected from viruses, spyware (command and control attacks), and vulnerabilities
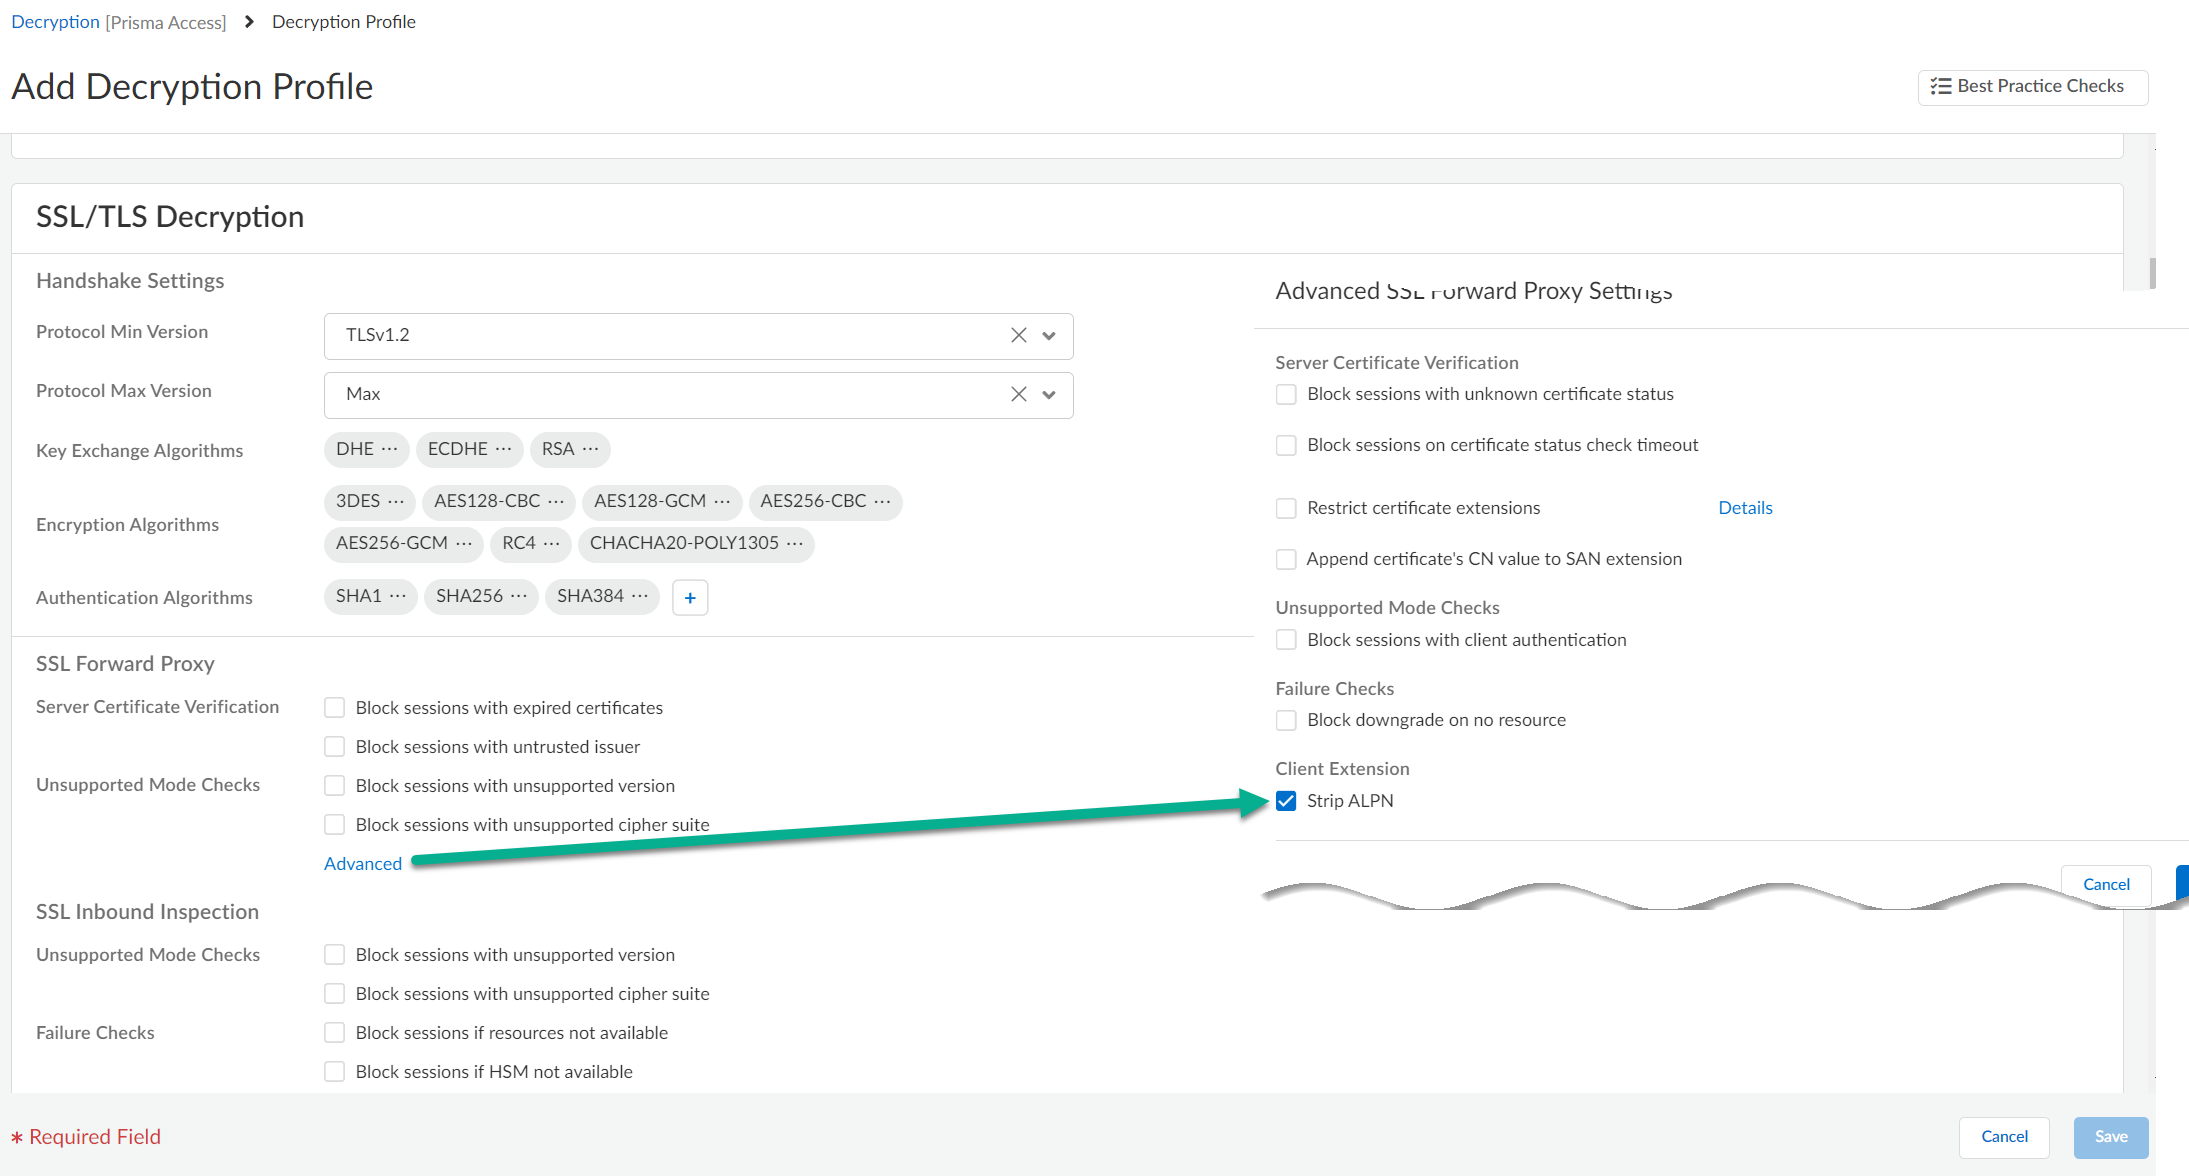
After going through the initial setup, you can review and update these default rules to meet your enterprise needs.Verify that the mobile users location is activeAfter you push your initial configuration to Prisma Access, Prisma Access begins provisioning your mobile user environment. This can take up to 15 minutes. When your mobile user locations are up and running, you’ll be able to verify them on the Mobile Users setup pages, the Overview, and within Insights.You can also validate your setup by selecting ConfigurationNGFW and Prisma AccessConfiguration ScopePrisma AccessExplicit ProxyInfrastructure Settings and confirm a gateway is set up in each of the locations you provisioned.Enable decryption for explicit proxy traffic- Set the maximum supported TLS version to 1.2.
- Set Strip ALPN (Advanced SSL Forward Proxy settings) because explicit proxy does not support native HTTP/2, and you must remove the ALPN headers.
![]()
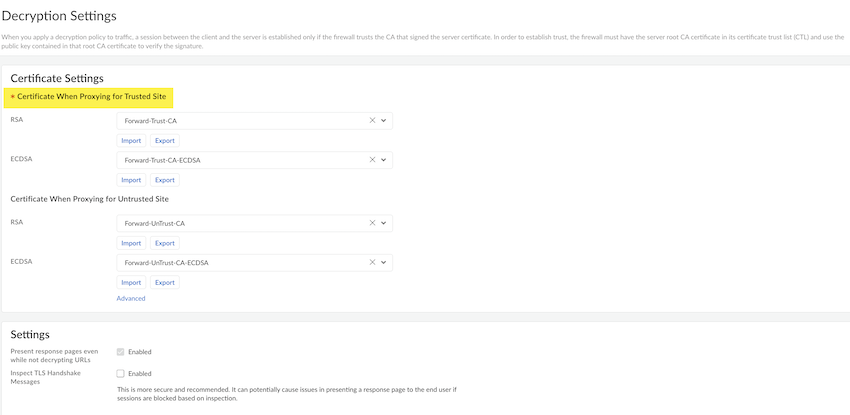
- To add the SSL-decrypt forward-trust certificate:
- Go to Decryption Settings and select the settings icon.
- Select the predefined certificate from the drop down list to add RSA and ECDSA for the Trusted Site.
- (Optional) You can add RSA and ECDSA for the Untrusted Site.
- Select Save and Push
Config to push the configuration.
![]()
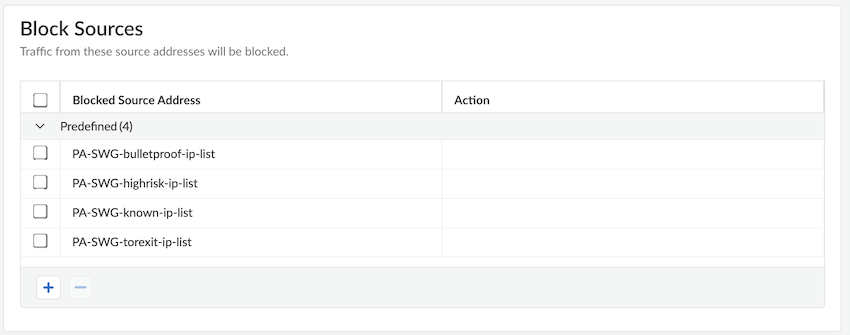
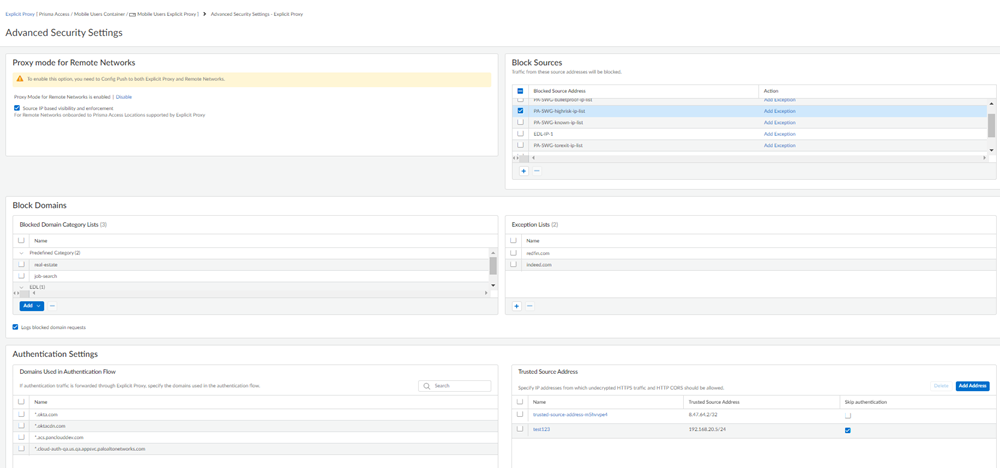
Download the root CA and install it on your endpoint for SSL decryption.Edit PAC file. Use Forwarding Profiles to manage PAC files.Configure Advanced Security Settings.- Specify Block Sources.Add any source IP address traffic that should be blocked to the Block Source Address list.
![]() Specify an address, address group, or EDL.To exclude IP address list entries from enforcement, Add Exception and select the IP addresses to exclude from being blocked.
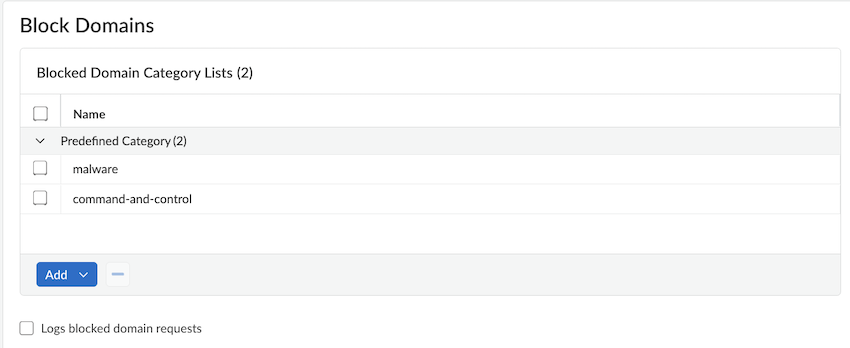
Specify an address, address group, or EDL.To exclude IP address list entries from enforcement, Add Exception and select the IP addresses to exclude from being blocked. - Specify Blocked Domains.Specify the domains or domain categories for malicious websites, or for any websites that you do not want users to access. Prisma Access prevents users from accessing the URLs and IP addresses you specify in this area when users initiate an HTTP GET (for unencrypted requests) or HTTP CONNECT (for encrypted requests). Users receive a block page when they attempt to access blocked websites.
![]()
- If you want to exempt any domains that are included in a blocked domain category list, specify them in the Exception List.
![]() Any domains that are entered are exempted from being blocked, even if they appear in a domain category that you have blocked.
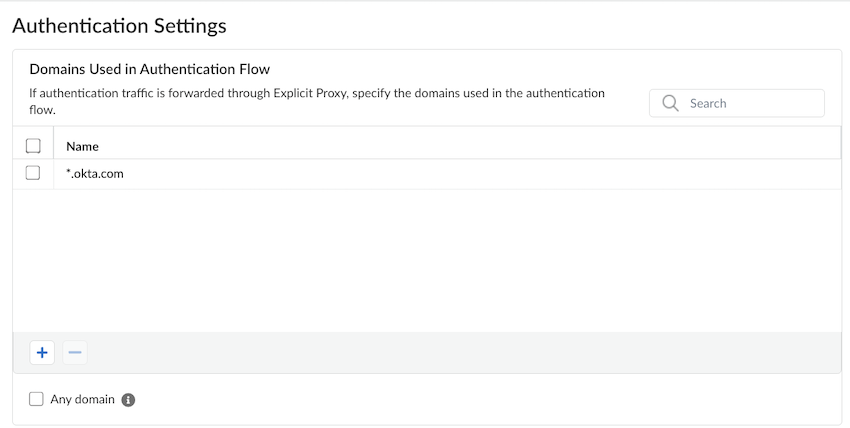
Any domains that are entered are exempted from being blocked, even if they appear in a domain category that you have blocked. - Explicit proxy requires decryption to authenticate users. Enter the Domains Used in Authentication Flow.
![]()
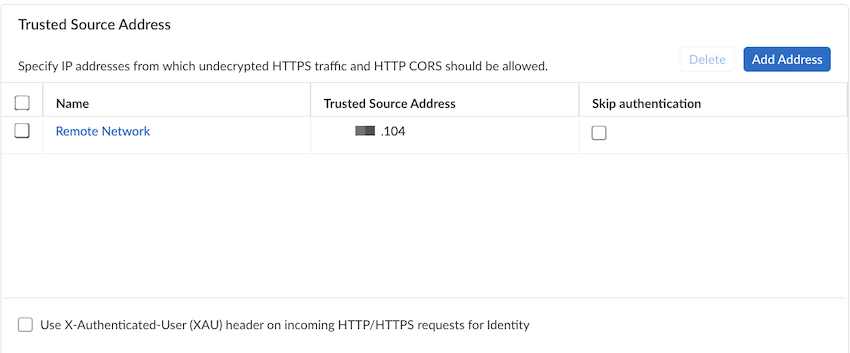
- Enter any IP addresses from which undecrypted HTTPS or HTTP cross-origin resource sharing (CORS) traffic can be allowed to the Trusted Source Address.
![]()
- To bypass authentication
of any trusted source addresses you entered, select Skip
authentication.You can use Skip authentication with Source IP based visibility and enforcement to Skip authentication of headless systems that can't authenticate, set up security policies, and get visibility of the traffic on Prisma Access explicit proxy.You can add either IP addresses or subnets. A maximum of 200,000 IP addresses are supported after expanding the subnets.If you select Skip authentication to skip authentication for an address object, and then later want to enable authentication by deselecting Skip authentication for that address object, it can take up to 24 hours for the change to take effect after you make the change and Commit and Push your changes.
- If you have an explicit proxy deployment and have added a list of trusted source IP addresses, you can Use X-Authenticated-User (XAU) headers on incoming HTTP/HTTPS requests for identity. Use this functionality to allow users that are logged in from another proxy that use XAU headers for authentication.You must Save for the XAU setting to take effect.
![]()


