Prisma Access
Integrate Prisma Access with Cisco Meraki SD-WAN
Table of Contents
Integrate Prisma Access with Cisco Meraki SD-WAN
| Where Can I Use This? | What Do I Need? |
|---|---|
|
|
Prisma Access provides a flexible way to effectively secure Cisco Meraki SD-WAN
deployments. By delivering security from the cloud and closer to the branch
networks, Prisma Access lets you optimize networking and security with the same
protections that you have at corporate headquarters.
As with other SD-WAN deployments, you secure the Cisco Meraki SD-WAN by onboarding a
remote network using IPSec tunnels between the Cisco Meraki SD-WAN and Prisma
Access. Using Prisma Access, you can secure SD-WAN devices at a branch, at a data
center, or both, as shown in the topic Integrate Third-Party SD-WANs with
Prisma Access.
You can onboard a remote network using IPSec tunnels between the Cisco Meraki SD-WAN
device and Prisma Access automatically or manually. See the product requirements
below for eligible devices that support this automation. The automation also
supports devices in MX Warm Spare – high-availability pair mode. To onboard the
Cisco Meraki networks manually, see Integrate Prisma Access with Cisco Meraki SD-WAN (Manual Integration). Ensure you meet the following
requirements before you integrate Prisma Access with Cisco Meraki:
| Product | Requirement |
|---|---|
|
Prisma Access
|
|
|
Cisco Meraki
|
|
To secure a Cisco Meraki SD-WAN with Prisma Access, complete the following steps.
- Configure Cisco Meraki SD-WAN based on the requirements mentioned above.If you have not already, allocate bandwidth for Prisma Access locations.
- Go to .Edit the Assigned Bandwidth for the remote network’s compute location.Push the changes.Go to Cisco Meraki Integration with Prisma Access settings.
- Select .Locate the Cisco Meraki Integration with Prisma Access application.Contact your Palo Alto Networks account team if you don’t see this integration option.
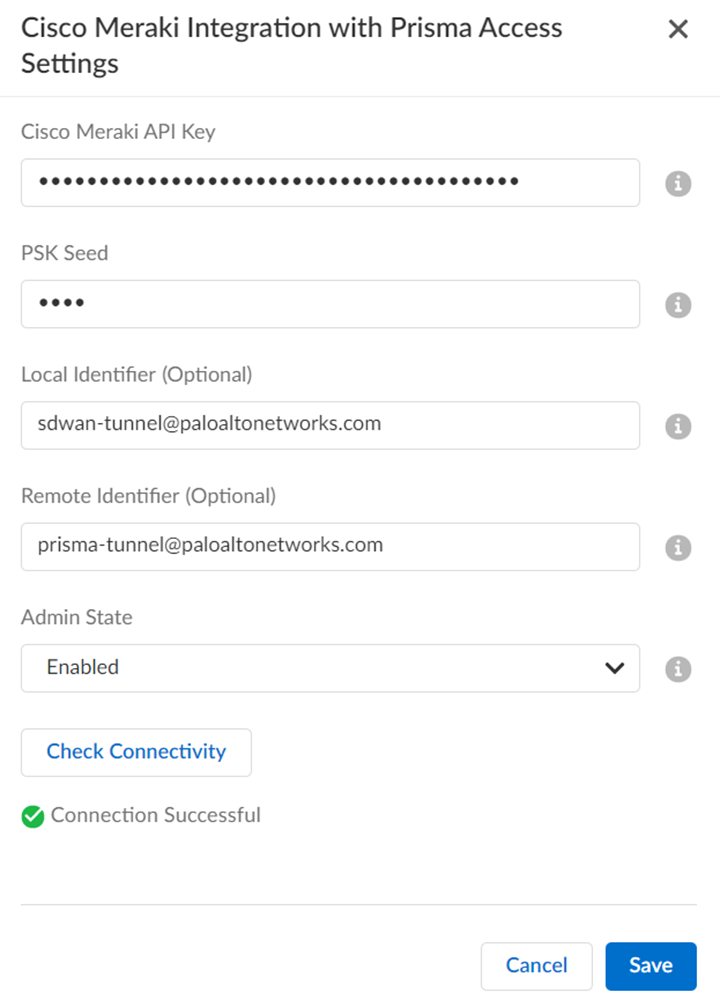
![]() Enter the information needed to establish a connection between Prisma Access and Cisco Meraki by editing the Settings.
Enter the information needed to establish a connection between Prisma Access and Cisco Meraki by editing the Settings.- Generate Cisco Meraki API Key in Cisco Meraki dashboard, and enter the key information.Enter the PSK Seed, which is a string used to derive pre-shared keys (PSKs) per tunnel.(Optional) Enter an FQDN IKE identifier as the Local Identifier in the following syntax: name@domain.comThis identifier acts as a template to generate a unique ID per tunnel.(Optional) Enter an FQDN IKE identifier different from the local identifier as the Remote Identifier in the following syntax: name@domain.comSet the Admin State as Enabled.You can set Admin State in the following modes:
- Enabled: Enables the integration to discover new networks on Cisco Meraki that are eligible for tunnel formation with Prisma Access. Additionally, this verifies current configurations.
- Disabled: Disable the integration to remove all configurations created, in Prisma Access as well as in Cisco Meraki, when a connection was set up between them.
- Paused: When you pause the integration, you can no longer add new networks or remove any unconfigured networks. However, the current configurations don't change.
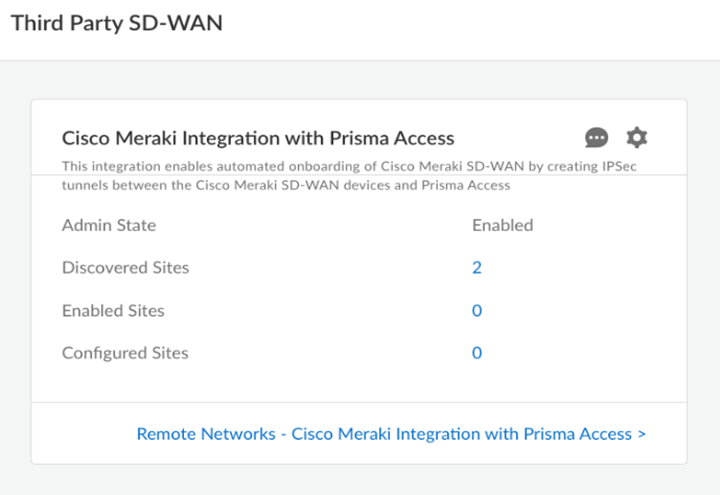
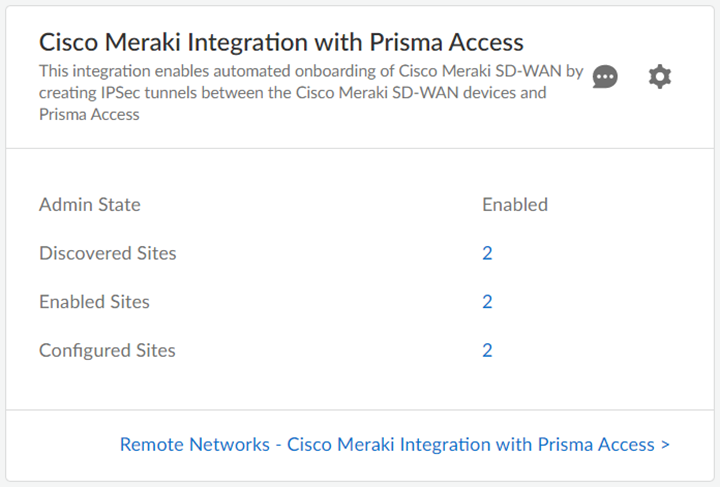
Check Connectivity to verify the connection.Save the changes.You can Save changes only after you Check Connectivity every time you change settings or configurations.![]() After you save the changes, you can see the Cisco Meraki networks eligible for tunnel formation with Prisma Access in Discovered Sites. Cisco Meraki networks are displayed as sites here. It might take some time to view the discovered sites.
After you save the changes, you can see the Cisco Meraki networks eligible for tunnel formation with Prisma Access in Discovered Sites. Cisco Meraki networks are displayed as sites here. It might take some time to view the discovered sites.![]() Establish the tunnel setup between Prisma Access and Cisco Meraki devices.
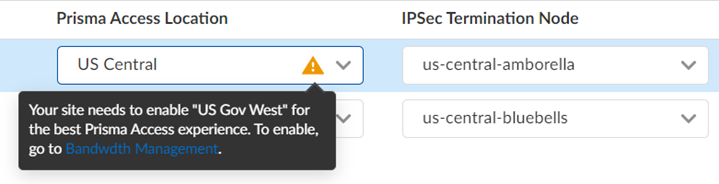
Establish the tunnel setup between Prisma Access and Cisco Meraki devices.- View the discovered Cisco Meraki networks and their information by clicking the site count.The integration checks every 15 minutes for new Cisco Meraki networks. You can also initiate an on-demand site discovery.(Optional) Select the nearest Prisma Access Location for the networks.(Optional) Select IPSec Termination Node for each site.If you select the same Prisma Access location for multiple networks, ensure to allocate the bandwidth equally by selecting different IPSec termination nodes for the networks sharing the same Prisma Access location.The integration assigns Prisma Access location and IPSec termination nodes automatically. However, you can choose other Prisma Access locations or IPSec termination nodes if needed.
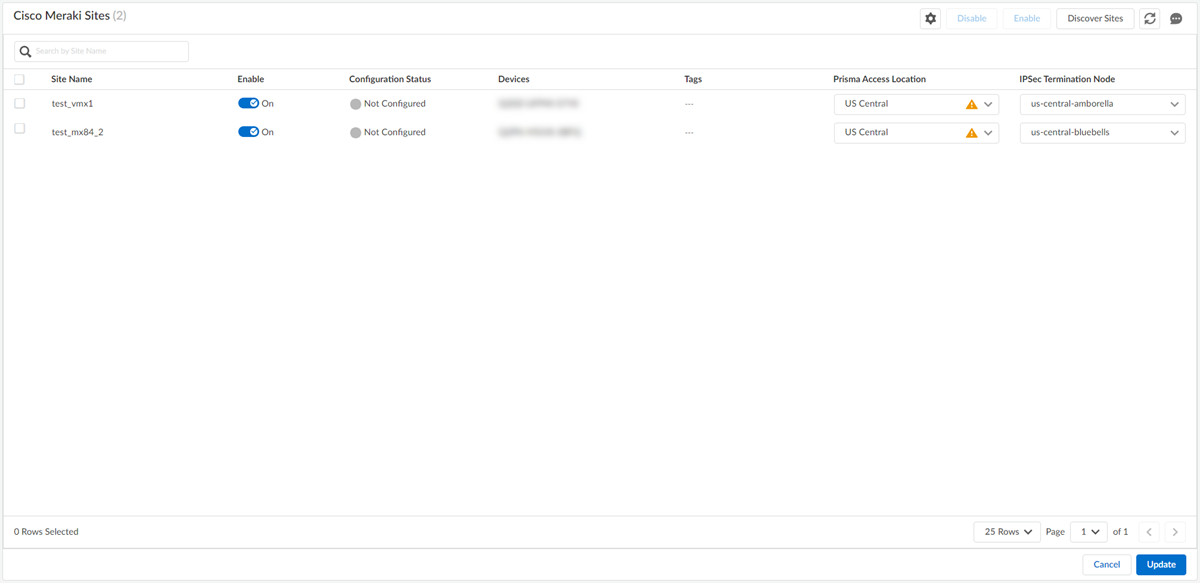
![]() Select the Cisco Meraki network and toggle the Enable option to establish a tunnel formation with Prisma Access.Update the changes.You can view all the Enabled Sites and Configured Sites in the Cisco Meraki Integration with Prisma Access application.
Select the Cisco Meraki network and toggle the Enable option to establish a tunnel formation with Prisma Access.Update the changes.You can view all the Enabled Sites and Configured Sites in the Cisco Meraki Integration with Prisma Access application.![]()
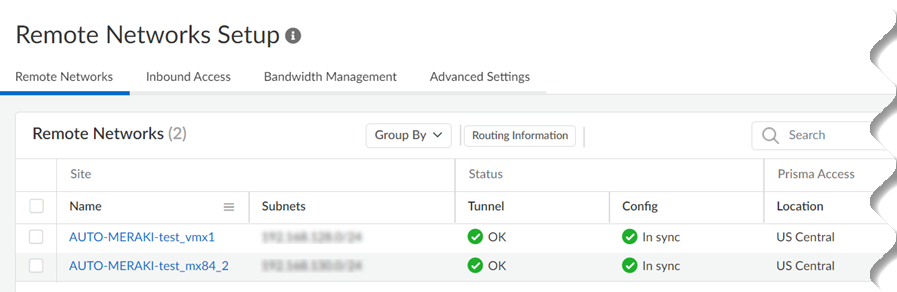
![]() Verify the changes in Prisma Access.
Verify the changes in Prisma Access.- Go to .Alternatively, you can click Remote Networks - Cisco Meraki Integration with Prisma Access >.Verify the tunnel status. The integration creates remote networks automatically. Such remote networks have names in the following syntax: AUTO-Meraki-Network_Name
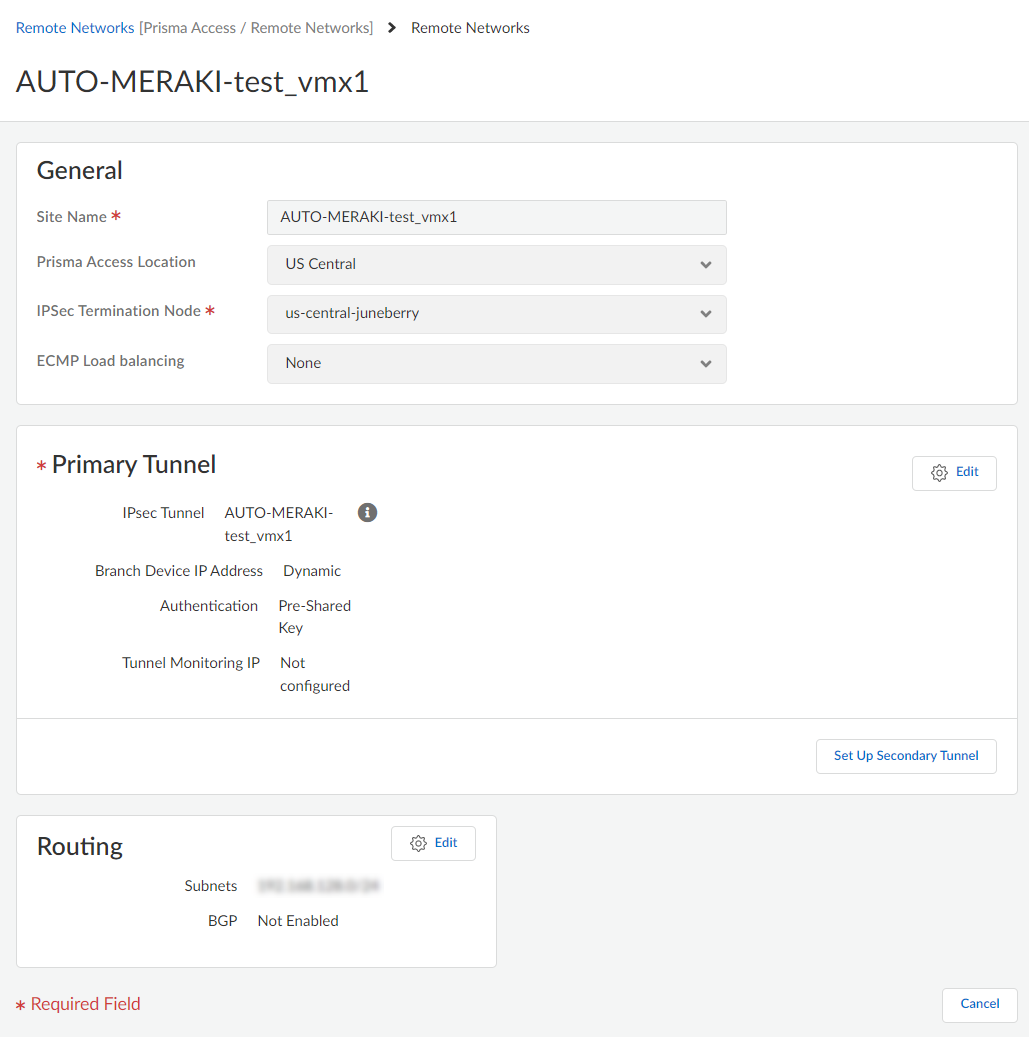
![]() The configuration status of Cisco Meraki networks will be In sync.View the IPSec Tunnel, IKE gateway, IKE Crypto profile, and IPSec Crypto profile details.Select the remote network site to view these details.
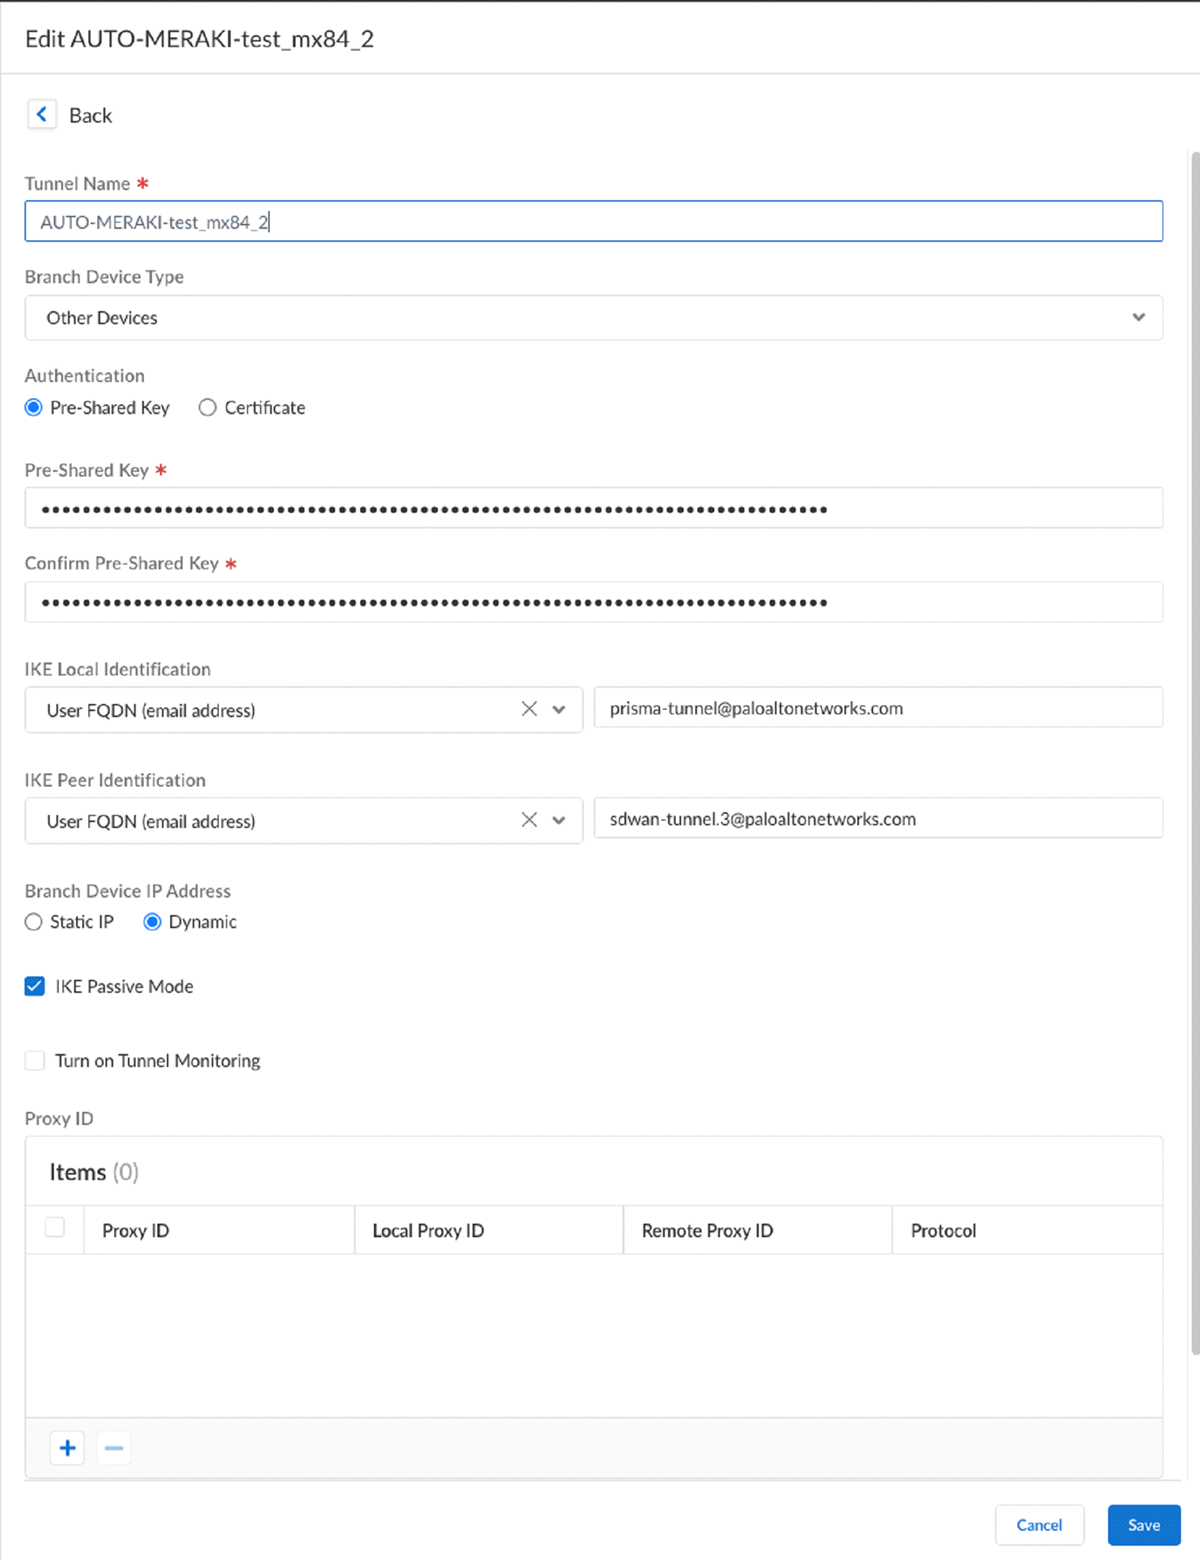
The configuration status of Cisco Meraki networks will be In sync.View the IPSec Tunnel, IKE gateway, IKE Crypto profile, and IPSec Crypto profile details.Select the remote network site to view these details.![]() IPSec Tunnel details:
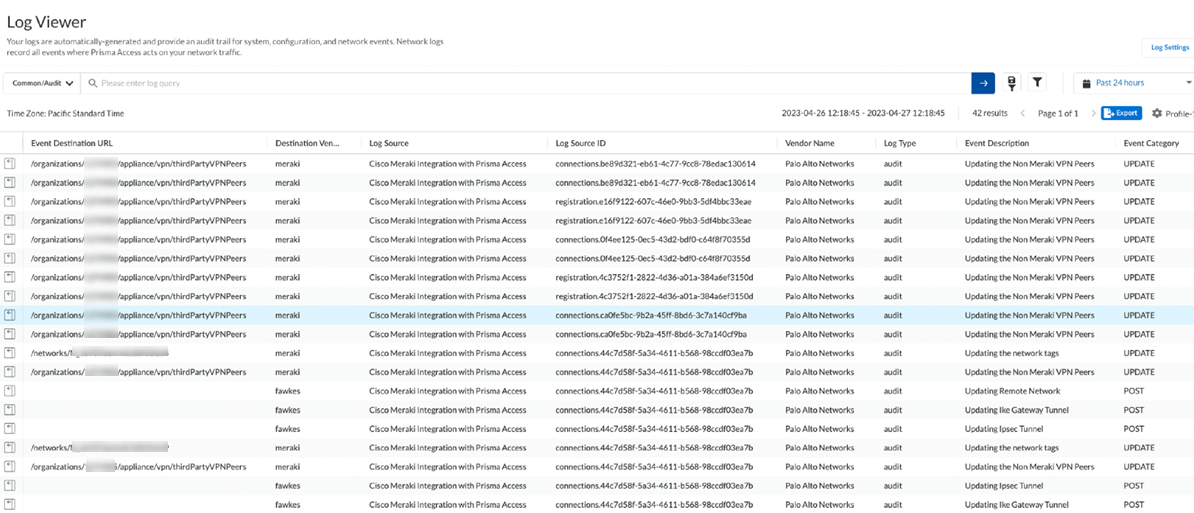
IPSec Tunnel details:![]() Select to view Cisco Meraki Integration with Prisma Access logs.The Destination Vendor specifies if the changes were made in Prisma Access or in the Cisco Meraki dashboard.
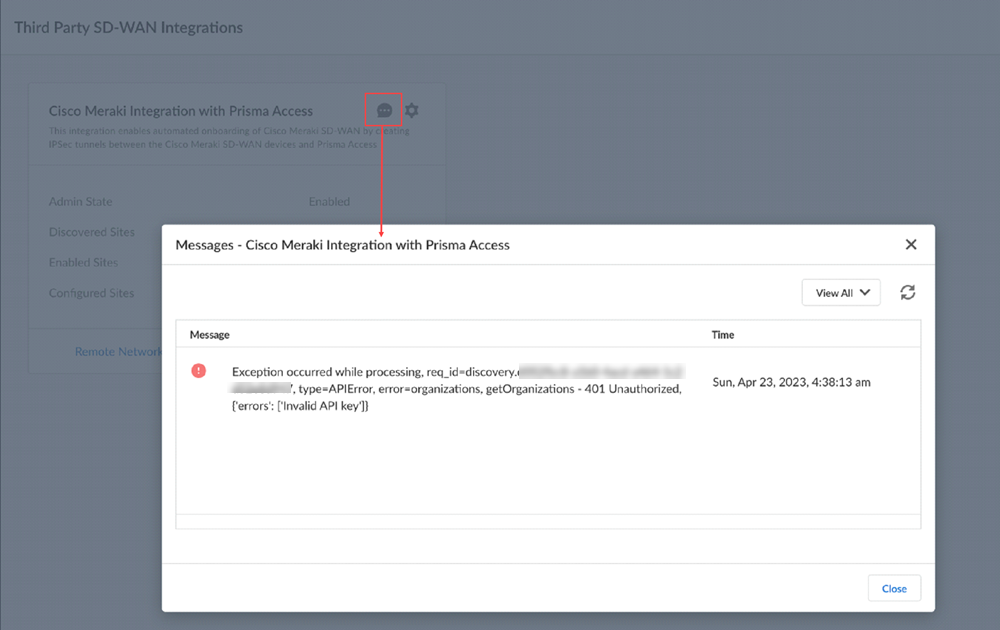
Select to view Cisco Meraki Integration with Prisma Access logs.The Destination Vendor specifies if the changes were made in Prisma Access or in the Cisco Meraki dashboard.![]() (Optional) View errors or warnings in Messages.
(Optional) View errors or warnings in Messages.![]() Verify the tunnel status in the Cisco Meraki dashboard.
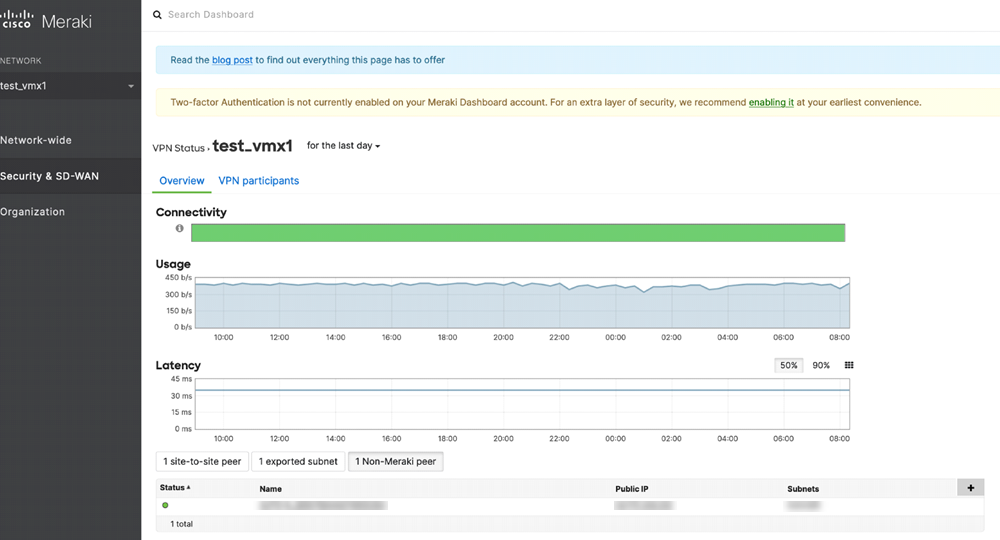
Verify the tunnel status in the Cisco Meraki dashboard.- Log in to the dashboard, and select .Check the status for non-Meraki peer.
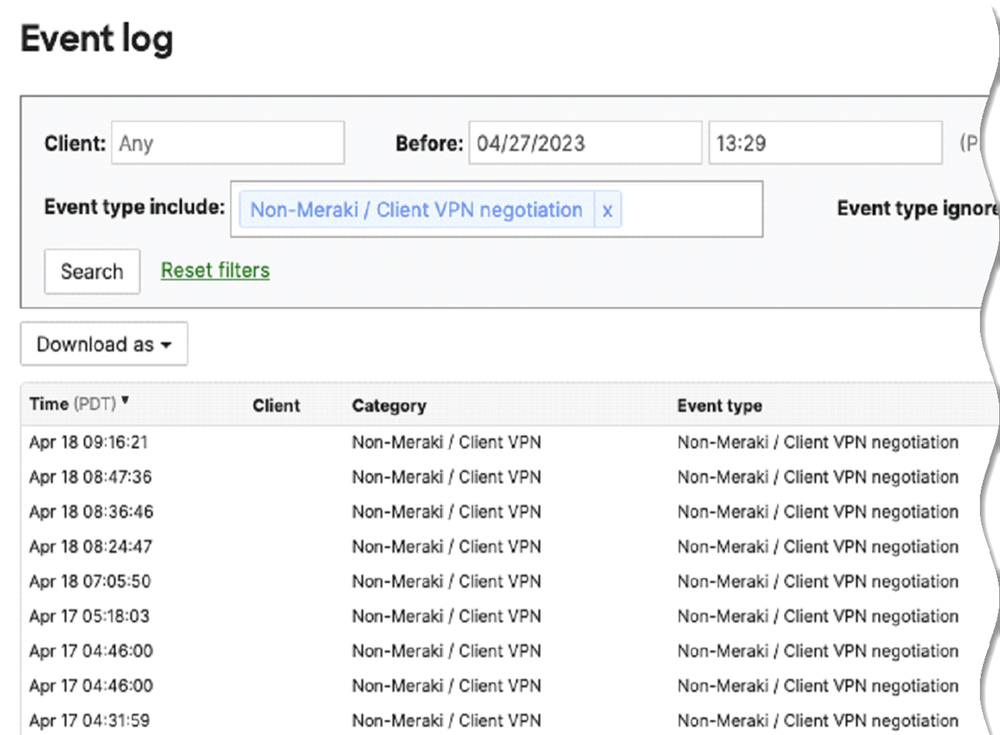
![]() View the logs under for non-Meraki event types.
View the logs under for non-Meraki event types.![]() Contact Cisco Systems support for any errors you see in the Cisco Meraki networks and dashboard.
Contact Cisco Systems support for any errors you see in the Cisco Meraki networks and dashboard.On-Demand Site Discovery
You can initiate network discoveries anytime to view new networks added in the Cisco Meraki dashboard. You can also initiate network discoveries to resolve any misconfiguration in the integration-created objects. To initiate on-demand network discovery, perform the following steps: - Select .Locate the Cisco Meraki Integration with Prisma Access application.View the discovered Meraki networks and their information by clicking the site count.Discover Sites to identify new eligible Cisco Meraki networks when required.