Prisma Access
Configure ADFS as a SAML Provider for Mobile Users
Table of Contents
Expand All
|
Collapse All
Prisma Access Docs
-
- 6.1 Preferred and Innovation
- 6.0 Preferred and Innovation
- 5.2 Preferred and Innovation
- 5.1 Preferred and Innovation
- 5.0 Preferred and Innovation
- 4.2 Preferred
- 4.1 Preferred
- 4.0 Preferred
- 3.2 Preferred and Innovation
- 3.1 Preferred and Innovation
- 3.0 Preferred and Innovation
- 2.2 Preferred
-
-
- 4.0 & Later
- Prisma Access China
-
-
Configure ADFS as a SAML Provider for Mobile Users
| Where Can I Use This? | What Do I Need? |
|---|---|
|
|
This section describes the steps you perform to integrate Prisma Access with Active
Directory Federation Services (ADFS) 4.0 as a Security Assertion Markup Language
(SAML) identity provider.
Prisma Access users provides enterprise authentication via SAML. When a mobile user
attempts to connect, Prisma Access, acting as the SAML service provider, or SP,
returns an authentication request to the client browser, which in turn sends it to
your SAML identity provider (IdP) to authenticate the user. Use the following
procedure to configure a trust relationship between Prisma Access and your Active
Directory Federation Services (ADFS) 4.0 IdP.
Before you start this procedure, make sure that the ADFS server has the following
prerequisites:
- Check that you can navigate to your AD FS namespace’s initiated sign-on page. The URL is in the format https://<namespace><adfs-server-hostname>/adfs/ls/idpinitiatedsignon.aspx, where <namespace> is the namespace for the ADFS server (either adfs. or, if you use the Secure Token Service (STS), sts.) and <adfs-server-hostname> is the host name for the ADFS server.An example URL is https://adfs.hooli.com/adfs/ls/idpinitiatedsignon.aspx.
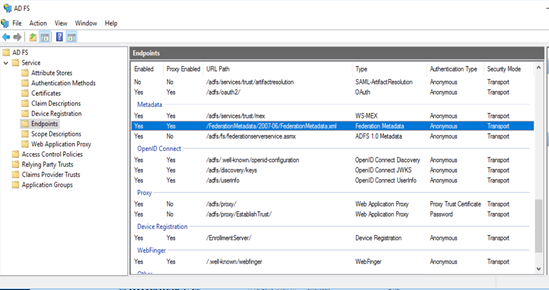
- Make sure that you downloaded the federation metadata XML file to a local machine. You must import this file into Panorama to complete the SAML identity provider configuration.To download this file, start AD FS Management on the server running ADFS, then select AD FSServiceEndpoints and find the URL to download the file. The URL is in the format https://<adfs-server-hostname>/FederationMetadata/2007-06/FederationMetadata.xml, where <adfs-server-hostname> is the host name for the ADFS server.
![]()
Configure ADFS as a SAML Provider for Mobile Users (Strata Cloud Manager)
Configure Prisma Access to establish a trust relationship between Prisma Access and
your ADFS IdP for SAML 2.0 to enable authentication for your mobile users.
Before you begin, make sure that you can navigate to your AD FS namespace’s initiated
sign-on page. The URL is in the format
https://<namespace><adfs-server-hostname>/adfs/ls/idpinitiatedsignon.aspx,
where <namespace> is the namespace for the ADFS server (either
adfs. or, if you use the Secure Token Service (STS), sts.) and
<adfs-server-hostname> is the host name for the ADFS
server. An example URL is
https://adfs.acme.com/adfs/ls/idpinitiatedsignon.aspx.
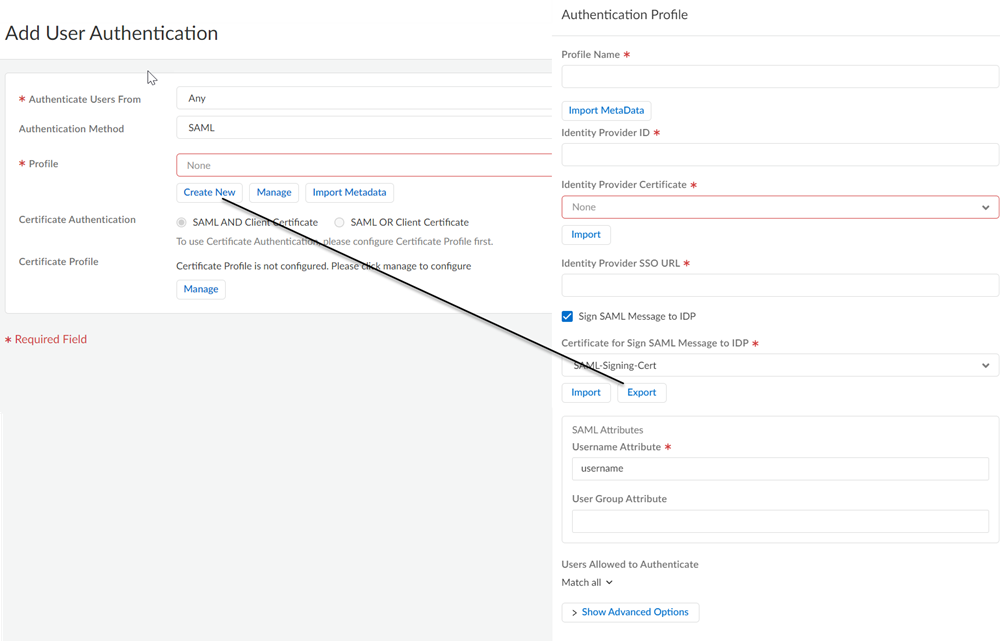
- Enable Mobile Users to Authenticate to Prisma Access.Complete the steps for defining the Service Provider (SP) settings, including generating or importing the certificate that Prisma Access uses to sign SAML messages that it sends to the identity provider (IdP).Export the Prisma Access signing certificate so that you can import it onto your IdP.
![]() Add each Prisma Access portal and gateway as a Relying Party Trust to the Windows server.
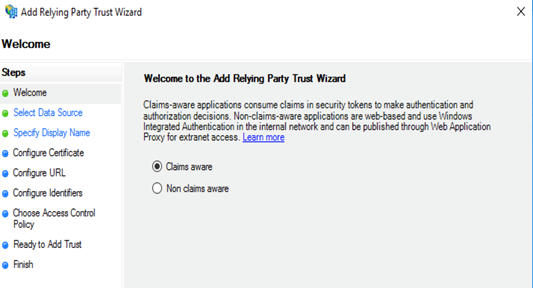
Add each Prisma Access portal and gateway as a Relying Party Trust to the Windows server.- On the server running AD FS, start AD FS Management.In the Navigation Pane, expand Trust Relationships, and then select Relying Party Trusts.On the Actions menu located in the right column, select Add Relying Party Trust.In the Add Relying Party Trust Wizard page, select Claims aware and click Start.
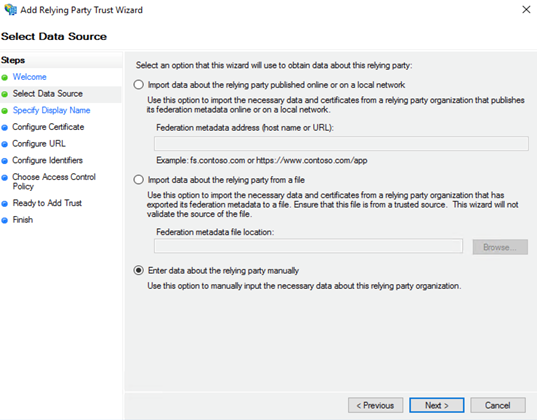
![]() In the Select Data Source page, select Enter data about the relying party manually and click Next.
In the Select Data Source page, select Enter data about the relying party manually and click Next.![]() In the Specify Display Name page, enter the name for the first relying party (one of the IP addresses in the list of security processing nodes you exported from Prisma Access) and click Next.This example specifies one of the security processing nodes from Prisma Access as a relying party.
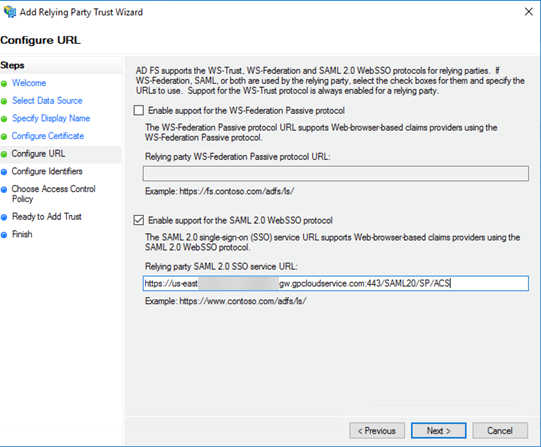
In the Specify Display Name page, enter the name for the first relying party (one of the IP addresses in the list of security processing nodes you exported from Prisma Access) and click Next.This example specifies one of the security processing nodes from Prisma Access as a relying party.![]() In the Configure URL page, enter the SAML single sign-on URL you configured for Prisma Access and then click Next.The URL is in the format https://<prisma-access-hostname>:433/SAML20/SP/ACS, where <prisma-access-hostname> is the name of the Prisma Access gateway you are configuring as a relying party trust.
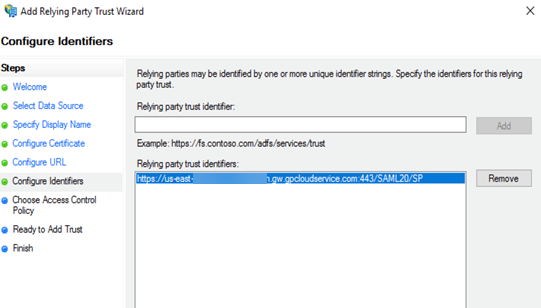
In the Configure URL page, enter the SAML single sign-on URL you configured for Prisma Access and then click Next.The URL is in the format https://<prisma-access-hostname>:433/SAML20/SP/ACS, where <prisma-access-hostname> is the name of the Prisma Access gateway you are configuring as a relying party trust.![]() In the Configure Identifiers page, enter the relying party trust identifier for Prisma Access and then click Next.The relying party trust identifier URL is in the format https://<prisma-access-hostname>:443/SAML20/SP, where <prisma-access-hostname> is the name of the Prisma Access security processing node you are configuring as a relying party trust.
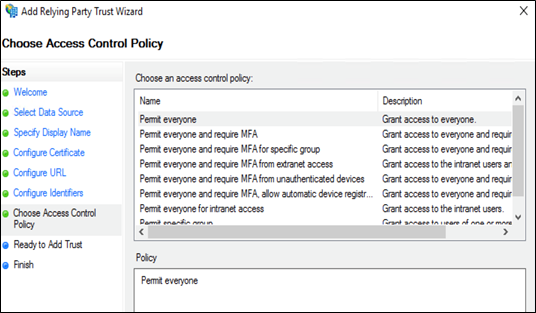
In the Configure Identifiers page, enter the relying party trust identifier for Prisma Access and then click Next.The relying party trust identifier URL is in the format https://<prisma-access-hostname>:443/SAML20/SP, where <prisma-access-hostname> is the name of the Prisma Access security processing node you are configuring as a relying party trust.![]() In the Choose Access Control Policy page, leave the Policy as Permit everyone and click Next.
In the Choose Access Control Policy page, leave the Policy as Permit everyone and click Next.![]() Click Finish.ADFS adds a new Relying Party Trusts entry.
Click Finish.ADFS adds a new Relying Party Trusts entry.![]() Add a rule to the relying party trust you created.
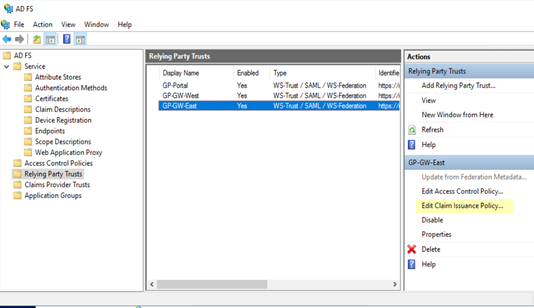
Add a rule to the relying party trust you created.- In the Relying Party Trusts page, find the Prisma Access node you just added in the selections on the right, then select Edit Claim Issuance Policy.
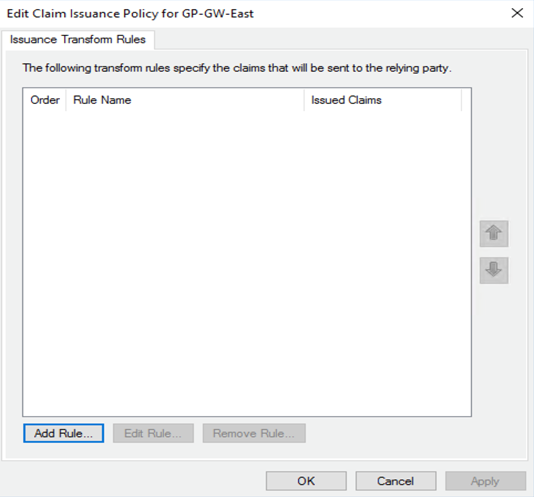
![]() In the Edit Claim Issuance Policy page, click Add Rule.
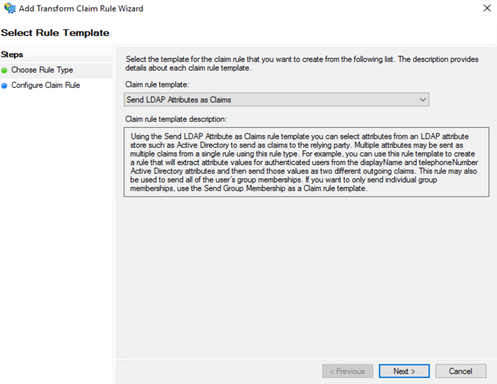
In the Edit Claim Issuance Policy page, click Add Rule.![]() In the Select Rule Template page, select Send LDAP attributes as Claims as the Claim rule template and click Next.
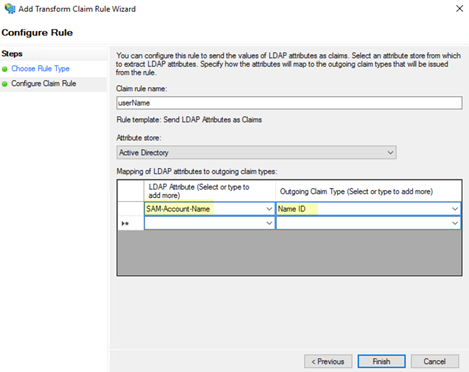
In the Select Rule Template page, select Send LDAP attributes as Claims as the Claim rule template and click Next.![]() In the Configure Rule window, add an LDAP Attribute of SAM-Account-Name and an Outgoing Claim Type of Name ID.By default, the Prisma Access security processing nodes expect the username attribute in the SAML response from the Identity Provider (IdP).
In the Configure Rule window, add an LDAP Attribute of SAM-Account-Name and an Outgoing Claim Type of Name ID.By default, the Prisma Access security processing nodes expect the username attribute in the SAML response from the Identity Provider (IdP).![]() Click Apply then click OK.
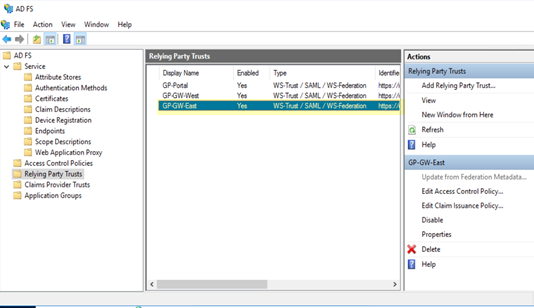
Click Apply then click OK.![]() The Prisma Access node displays in the list of Relying Party Trusts.
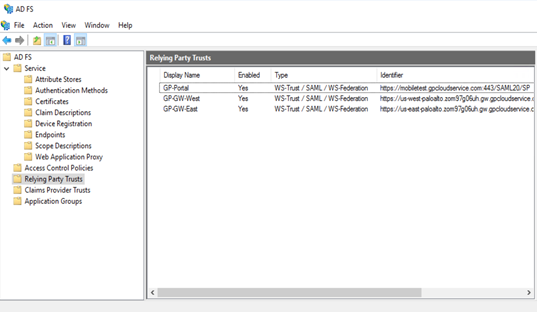
The Prisma Access node displays in the list of Relying Party Trusts.![]() Add the remaining security processing nodes in Prisma Access as Relying Party Trusts.Download the federation metadata XML file and the ADFS CA certificate to a local machine for import into Prisma Access:
Add the remaining security processing nodes in Prisma Access as Relying Party Trusts.Download the federation metadata XML file and the ADFS CA certificate to a local machine for import into Prisma Access:- To download the metadata file, start AD FS Management on the server running ADFS, then select AD FSServiceEndpoints and find the URL to download the file. The URL is in the format https://<adfs-server-hostname>/FederationMetadata/2007-06/FederationMetadata.xml, where <adfs-server-hostname> is the host name for the ADFS server.If the certificate that the ADFS server uses to sign SAML responses is not signed by a well-known, third-party CA, export the CA certificate so that you can import it into Prisma Access.
![]() Import the metadata file and the CA certificate (if needed) from ADFS into Prisma Access.
Import the metadata file and the CA certificate (if needed) from ADFS into Prisma Access.- Log in to the Strata Cloud Manager on the hub and select ConfigureMobile UsersGo To Summary and Edit the Enterprise Authentication configuration.In SAML IdP Profile click Add SAML IdP Profile and Import the metadata file you exported from the ADFS server.Save the IdP profile.
Configure ADFS as a SAML Provider for Mobile Users (Panorama)
Make sure that ADFS is using an SSL certificate issued by a trusted certificate authority (CA). If the CA is self-signed and belongs to the organization, import the CA certificate into Panorama Certificate ManagementCertificatesImport) under the Mobile_User_Template.The examples in this section show the ADFS server being configured on Windows Server 2016.Configure ADFS on the ADFS Server
For ADFS to work with Prisma Access, you must add all configuration associated with mobile users as a Relying Party Trust. Add this information by completing the following steps.- Retrieve the list of URLs associated with the cloud-based portals and gateways.
- In Panorama, select PanoramaCloud ServicesStatus, then select Mobile Users.Copy the URLs of the Portals and Gateways that display.
![]() Add each Prisma Access portal and gateway as a Relying Party Trust to the Windows server.
Add each Prisma Access portal and gateway as a Relying Party Trust to the Windows server.- On the server running AD FS, start AD FS Management.In the Navigation Pane, expand Trust Relationships, and then select Relying Party Trusts.On the Actions menu located in the right column, select Add Relying Party Trust.In the Add Relying Party Trust Wizard page, select Claims aware and click Start.
![]() In the Select Data Source page, select Enter data about the relying party manually and click Next.
In the Select Data Source page, select Enter data about the relying party manually and click Next.![]() In the Specify Display Name page, enter the name for the first relying party (one of the Prisma Access gateways or portals) and click Next.This example specifies one of the cloud Gateways from Prisma Access as a relying party.
In the Specify Display Name page, enter the name for the first relying party (one of the Prisma Access gateways or portals) and click Next.This example specifies one of the cloud Gateways from Prisma Access as a relying party.![]() In the Configure URL page, enter the SAML single sign-on URL for the gateway; then click Next.The URL is in the format https://<gateway-hostname>:443/SAML20/SP/ACS, where <gateway-hostname> is the name of the Prisma Access gateway you are configuring as a relying party trust.
In the Configure URL page, enter the SAML single sign-on URL for the gateway; then click Next.The URL is in the format https://<gateway-hostname>:443/SAML20/SP/ACS, where <gateway-hostname> is the name of the Prisma Access gateway you are configuring as a relying party trust.![]() In the Configure Identifiers page, enter the relying party trust identifier for the gateway; then click Next.The relying party trust identifier URL is in the format https://<gateway-hostname>:443/SAML20/SP, where <gateway-hostname> is the name of the Prisma Access gateway you are configuring as a relying party trust.
In the Configure Identifiers page, enter the relying party trust identifier for the gateway; then click Next.The relying party trust identifier URL is in the format https://<gateway-hostname>:443/SAML20/SP, where <gateway-hostname> is the name of the Prisma Access gateway you are configuring as a relying party trust.![]() In the Choose Access Control Policy page, leave the Policy as Permit everyone and click Next.
In the Choose Access Control Policy page, leave the Policy as Permit everyone and click Next.![]() Click Finish.ADFS adds a new Relying Party Trusts entry.
Click Finish.ADFS adds a new Relying Party Trusts entry.![]() Add a rule to the relying party trust you created.
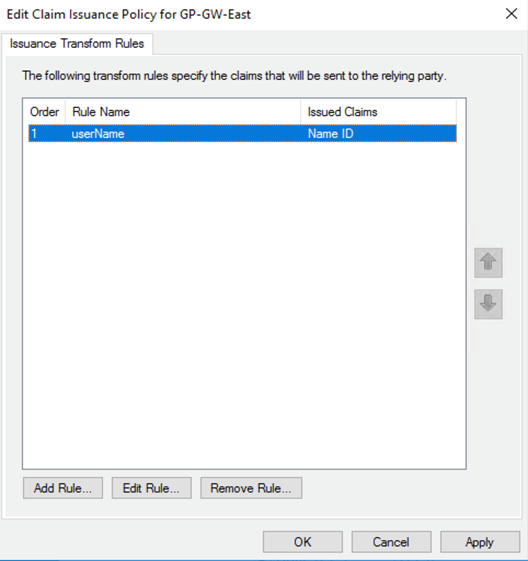
Add a rule to the relying party trust you created.- In the Relying Party Trusts page, find the gateway you just added in the selections on the right, then select Edit Claim Issuance Policy.
![]() In the Edit Claim Issuance Policy page, click Add Rule.
In the Edit Claim Issuance Policy page, click Add Rule.![]() In the Select Rule Template page, select Send LDAP attributes as Claims as the Claim rule template and click Next.
In the Select Rule Template page, select Send LDAP attributes as Claims as the Claim rule template and click Next.![]() In the Configure Rule window, add an LDAP Attribute of SAML-Account-Name and an Outgoing Claim Type of Name ID.By default, the Prisma Access portal and gateways expect to see the username attribute in the SAML response from the Identity Provider (IdP).
In the Configure Rule window, add an LDAP Attribute of SAML-Account-Name and an Outgoing Claim Type of Name ID.By default, the Prisma Access portal and gateways expect to see the username attribute in the SAML response from the Identity Provider (IdP).![]() Click Apply then click OK.
Click Apply then click OK.![]() The gateway displays in the list of Relying Party Trusts.
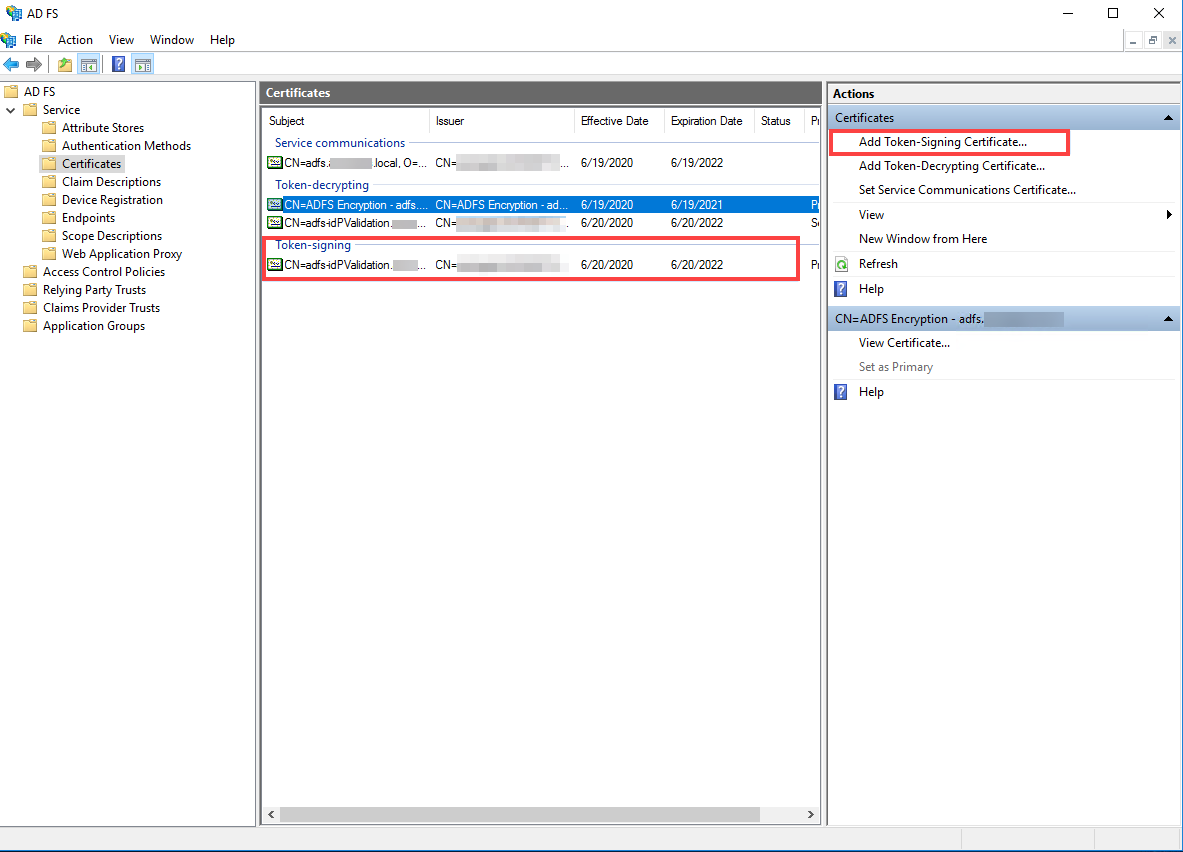
The gateway displays in the list of Relying Party Trusts.![]() (Optional) If you use a certificate issued by a Certificate Authority (CA), add it as a token signing certificate and enable IdP provider certificate validation on ADFS.
(Optional) If you use a certificate issued by a Certificate Authority (CA), add it as a token signing certificate and enable IdP provider certificate validation on ADFS.- Generate a certificate using your enterprise CA.Add the token signing certificate on ADFS.Use the instructions on the Microsoft website to add the certificate.
![]()
Configure ADFS on Panorama
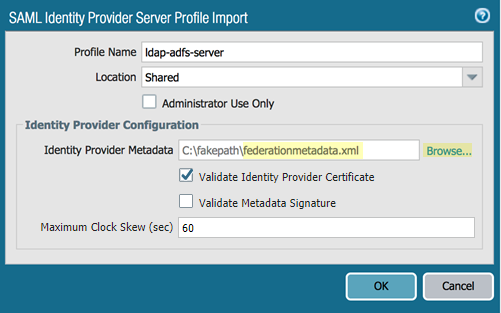
Complete ADFS configuration by performing the following steps in Panorama.- In Panorama, select DeviceServer ProfilesSAML Identity Provider.Make sure that you select Mobile_User_Template in the Templates area.Import a new SAML Identity Provider.
- Give the profile a Profile Name.Click Browse next to the Identity Provider Metadata field and import the federation metadata XML file you downloaded to your local machine.(Optional) If you configured a CA-issued certificate in Configure ADFS on the ADFS Server, select Validate Identity Provider Certificate.
![]() (Optional) if you are using a CA-issued certificate, import the certificate and create a certificate profile.
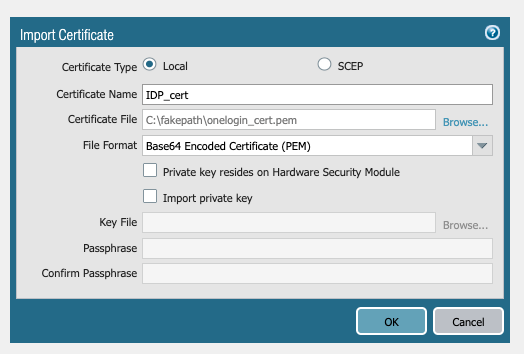
(Optional) if you are using a CA-issued certificate, import the certificate and create a certificate profile.- Select Certificate ManagementCertificates and Import the IdP root certificate into Panorama.
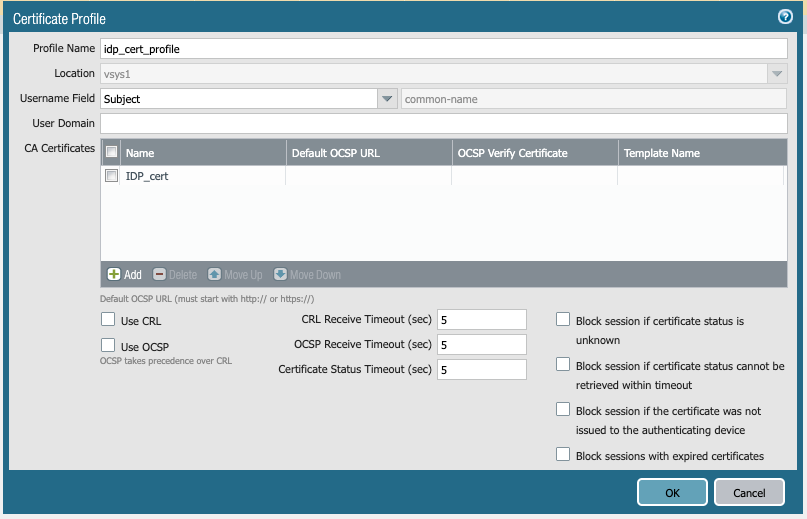
![]() Select DeviceDevice ManagementCertificate Management and Add a certificate profile; then, Add a CA Certificate, specifying the certificate you just imported.
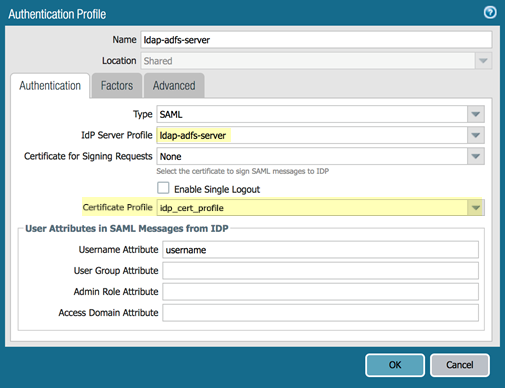
Select DeviceDevice ManagementCertificate Management and Add a certificate profile; then, Add a CA Certificate, specifying the certificate you just imported.![]() Select DeviceAuthentication Profile and Add a new Authentication Profile, specifying the following options:
Select DeviceAuthentication Profile and Add a new Authentication Profile, specifying the following options:- Select the server type as SAML
- (Optional) If you configured a CA-issued certificate in Configure ADFS on the ADFS Server, select the Certificate Profile that you created for the certificate; otherwise, leave the default of None.
Leave the other fields unchanged.![]() After you add the authentication profile, you can use it with portal and gateway authentication.To check authentication-related messages in the system logs, use a filter of subtype eq auth.
After you add the authentication profile, you can use it with portal and gateway authentication.To check authentication-related messages in the system logs, use a filter of subtype eq auth.

