Prisma Access
Set Up Explicit Proxy (Panorama)
Table of Contents
Expand All
|
Collapse All
Prisma Access Docs
-
- 6.1 Preferred and Innovation
- 6.0 Preferred and Innovation
- 5.2 Preferred and Innovation
- 5.1 Preferred and Innovation
- 5.0 Preferred and Innovation
- 4.2 Preferred
- 4.1 Preferred
- 4.0 Preferred
- 3.2 Preferred and Innovation
- 3.1 Preferred and Innovation
- 3.0 Preferred and Innovation
- 2.2 Preferred
-
-
- 4.0 & Later
- Prisma Access China
-
-
Set Up Explicit Proxy (Panorama)
Secure Prisma Access mobile users by creating an Explicit
Proxy and using a PAC file.
To secure mobile users or headless devices with explicit proxy, complete the following steps.
Before you configure explicit proxy, go through the planning checklist and learn
how to set up the Explicit Proxy PAC
file.
- Set up authentication for explicit proxy.Use the following guidelines when configuring SAML authentication for the IdP and in Panorama:
- Panorama Guidelines:
- Configure a SAML Identity Provider and an Authentication Profile, for Prisma Access. You specify the authentication profile you create in a later step.
- Be sure that you configure the authentication profile under the Explicit_Proxy_Template.
- Use mail as the user attribute in the IdP server profile and in the Authentication Profile on Panorama.
- Explicit proxy does not support Sign SAML Message to IdP in the SAML Identity Provider Server Profile.
- When you configure the Cloud Identity Engine (CIE) to retrieve user and group mapping information, use mail or userPrincipalName as the SamAccountName in Group Mapping.
- When configuring Group Mapping Settings during Explicit Proxy setup, use the same Directory Attribute for Primary Username and email, or Prisma Access does not accurately reflect user counts. For example, given the following user profile:
sAMAccountName: muser
Netbios: example
userPrincipalName: muser@example.com
mail: mobile.user@example.com
If, in the CIE configuration, you use a Primary Username of userPrincipalName and an E-Mail of mail, the user information that Strata Logging Service returns in traffic logs and the user information that the ACS returns in authentication logs will be different. In this example, ACS sends the mail attribute (mobile.user@example.com) to the authentication logs and Strata Logging Service sends the userPrincipalName attribute (muser@example.com) to the traffic logs. As a result of this mismatch, your user count will not be accurate in the Current Users and Users (Last 90 days) fields when checking the Explicit Proxy status in the Status (PanoramaCloud ServicesStatusStatus page. For this reason, use the same directory attribute for Primary Username and E-Mail (for example, mail) when specifying Group Mapping Settings. - When using Panorama to manage Prisma Access, the Cloud Identity Engine does not auto-populate user and group information in security policy rules.
- IdP Guidelines:
- Use the following URLs when configuring SAML:SAML Assertion Consumer Service URL: https://global.acs.prismaaccess.com/saml/acsEntity ID URL: https://global.acs.prismaaccess.com/saml/metadata
- If you use Okta as the IdP, use EmailAddress for the Name ID Format setting.
- Enter a single sign on URL of https://global.acs.prismaaccess.com/saml/acs.
- Single Logout (SLO) is not supported.
- To troubleshoot IdP authentication issues, use the IdP’s monitoring and troubleshooting capabilities. The ACS does not log IdP authentication failures.
- When creating an Authentication Profile for the SAML IdP, in the Advanced tab, select all in the Allow List or Explicit Proxy will not be able to retrieve group mapping.
Configure explicit proxy settings.- Select PanoramaCloud ServicesConfigurationMobile Users—Explicit Proxy and select the gear icon to edit explicit proxy Settings.In the Settings tab, edit the following settings:
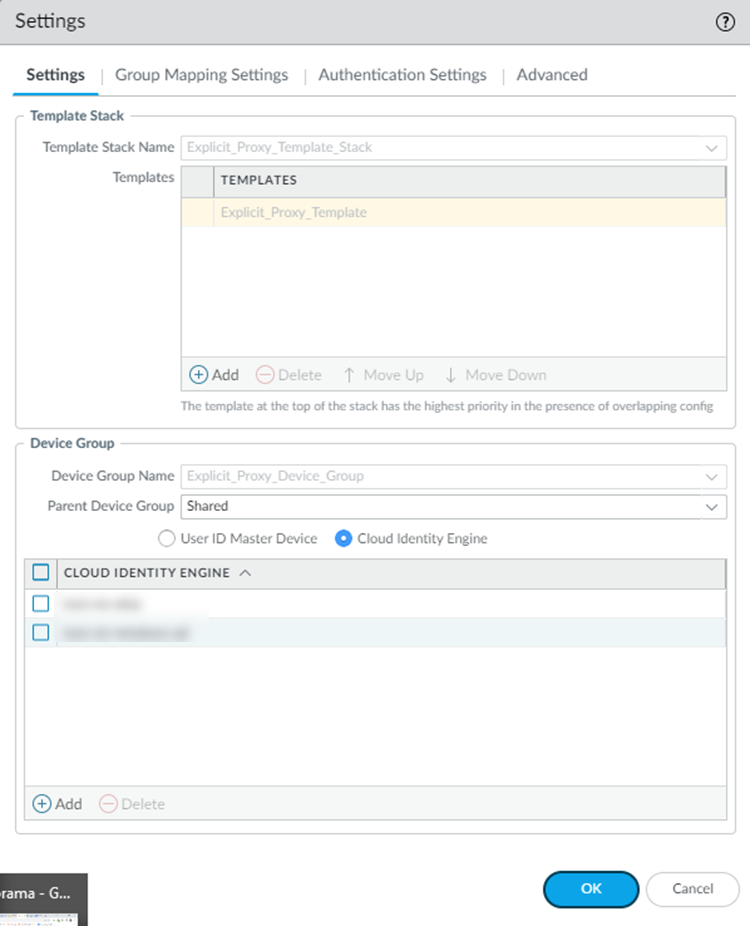
- (Optional) Verify the template and template stack names.By default, Prisma Access creates a new template stack Explicit_Proxy_Template_Stack and a new template Explicit_Proxy_Template. Make sure that you are using this template when you create and edit your Device settings in Panorama.
- In the Device Group section, select the Parent Device Group that contains the configuration settings you want to push for the Explicit Proxy, or leave the parent device group as Shared to use the Prisma Access device group shared hierarchy. The Device Group Name cannot be changed.
- (Optional) If you have configured a next-generation firewall as a master device or added a Cloud Identity Engine profile to populate user and group information in security policy rules, select User-ID Master Device or Cloud Identity Engine; then, select either the Master Device or the Cloud Identity Engine profile that you created.
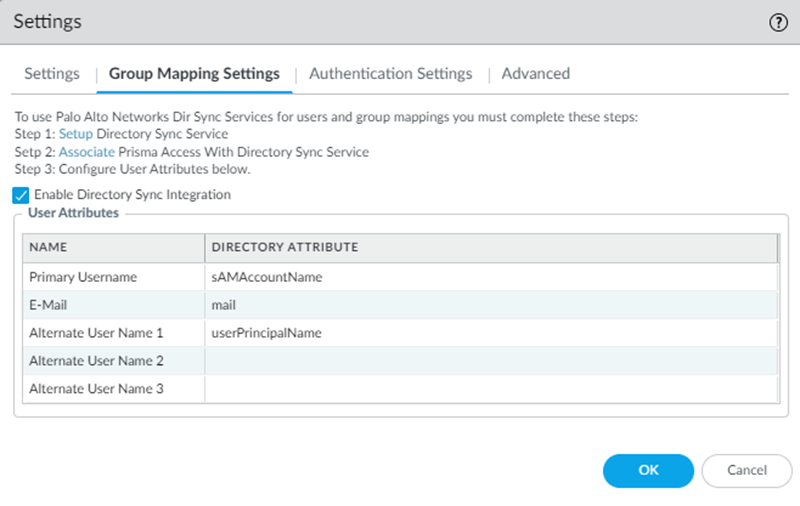
![]() In the Group Mapping Settings tab, Enable Directory Sync Integration (now known as the Cloud Identity Engine) to configure Prisma Access to use the Cloud Identity Engine to retrieve user and group information.You use the Cloud Identity Engine to populate user and group mapping information for an explicit proxy deployment.Enter mail for the Directory Attribute in the Primary Username field and mail for the E-Mail field.
In the Group Mapping Settings tab, Enable Directory Sync Integration (now known as the Cloud Identity Engine) to configure Prisma Access to use the Cloud Identity Engine to retrieve user and group information.You use the Cloud Identity Engine to populate user and group mapping information for an explicit proxy deployment.Enter mail for the Directory Attribute in the Primary Username field and mail for the E-Mail field.![]() Click OK when finished.(Optional) Configure Block Settings.Use Block Settings to block access to an internet destination at the DNS resolution stage.To restrict access to explicit proxy to specific source IP addresses, you can also use special objects. These Address Objects, Address Groups, and External Dynamic Lists (EDLs) that use specific names allow the IP addresses you specify for internet traffic and block any other IP addresses.In the Authentication Settings tab, configure decryption, X-Authenticated-User (XAU), and authentication settings.
Click OK when finished.(Optional) Configure Block Settings.Use Block Settings to block access to an internet destination at the DNS resolution stage.To restrict access to explicit proxy to specific source IP addresses, you can also use special objects. These Address Objects, Address Groups, and External Dynamic Lists (EDLs) that use specific names allow the IP addresses you specify for internet traffic and block any other IP addresses.In the Authentication Settings tab, configure decryption, X-Authenticated-User (XAU), and authentication settings.- Configure your settings for decrypted traffic.
- Select Decrypt Traffic That Matches Existing Decryption rules; For Undecrypted Traffic, Allow Traffic Only From Known IPs Registered By Authenticated Users to configure the following decryption rules:
- Traffic that matches decryption policy rules you have configured with an Action to Decrypt or Decrypt and Forward will be decrypted.If a user accesses an undecrypted HTTPS site, and a user has not yet authenticated to explicit proxy from that IP address, the user is blocked. However, the user can access a decrypted site, complete authentication, and then access undecrypted sites.
- Undecrypted traffic is allowed from IP addresses from which mobile user have already authenticated.
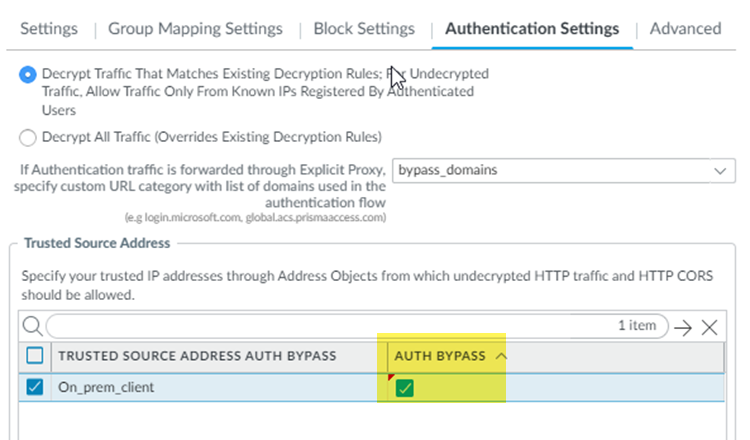
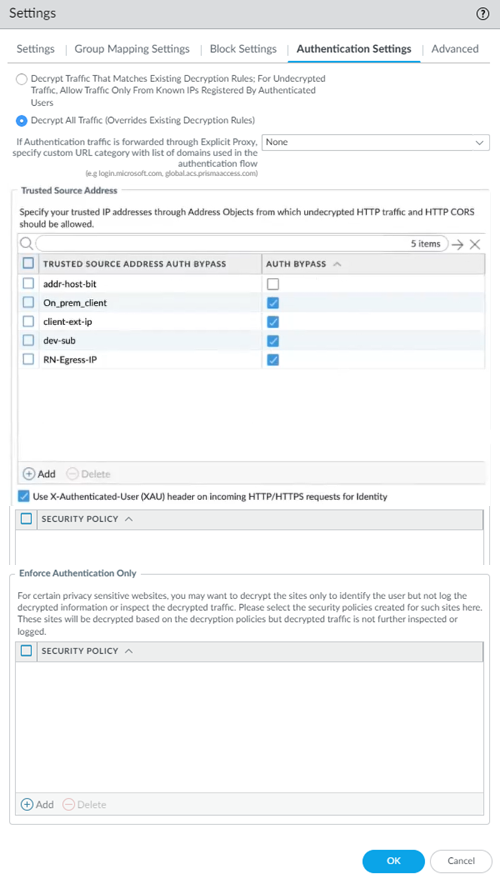
Explicit proxy requires decryption to authenticate users. Enter the domains that can be decrypted in a custom URL category; then, specify those categories in If Authentication traffic is forwarded through Explicit Proxy, specify the domains used in the authentication flow.Only add the domains that are required for authentication to the Custom URL category you specify, including all ACS and IdP FQDNs. You must add authentication URLs to the Custom URL category, even if you have added them to a decryption policy. - To allow all traffic to be decrypted, select Decrypt All traffic (Overrides Existing Decryption Rules).If you choose this radio button, ensure that:
- You do not have exceptions in your decryption policy.
- You are applying source IP address-based restrictions in your security policy.
Failing to follow these recommendations enables the abuse of explicit proxy as an open proxy that can be widely misused as a forwarding service for conducting denial of service attacks.- You have at least one SSL Forward Proxy certificate specified as a Forward Trust Certificate.If you do not have a forward trust certificate, create one on Panorama; then, Commit and Push your changes to Prisma Access. Failure to have a forward trust certificate will cause a commit error when you commit your explicit proxy changes.
(Optional) Enter any IP addresses from which undecrypted HTTP or HTTP Cross-Origin Resource Sharing (CORS) traffic should be allowed to the Trusted Source Address Auth Bypass.Add the IP addresses to IP address-based Address Objects and Add the address objects in the field.Enter a maximum of 200,000 addresses. Make sure that the address object uses IP addresses only.(Optional) To bypass authentication of any trusted source addresses you entered, select Auth Bypass.You can use Auth Bypass with Source IP based visibility and enforcement to skip authentication of headless systems that can't authenticate, set up security policies, and get visibility of the traffic on Prisma Access explicit proxy.You can add either IP addresses or subnets. A maximum of 200,000 IP addresses are supported after expanding the subnets.If you select Auth Bypass to skip authentication for an address object, and then later want to enable authentication by deselecting Auth Bypass for that address object, it can take up to 24 hours for the change to take effect after you make the change and Commit and Push your changes.![]() (Optional) To allow the trusted source Address IP addresses to use XAU for identity, select Use X-Authenticated-User (XAU) header on incoming HTTP/HTTPS requests for Identity.Select this option if you if you are using proxy chaining from a third-party proxy to explicit proxy, users have authenticated in that proxy, and the proxy uses XAU headers.XAU headers are the only HTTP headers supported for explicit proxy header ingestion. X-Forwarded-For (XFF) headers are not supported.(Optional) Specify settings for privacy-sensitive websites by creating security policy rules for those sites, then specifying the Security Policy or policies for those sites in the Enforce Authentication Only area.For any websites you specify in the in the Security Policy or policies you add, explicit proxy decrypts the websites based on the decryption policies, but does not inspect or log the decrypted traffic.
(Optional) To allow the trusted source Address IP addresses to use XAU for identity, select Use X-Authenticated-User (XAU) header on incoming HTTP/HTTPS requests for Identity.Select this option if you if you are using proxy chaining from a third-party proxy to explicit proxy, users have authenticated in that proxy, and the proxy uses XAU headers.XAU headers are the only HTTP headers supported for explicit proxy header ingestion. X-Forwarded-For (XFF) headers are not supported.(Optional) Specify settings for privacy-sensitive websites by creating security policy rules for those sites, then specifying the Security Policy or policies for those sites in the Enforce Authentication Only area.For any websites you specify in the in the Security Policy or policies you add, explicit proxy decrypts the websites based on the decryption policies, but does not inspect or log the decrypted traffic.![]() (Optional) Configure .Configure explicit proxy setup.
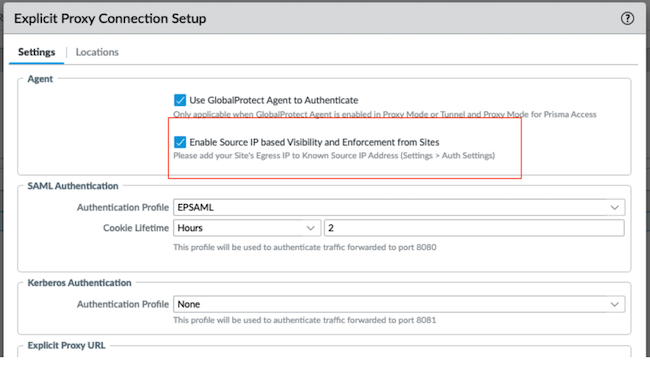
(Optional) Configure .Configure explicit proxy setup.- Specify an Explicit Proxy FQDN.By default, the name is proxyname.proxy.prismaaccess.com, where proxyname is the subdomain you specify, and uses port 8080. If you want to use your organization’s domain name in the explicit proxy URL (for example, thisproxy.proxy.mycompany.com), enter a CNAME record your organization’s domain.For example, to map a proxy URL named thisproxy.prismaaccess.com to a proxy named thisproxy.proxy.mycompany.com, you would add a CNAME of thisproxy.proxy.prismaaccess.com to the CNAME record in your organization’s domain.(Optional) Enable the following options as per your configuration requirement. These options are available only with Mobile User license.
- Use GlobalProtect Agent to Authenticate
to enable the agent-based proxy functionality.
- Enable Source IP based Visibility and Enforcement from Sites and add sites egress IP addresses to Known Source IP Address.
![]() Specify an Authentication Profile and Cookie Lifetime.
Specify an Authentication Profile and Cookie Lifetime.- Specify the SAML Authentication Profile you used in Step 1, or add a New authentication profile to use with Prisma Access.You must configure SAML authentication, including configuring a SAML Identity Provider (IdP) and an Authentication Profile, to use an explicit proxy.
- (Optional) Specify a Cookie Lifetime for the cookie that stores the users’ authentication credentials.Prisma Access caches the user’s credentials and stores them in the form of a cookie. To change the value, specify the length of time to use in Seconds, Minutes, Hours, or Days.To prevent issues with users not being able to download large files before the cookie lifetime expires, or the cookie expiring when users are accessing a single website for a long period of time, Palo Alto Networks recommends that you configure a Cookie Lifetime of at least one day. If explicit proxy users have a cookie lifetime expiration issue, they can browse to a different website to re-authenticate to ACS and refresh the ACS cookie.If you are downloading a file, and the file download takes longer than the Cookie Lifetime, the file download will terminate when the lifetime value expires. For this reason, consider using a longer Cookie Lifetime if you download large files that take a long time to download.
- Edit or upload the PAC file to use with explicit proxy.Use Forwarding Profiles to manage PAC files.
![]()
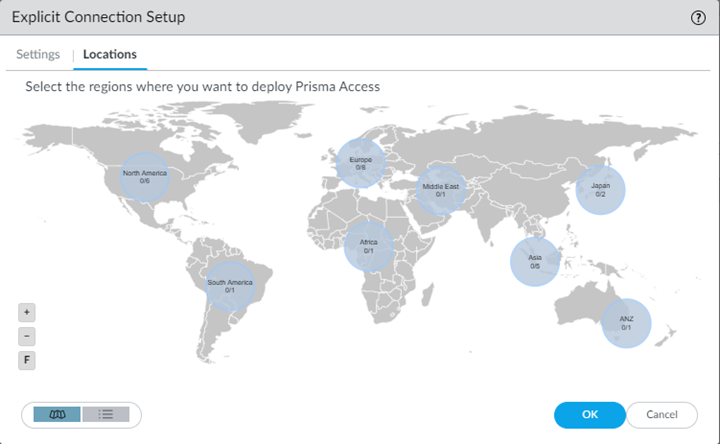
Select the Locations and the regions associated with those locations where you want to deploy your explicit proxy for mobile users. Prisma Access adds a proxy node into each location you select.Explicit proxy supports a subset of all Prisma Access locations. See Explicit Proxy Configuration Guidelines for the list of locations.The Locations tab displays a map. Highlighting the map shows the global regions (Americas, Europe, and Asia Pacific) and the locations available inside each region. Select a region, then select the locations you want to deploy in each region.You should enable explicit proxy locations in at least two regions to ensure regional redundancy.- Click the Locations tab and select a region.
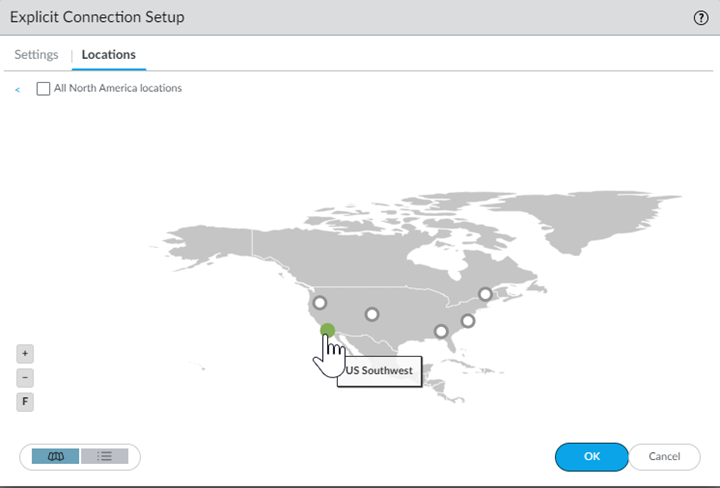
![]() Select one or more explicit proxy locations within your selected region using the map.Hovering your cursor over a location highlights it. White circles indicate an available location; green circles indicate that you have selected that location.
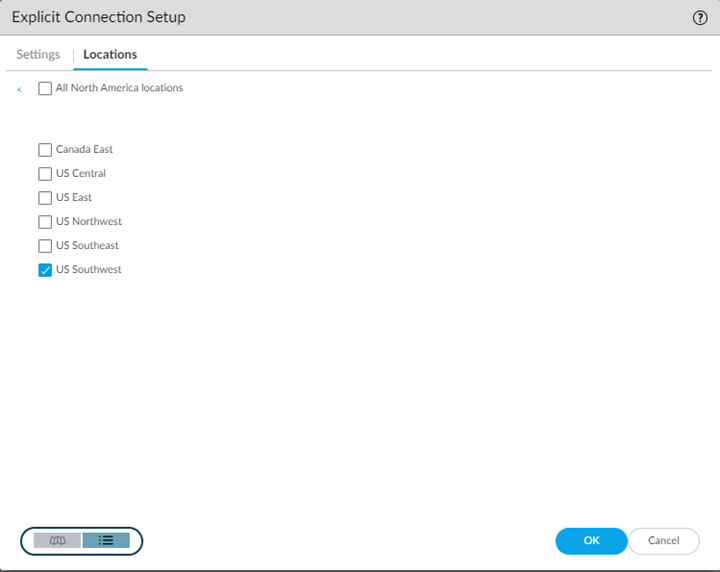
Select one or more explicit proxy locations within your selected region using the map.Hovering your cursor over a location highlights it. White circles indicate an available location; green circles indicate that you have selected that location.![]() In addition to the map view, you can view a list of regions and locations. Choose between the map and list view from the lower left corner. In the list view, the list displays regions sorted by columns, with all locations sorted by region. You can select All sites within a region (top of the dialog).
In addition to the map view, you can view a list of regions and locations. Choose between the map and list view from the lower left corner. In the list view, the list displays regions sorted by columns, with all locations sorted by region. You can select All sites within a region (top of the dialog).![]() Click OK to add the locations.Configure security policy rules to enforce your organization’s security policies.To make required configuration changes and to control the URLs that mobile users can access from explicit proxy, use security policies. Use the following guidelines and requirements when configuring your security policies:
Click OK to add the locations.Configure security policy rules to enforce your organization’s security policies.To make required configuration changes and to control the URLs that mobile users can access from explicit proxy, use security policies. Use the following guidelines and requirements when configuring your security policies:- Based on your business goals, create security policies for sanctioned internet and SaaS apps using App-ID and user groups that need access to those applications.
- Attach security profiles to all security policy rules so that you can prevent both known and unknown threats following the security profile best practices.
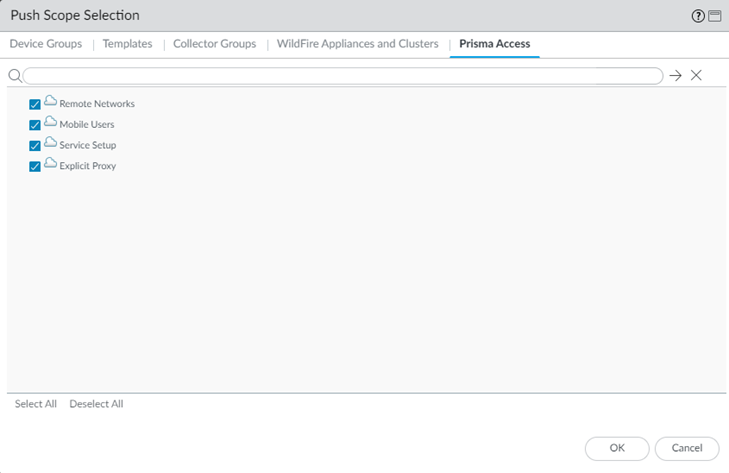
Commit your changes to Panorama and push the configuration changes to Prisma Access.- Click CommitCommit and Push.Edit Selections and, in the Prisma Access tab, make sure that Explicit Proxy is selected in the Push Scope, then click OK.
![]() Click Commit and Push.
Click Commit and Push.

