Prisma Access
Onboard an Azure Virtual Network (Strata Cloud Manager)
Table of Contents
Expand All
|
Collapse All
Prisma Access Docs
-
- 6.1 Preferred and Innovation
- 6.0 Preferred and Innovation
- 5.2 Preferred and Innovation
- 5.1 Preferred and Innovation
- 5.0 Preferred and Innovation
- 4.2 Preferred
- 4.1 Preferred
- 4.0 Preferred
- 3.2 Preferred and Innovation
- 3.1 Preferred and Innovation
- 3.0 Preferred and Innovation
- 2.2 Preferred
-
-
- 4.0 & Later
- Prisma Access China
-
-
Onboard an Azure Virtual Network (Strata Cloud Manager)
Onboard an Azure virtual network (VNet) to Prisma Access and secure access to it for
mobile users and remote networks.
Configure a Virtual Network and Virtual Network Gateway on Azure
The Azure virtual network uses a virtual network gateway for its side of the VPN
tunnel to Prisma Access. This gateway uses a subnet called GatewaySubnet. The
GatewaySubnet contains IP addresses used for virtual network gateway resources
and services and is part of the virtual network IP address range that you
specify when you configure your virtual network on Azure.
Each Azure VPN gateway incorporates high availability by having two instances per
gateway in an active-standby configuration. If an active instance goes down for
planned maintenance or an unplanned outage, the instance automatically fails
over to the standby instance and resumes the site-to-site VPN connections. For a
planned maintenance, Azure restores the connectivity in approximately 10 to 15
seconds. For an unplanned outage, Azure restores the connectivity in
approximately 1 minute to 90 seconds.
Create the virtual network and virtual network gateway using the following
task.
By default, Azure will not direct internet traffic to the VPN tunnel you
create in this task. To secure internet-bound traffic
with Prisma Access, enable forced tunneling on Azure using
PowerShell commands.
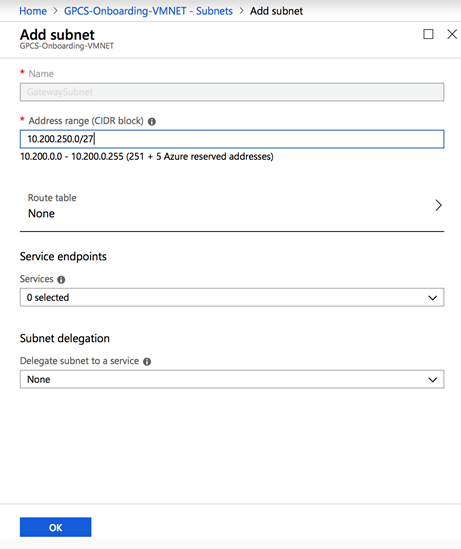
- In Azure, create your virtual network, if you have not already created it. See the Microsoft Azure documentation for details.Create a subnet for the gateway.You must name the subnet GatewaySubnet to let Azure deploy its gateway resources and Azure does not allow the use of another subnet name. Without a subnet named GatewaySubnet, gateway creation fails.
- In the Azure portal, navigate to the virtual network where you want to create a virtual network gateway.On your virtual network page, click Subnets to expand the Subnets page for the virtual network you created.Click +Gateway subnet at the top to open the Add subnet page.Add the address and click OK.
![]() Add a virtual network gateway.
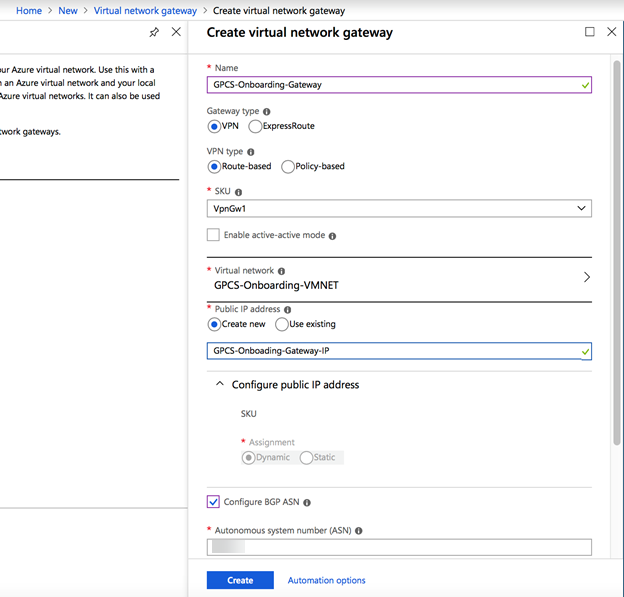
Add a virtual network gateway.- On the left side of the portal page, click +Create a resource and type Virtual Network Gateway in the search box, then press Enter.In Results, locate and click Virtual network gateways.At the bottom of the Virtual network gateway page, click Create virtual network gateway.Enter values similar to the values on the following screenshot and click Create.
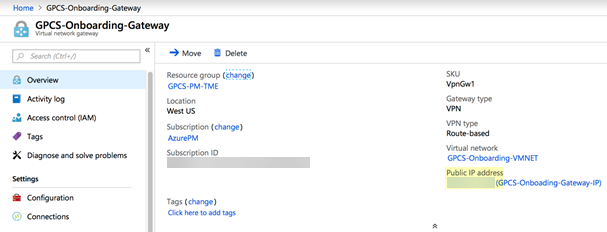
![]() It may take up to 30 minutes to create the virtual network gateway.After Azure creates the virtual network gateway, select the virtual network gateway you created, click Overview, and make a note of the Public IP address assigned to the virtual network gateway.
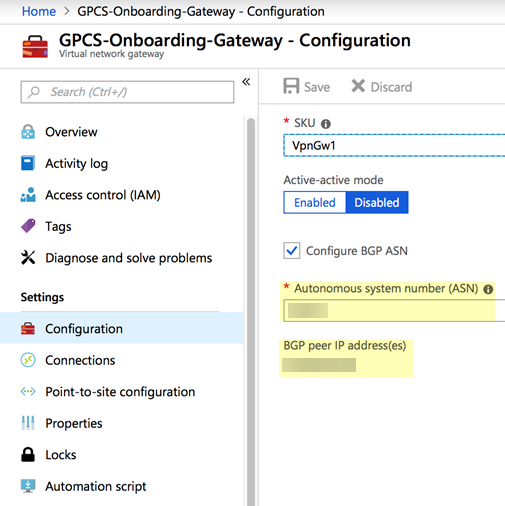
It may take up to 30 minutes to create the virtual network gateway.After Azure creates the virtual network gateway, select the virtual network gateway you created, click Overview, and make a note of the Public IP address assigned to the virtual network gateway.![]() Click Configuration and make a note of the BGP ASN and BGP peer IP address(es) fields.
Click Configuration and make a note of the BGP ASN and BGP peer IP address(es) fields.![]()
Configure IKE, IPSec, and BGP and Onboard the Azure VNet in Prisma Access
After you perform the initial configuration on Azure, create IKE and IPSec security profiles and policies and a remote network connection in Prisma Access.For assistance with configuring security parameters on Azure, see the Microsoft Azure documents About VPN devices and IPsec/IKE parameters for Site-to-Site VPN Gateway connections and About cryptographic requirements and Azure VPN gateways.- In Strata Cloud Manager, select ConfigurationNGFW and Prisma AccessConfiguration ScopePrisma AccessRemote Networks.(Optional) If you have not already, allocate bandwidth for the remote network under Bandwidth Management.You allocate bandwidth by selecting bandwidth for the remote network’s compute location. Select an Assigned Bandwidth for the remote network’s compute location.Go to Remote Networks and Add Remote Networks.
![]()
- Give the remote network a descriptive Site Name.Select the Prisma Access Location that is closest to your Azure VNet.Select the IPSec Termination Node to use for the remote network.Enable ECMP Load Balancing.Set up the IPSec tunnel for the Azure gateway.
- Set Up the primary tunnel.
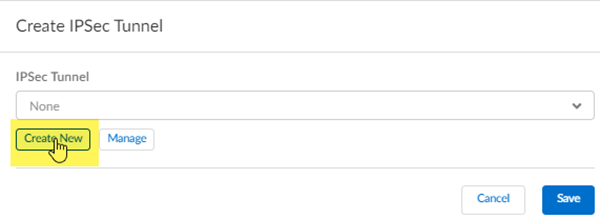
![]() Select an existing tunnel, or select Create New to create a new tunnel.
Select an existing tunnel, or select Create New to create a new tunnel.![]() Give the tunnel a descriptive Name.Select the Branch Device Type for the IPSec device at the remote network site that you’re using to establish the tunnel with Prisma Access.Specify a Pre-Shared Key.Specify a Branch Device IP Address of either Static IP or Dynamic IP.Setting up an IKE Peer Identification is required if you use a dynamic IP address. If you select Static IP, enter a static IP address.Select IKE Advanced Options, create an IPSec crypto profile for the IPSec tunnel, and Save the changes.The IPSec crypto settings you specify here must match the settings you specify on Azure. To set IKE and IPSec policies in Azure, see the Microsoft Azure documentation.Select IPSec Advanced Options, create an IKEv1 crypto profile for the gateway, and Save the changes.Set Up BGP routing.
Give the tunnel a descriptive Name.Select the Branch Device Type for the IPSec device at the remote network site that you’re using to establish the tunnel with Prisma Access.Specify a Pre-Shared Key.Specify a Branch Device IP Address of either Static IP or Dynamic IP.Setting up an IKE Peer Identification is required if you use a dynamic IP address. If you select Static IP, enter a static IP address.Select IKE Advanced Options, create an IPSec crypto profile for the IPSec tunnel, and Save the changes.The IPSec crypto settings you specify here must match the settings you specify on Azure. To set IKE and IPSec policies in Azure, see the Microsoft Azure documentation.Select IPSec Advanced Options, create an IKEv1 crypto profile for the gateway, and Save the changes.Set Up BGP routing.- Enable BGP for Dynamic Routing.Enter the Peer Address value from Azure in the Peer IP address field and enter the Autonomous system number (ASN) value from Azure in the Peer AS field.
- (Optional) Enter an address that Prisma Access uses as its Local IP Address for BGP.Make sure that the address you specify does not conflict or overlap with IP addresses in the Infrastructure Subnet or subnets in the remote network.You must configure a static route on your CPE to the BGP local address.Save the changes.Commit and Push your configuration.After the onboarding process completes, and make a note of the value in the Service IP field.
Set up Network Connectivity from your Azure Virtual Network
After you configure the remote network in Prisma Access, complete the configuration on Azure by performing the following task.For additional information about configuring BGP on Azure, see the Microsoft Azure document Overview of BGP with Azure VPN Gateways.- In Azure, create a local network gateway.
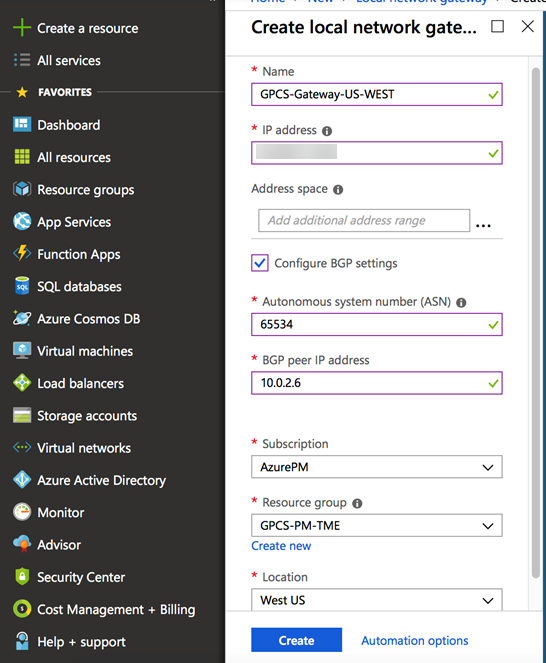
- In the Search resources, services, and docs search box, type local network gateways.Click +Add.Enter the following values in the text box that displays.
- Enter a Name for the gateway.
- Check Configure BGP settings and enter a unique Autonomous system number (ASN) and BGP peer IP address.
- Enter a Subscription, Resource group, and Location for the gateway.
Click Create.![]() Create a virtual network connection.
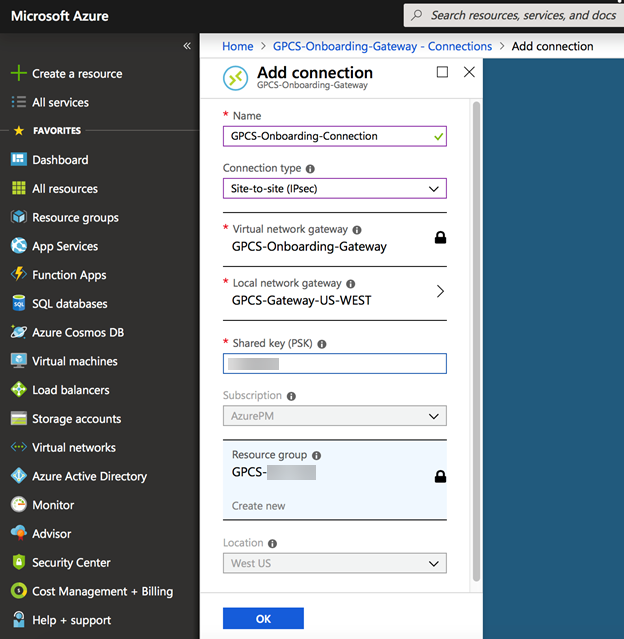
Create a virtual network connection.- Navigate to and open the page for the virtual network gateway you created when you configured a virtual network and virtual network gateway on Azure.See the Microsoft Azure documentation for details.On the page for the virtual network gateway, click Connections. At the top of the Connections page, click +Add to open the Add connection page.Enter values for the new connection, then click OK.In the Shared key (PSK) field, use the same Pre-shared Key that you used when you created the IKE gateway in Prisma Access.Click OK.
![]() Add a new route table to use for BGP routing.
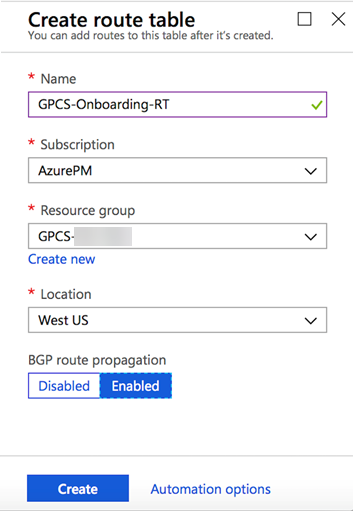
Add a new route table to use for BGP routing.- Select +Create a resource on the upper left corner of the Azure portal.Select Networking, then select Route table.Add a Name, Subscription, Resource Group, and Location.Set BGP route propagation to Enabled.Click Create.
![]() Associate a subnet to the route table you created.
Associate a subnet to the route table you created.- Open the route table you created.Select SettingsSubnets.Click Associate to add a subnet.In the Associate subnet column, click Virtual network.Select the virtual network you created when you configured a virtual network and virtual network gateway on Azure.Click OK.
![]()
Verify Remote Network Connectivity
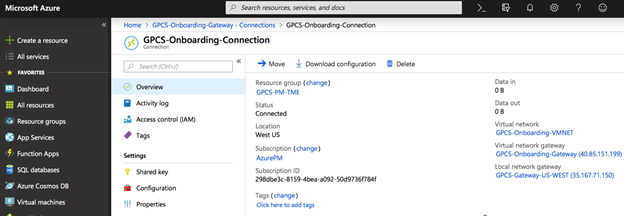
To verify that the IPSec tunnel between Azure and Prisma Access is operational, perform the following steps:- In Azure, select the Connection you created and click Overview.The tunnel should show a status of Connected.
![]() Verify that the BGP routes are being advertised on Azure.
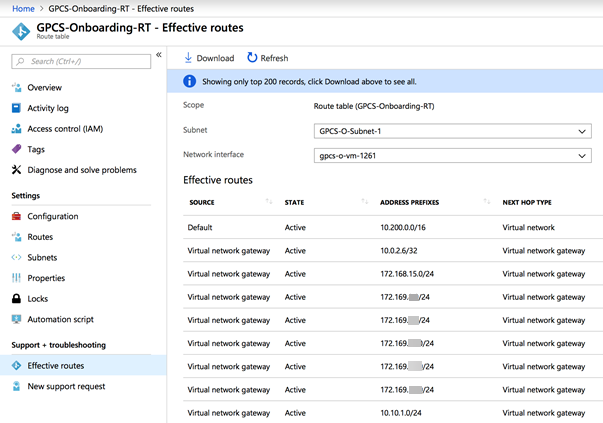
Verify that the BGP routes are being advertised on Azure.- Open the route table you just created.Select NetworkingSettings.Select the name of a network interface.Select Support + troubleshootingEffective routes.Verify that the BGP routes are being advertised.
![]() Check the remote network and BGP status in Prisma Access.In Strata Cloud Manager, select .ConfigurationNGFW and Prisma AccessConfiguration ScopePrisma AccessRemote Networks.The Config Status should be In Sync and verify the BGP Status in Routing Information.
Check the remote network and BGP status in Prisma Access.In Strata Cloud Manager, select .ConfigurationNGFW and Prisma AccessConfiguration ScopePrisma AccessRemote Networks.The Config Status should be In Sync and verify the BGP Status in Routing Information.Secure Internet-Bound Traffic with Prisma Access
If you enable BGP, the virtual network gateway does not use static routes and uses only the routes it learns from BGP advertisements.To secure all traffic to and from Azure, you must force traffic to pass through Prisma Access. You do this by enabling the forced tunneling feature on Azure.Enabling forced tunneling may result in a loss of connectivity to virtual network instances over the internet. Make sure that you use another connection method (for example, a bastion host) to connect to instances over the internet.You configure forced tunneling by using PowerShell CLI commands in your Azure account as described in the following task. For more details about forced tunneling, see the Microsoft Azure document Configure forced tunneling using the Azure Resource Manager deployment model.To enable the feature, complete the following workflow.These commands are examples. If you use different variables for your route tables, virtual network gateways, subnets, or resource groups, substitute those values in the commands provided in this task.- Log into your PowerShell console with elevated privileges, and connect to your account.Create a new route table by entering the following commands:
> New-AzureRmRouteTable -Name "DefRouteTable" -ResourceGroupName "GPCS-PM-TME" -Location "WEST US"> $rt = Get-AzureRmRouteTable -Name "DefRouteTable" -ResourceGroupName "GPCS-PM-TME"> Add-AzureRmRouteConfig -Name "DefaultRoute" -AddressPrefix "0.0.0.0/0" -NextHopType VirtualNetworkGateway -RouteTable $rt> Set-AzureRmRouteTable -RouteTable $rtModify the subnet configuration by entering the following commands:> $vnet = Get-AzureRmVirtualNetwork -Name "GPCS-Onboarding-VMNET" -ResourceGroupName "GPCS-PM-TME"> Set-AzureRmVirtualNetworkSubnetConfig -Name "GPCS-O-Subnet-1" -VirtualNetwork $vnet -AddressPrefix "10.200.1.0/24" -RouteTable $rt> Set-AzureRmVirtualNetwork -VirtualNetwork $vnetEnable the default route for the network gateway default site by entering the following commands.> $LocalGateway = Get-AzureRmLocalNetworkGateway -Name "GPCS-Gateway-US-WEST" -ResourceGroupName "GPCS-PM-TME"> $VirtualGateway = Get-AzureRmVirtualNetworkGateway -Name "GPCS-Onboarding-Gateway" -ResourceGroupName "GPCS-PM-TME"> Set-AzureRmVirtualNetworkGatewayDefaultSite -GatewayDefaultSite $LocalGateway -VirtualNetworkGateway $VirtualGateway

