Prisma Access
Set Up GlobalProtect Mobile Users
Table of Contents
Set Up GlobalProtect Mobile Users
Configure GlobalProtect mobile users in Prisma Access.
| Where Can I Use This? | What Do I Need? |
|---|---|
|
|
Before configuring mobile users, ensure that you have the required licenses (Prisma
Access license for mobile users and a Strata Logging Service license with proper firewall
storage space). If mobile users will be connecting to other connected networks, you will
need either the Zero Trust Network Access (ZTNA) or Enterprise Edition Prisma Access
license that will provide the corporate access node (CAN) necessary to connect.
To configure Prisma Access for mobile users, you will need the following:
- Prisma Access License for Mobile Users: Verify that the Prisma Access license for mobile users has been activated.
- IP Address Pool for Mobile Users: Verify that you have one or more non-overlapping IP address pools available for mobile users.
- Portal Hostname: Ensure that you know the fully qualified domain name (FQDN) of the portal.
- GlobalProtect Agent for Mobile Users: Prisma Access for mobile users requires the GlobalProtect app on each supported endpoint. You will need a deployment strategy for installing the GlobalProtect agent on mobile user devices.
- Security Policy Rule Information: You will deploy Security policy rules to allow or deny traffic through Prisma Access. You will need to know which rules to deploy as you configure Prisma Access for your mobile users.
- Geographic Locations of Your Mobile Users: When you provision mobile users, you should select an available geographic location that is close to your mobile users.
Learn how to onboard GlobalProtect mobile users to Prisma Access.
Set Up GlobalProtect Mobile Users (Strata Cloud Manager)
Set up a mobile users location in just a few steps in Prisma Access (Managed by Strata Cloud Manager).
In just a few steps, here’s how to start onboarding
GlobalProtect mobile users to Prisma Access.
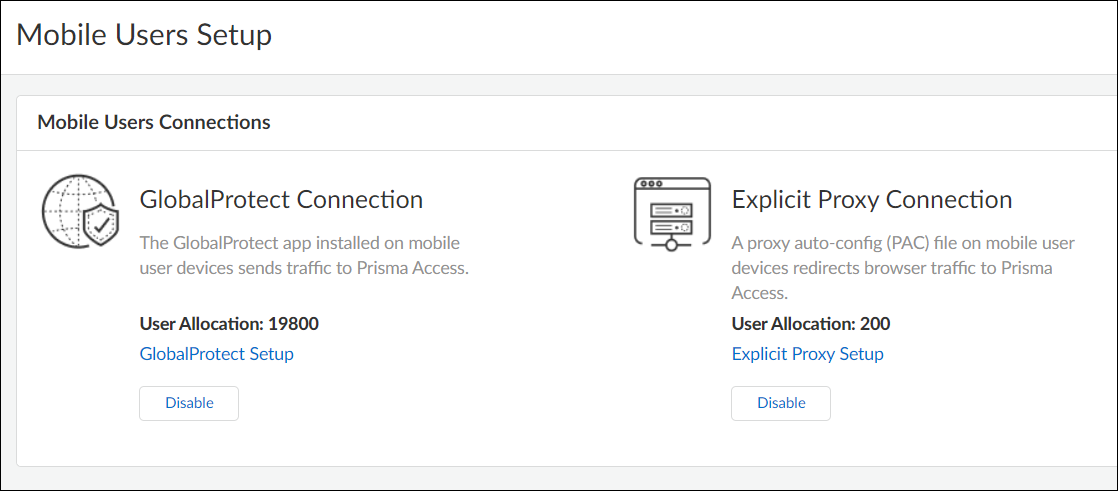
- Enable GlobalProtect as a mobile user connection type
Go to .You can divide your mobile user license between GlobalProtect and Explicit Proxy connections; some users can connect through GlobalProtect and others through Explicit Proxy. With a GlobalProtect Connection, the GlobalProtect app installed on mobile user devices sends traffic to Prisma Access.
![]()
- Set up basic infrastructure settings
Configure the infrastructure settings that are specific to GlobalProtect. There are a few required settings you’ll need to fill out initially, so that Prisma Access can provision your mobile user environment.
- When you set up GlobalProtect for the first time, you’ll decide whether to enable Prisma Access IP Optimization. Choosing to enable IP Optimization requires GlobalProtect client version 6.1.4 and later, 6.2.3 and later, or 6.3.0 and later, and does not support IPv6. Choose carefully, as you can’t change this setting later.
- IP Optimization functionality is for new Prisma Access GlobalProtect deployments only. Existing GlobalProtect deployments, including new tenants you create from an existing multitenant deployment, are not eligible.
- If you are migrating your GlobalProtect deployment to Prisma Access (away from using on-premises gateways and portals), ensure all users are running GlobalProtect app version 6.1.4 and later, 6.2.3 and later, or 6.3 and later before enabling this functionality.
![]() Go to .
Go to .![]()
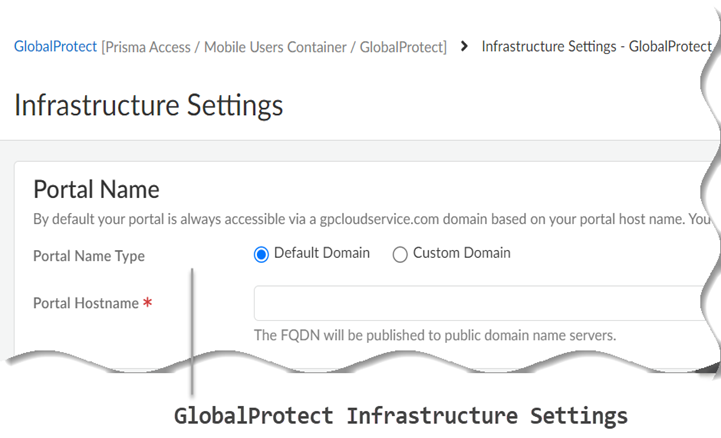
- Specify the Portal Name.
- Default Domain—If you select this option, your portal hostname uses the default domain name: .gpcloudservice.com. In this case, simply enter a Portal Hostname to append to the default domain name. Prisma Access for Users will automatically create the necessary certificates and publish the hostname to public DNS servers.
- Custom Domain—You can also customize the portal address if you want the domain in the portal hostname to match your company domain name (for example, myportal.mydomain.com).
- Enter Client DNS resolution settings for your
GlobalProtect deployment.
- Select a region for the DNS Servers
(Add Region).You can use a single IP address pool for all GlobalProtect endpoints in the world (Worldwide), you can use separate pools for each theater where you have mobile users, or you can specify pools per location group (a group of locations that is smaller than the theater). . If you specify multiple proxy settings with a mix of Worldwide and theater settings, Prisma Access uses the settings for the location group, then theater, then Worldwide. Prisma Access evaluates the rules from top to bottom in the list.
- Choose whether or not you want Prisma Access to Resolve internal domains; if you do, Add one or more Internal Domain Resolve Rules.
- Enter a unique Name for the rule.
- Select Prisma Access Default to use the default Prisma Access DNS server to resolve internal domains. you want your internal DNS server to only resolve the domains you specify, enter the domains to resolve in the Domain List. Specify an asterisk in front of the domain; for example, *.acme.com. You can specify a maximum of 1,024 domain entries.
- If you have a Custom DNS server that can access your internal domains, specify the Primary DNS and Secondary DNS server IP addresses.
- If you want your internal DNS server to only resolve the domains you specify, enter the domains to resolve in the Domain Lists. Specify an asterisk in front of the domain; for example, *.acme.com. You can specify a maximum of 1,024 domain entries.
- Save your changes when finished.
- Select a region for the DNS Servers
(Add Region).
- (Optional) Specify a Client IP
Pool.By default, Prisma Access provides you with a default mobile user IP Address pool of 100.127.0.0/16 that can be used any location worldwide. Prisma Access assigns an IP address from this pool to each GlobalProtect-connected device. You can optionally add an IP address pool on a per-region basis here.
- Enter a minimum required subnet of /23 (512 IP addresses) per location. Additional locations require a minimum /23 subnet. If you specify a Worldwide subnet, the minimum required subnet is /23 but we recommend IP Address Pools for a GlobalProtect Mobile Users Deployment to allocate a of IP addresses that is equal to or greater than the number of licensed mobile users so that they can log in at the same time.Don't specify addresses that overlap with other networks you use internally or with the pools you assigned when you Configure the Prisma Access Service Infrastructure (Panorama). In addition, don't use the following IP addresses and subnets, because Prisma Access reserves those IP addresses and subnets for its internal use.:
- 169.254.0.0/16
- 100.64.0.0/10
We recommend using an RFC 1918-compliant IP address pool. While we support the use of non-RFC 1918-compliant (public) IP addresses for mobile users, we don't recommend using it to possible conflicts with internet public IP address space.
- Specify the DNS settings for Primary DNS for public domains and Secondary DNS for public domains.
- Prisma Access Default—Use the default Prisma Access DNS server.
- Internal DNS—Use the same server that you use to resolve internal domains.
- Custom—If you have a DNS server that can access your public (external) domains, enter the Primary DNS server address in that field.
- You can add a Client DNS Suffix List to specify the suffix that the client should use locally when an unqualified hostname is entered that it can't resolve, for example, acme.local. Don't enter a wildcard (*) character in front of the domain suffix (for example, acme.com). You can add multiple suffixes.
- Set up Advanced Settings.
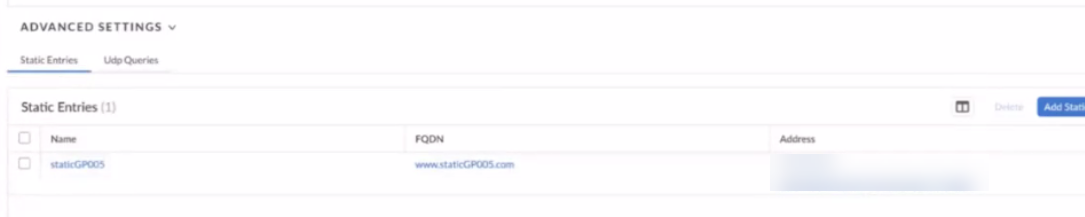
- (Optional) Use
Static Entries to resolve FQDNs to specific
IP addresses.This functionality can be useful if you have guest internet services at your organization and you want your guests to safely use search engines, preventing them from searching for potentially inappropriate or offensive material that could be against company policy. To do so, enter a unique Name for the static entry rule, an FQDN, and the IP Address where the FQDN request should be directed.
![]()
- If you want Prisma Access to proxy DNS requests, configure values for UDP Queries Retries (the Interval (Sec) to retry the query in seconds and the number of retry Attempts to perform.
- (Optional) Use
Static Entries to resolve FQDNs to specific
IP addresses.
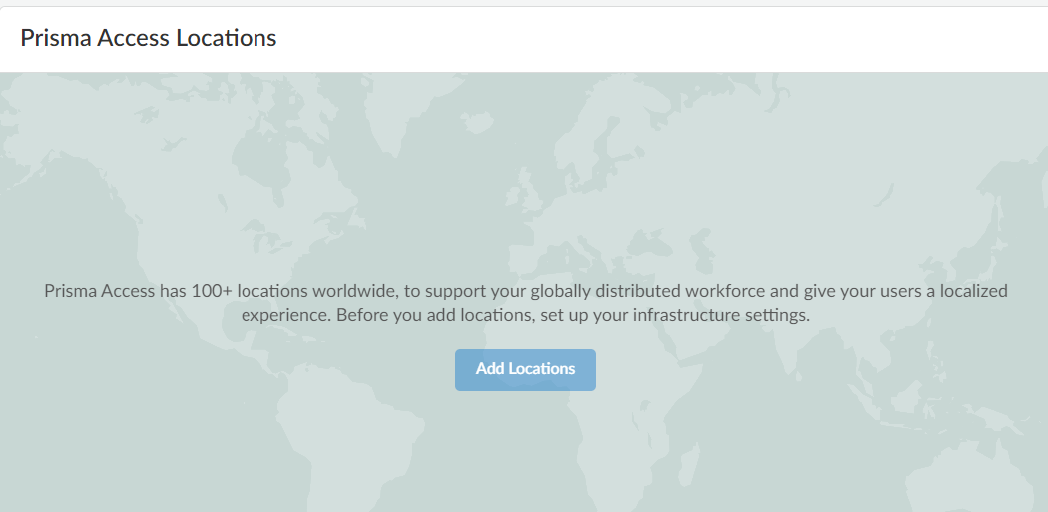
- Choose the Prisma Access location to which your GlobalProtect users will connect
Add the Prisma Access locations where you want to support GlobalProtect users. Go to .
![]() The map displays the global regions where you can deploy Prisma Access for Users . In addition, Prisma Access provides multiple locations within each region to ensure that your users can connect to a location that provides a user experience tailored to the users’ locale. For the best performance, Select All. Alternatively, select the specific locations within each selected region where your users will need access. By limiting your deployment to a single region, you can have more granular control over your deployed regions and exclude regions required by your policy or industry regulations.For the best user experience, if you're limiting the number of locations, choose locations that are closest to your users or in the same country as your users. If a location isn't available in the country where your mobile users reside, choose a location that is closest to your users for the best performance.
The map displays the global regions where you can deploy Prisma Access for Users . In addition, Prisma Access provides multiple locations within each region to ensure that your users can connect to a location that provides a user experience tailored to the users’ locale. For the best performance, Select All. Alternatively, select the specific locations within each selected region where your users will need access. By limiting your deployment to a single region, you can have more granular control over your deployed regions and exclude regions required by your policy or industry regulations.For the best user experience, if you're limiting the number of locations, choose locations that are closest to your users or in the same country as your users. If a location isn't available in the country where your mobile users reside, choose a location that is closest to your users for the best performance. - Authenticate GlobalProtect users
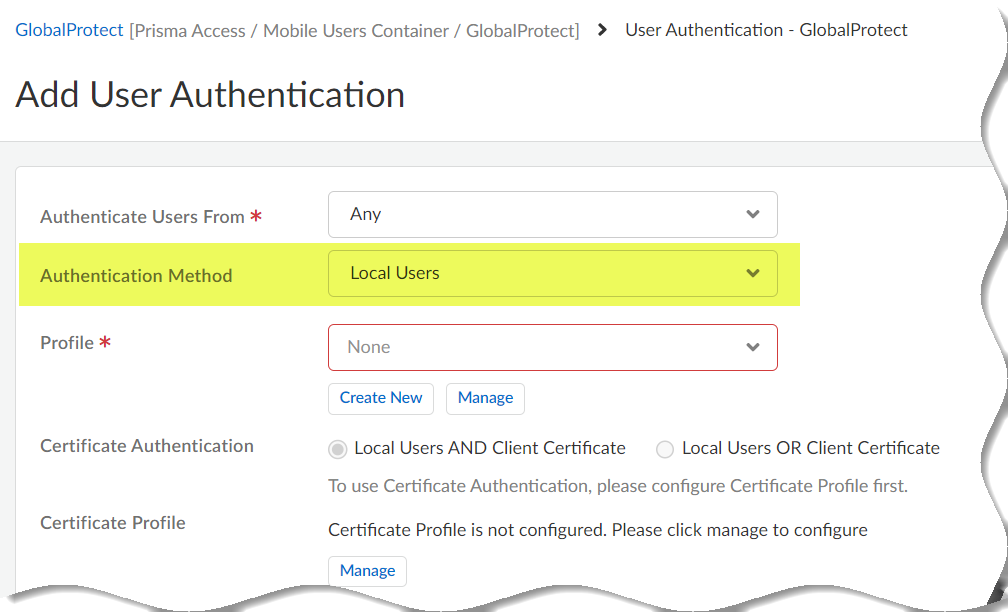
Set up User Authentication so that only legitimate users have access to your services and applications. Go to .To test your setup, you can add users who Prisma Access authenticates locally, or you can go straight to setting up enterprise-level authentication. Learn more on how to Enable Mobile Users to Authenticate to Prisma Access.
![]()
- Prisma Access enforces best practice security policy rules by default. These rules allow your users to securely browse to general internet sites. Users are:
- Blocked from visiting known bad websites based on URL
- Blocked from uploading or downloading files that are known to be malicious
- Protected from unknown, never-before-seen threats
- Protected from malware, spyware (command and control attacks), and vulnerabilities
After going through the initial setup, you can review and update these default rules to meet your enterprise needs. - Verify that the mobile user's location is active
After you push your initial configuration to Prisma Access, Prisma Access begins provisioning your GlobalProtect mobile user environment. This can take up to 15 minutes.You can also validate your setup by selecting and edit infrastructure settings to confirm a gateway is set up in each of the locations you provisioned.

GlobalProtect — Customize the Portal Address
Prisma Access requires only the minimal settings to provision your mobile user's environment so
that you can test it. If you would prefer to use your company domain in the
portal address, you can change the address after the initial environment
setup.
By default, Prisma Access uses the gpcloudservice.com domain to set up the
Prisma Access portal address that your mobile users will need to
connect to for secure access to the internet and your HQ and data centers. You
must use this default domain when you initially set up and test your
environment. If you want to customize the domain name after the initial setup to
use your company domain, you can go back and edit the environment settings so
that the portal address your users connect to contains your own company domain
(for example, prisma-access.acme.com).
The *.gpcloudservice.com domain is
associated with the Palo Alto Networks application.
To configure Prisma Access to use
your own domain, you must:
- Obtain certificates for the service.
- Create a DNS CNAME entry on your DNS servers that maps the default portal address using the default domain to the custom portal address that uses your company domain. You need to do this because Prisma Access publishes the portal address you set up to public domain servers during initial provisioning.
- Select and edit Infrastructure Settings.In Strata Cloud Manager, Network Redundancy is enabled by default between portals or gateways and service connections, ensuring redundant connectivity for mobile users to accessible services and applications.Set the Portal Name Type to Custom Domain.Enter the Portal Hostname you want to use.
![]() Add the Portal DNS CNAME to which to map your DNS server entries.Import the Certificate you provisioned for your custom domain portal address.
Add the Portal DNS CNAME to which to map your DNS server entries.Import the Certificate you provisioned for your custom domain portal address.- Select the certificate Format for the certificate you're importing:
- Encrypted Private Key and Certificate (PKCS12)—The key and certificate are in a single container (Certificate File). Click Choose File and browse to the PKCS12 file to import.
- Base64 Encoded Certificate (PEM)—If you select this option, you must import the Key File separately from the certificate. To import the PEM certificate and Key File, click Choose File.
Enter the Passphrase to encrypt the key and Confirm Passphrase and then click Save.If you have not already done so, configure your DNS servers to point to the Prisma Access DNS CNAME you defined.Save the environment setup and Push Config to Prisma Access.Make sure to select both Explicit Proxy and GlobalProtect configuration scopes.
Set Up GlobalProtect Mobile Users (Panorama)
Learn how to set up a Mobile Users—GlobalProtect deployment in Prisma Access.To configure a Mobile Users—GlobalProtect deployment, complete the following steps. Before you begin, be sure that you understand how and use the checklist to plan for your GlobalProtect deployment.- Select .
- When you set up GlobalProtect for the first time, you’ll be asked whether or not you want to enable Prisma Access IP Optimization. Choosing to enable IP Optimization requires GlobalProtect client version 6.1.4 and later, 6.2.3 and later, or 6.3.0 and later, and does not support IPv6. Choose carefully, as you can’t change this setting later.
- IP Optimization functionality is for new Prisma Access GlobalProtect deployments only. Existing Global Protect deployments, including new tenants you create from an existing multitenant deployment, are not eligible.
- If you are migrating your GlobalProtect deployment to Prisma Access (away from using on-premises gateways and portals), ensure all users are running GlobalProtect app version 6.1.4 and later, 6.2.3 and later, or 6.3 and later before enabling this functionality
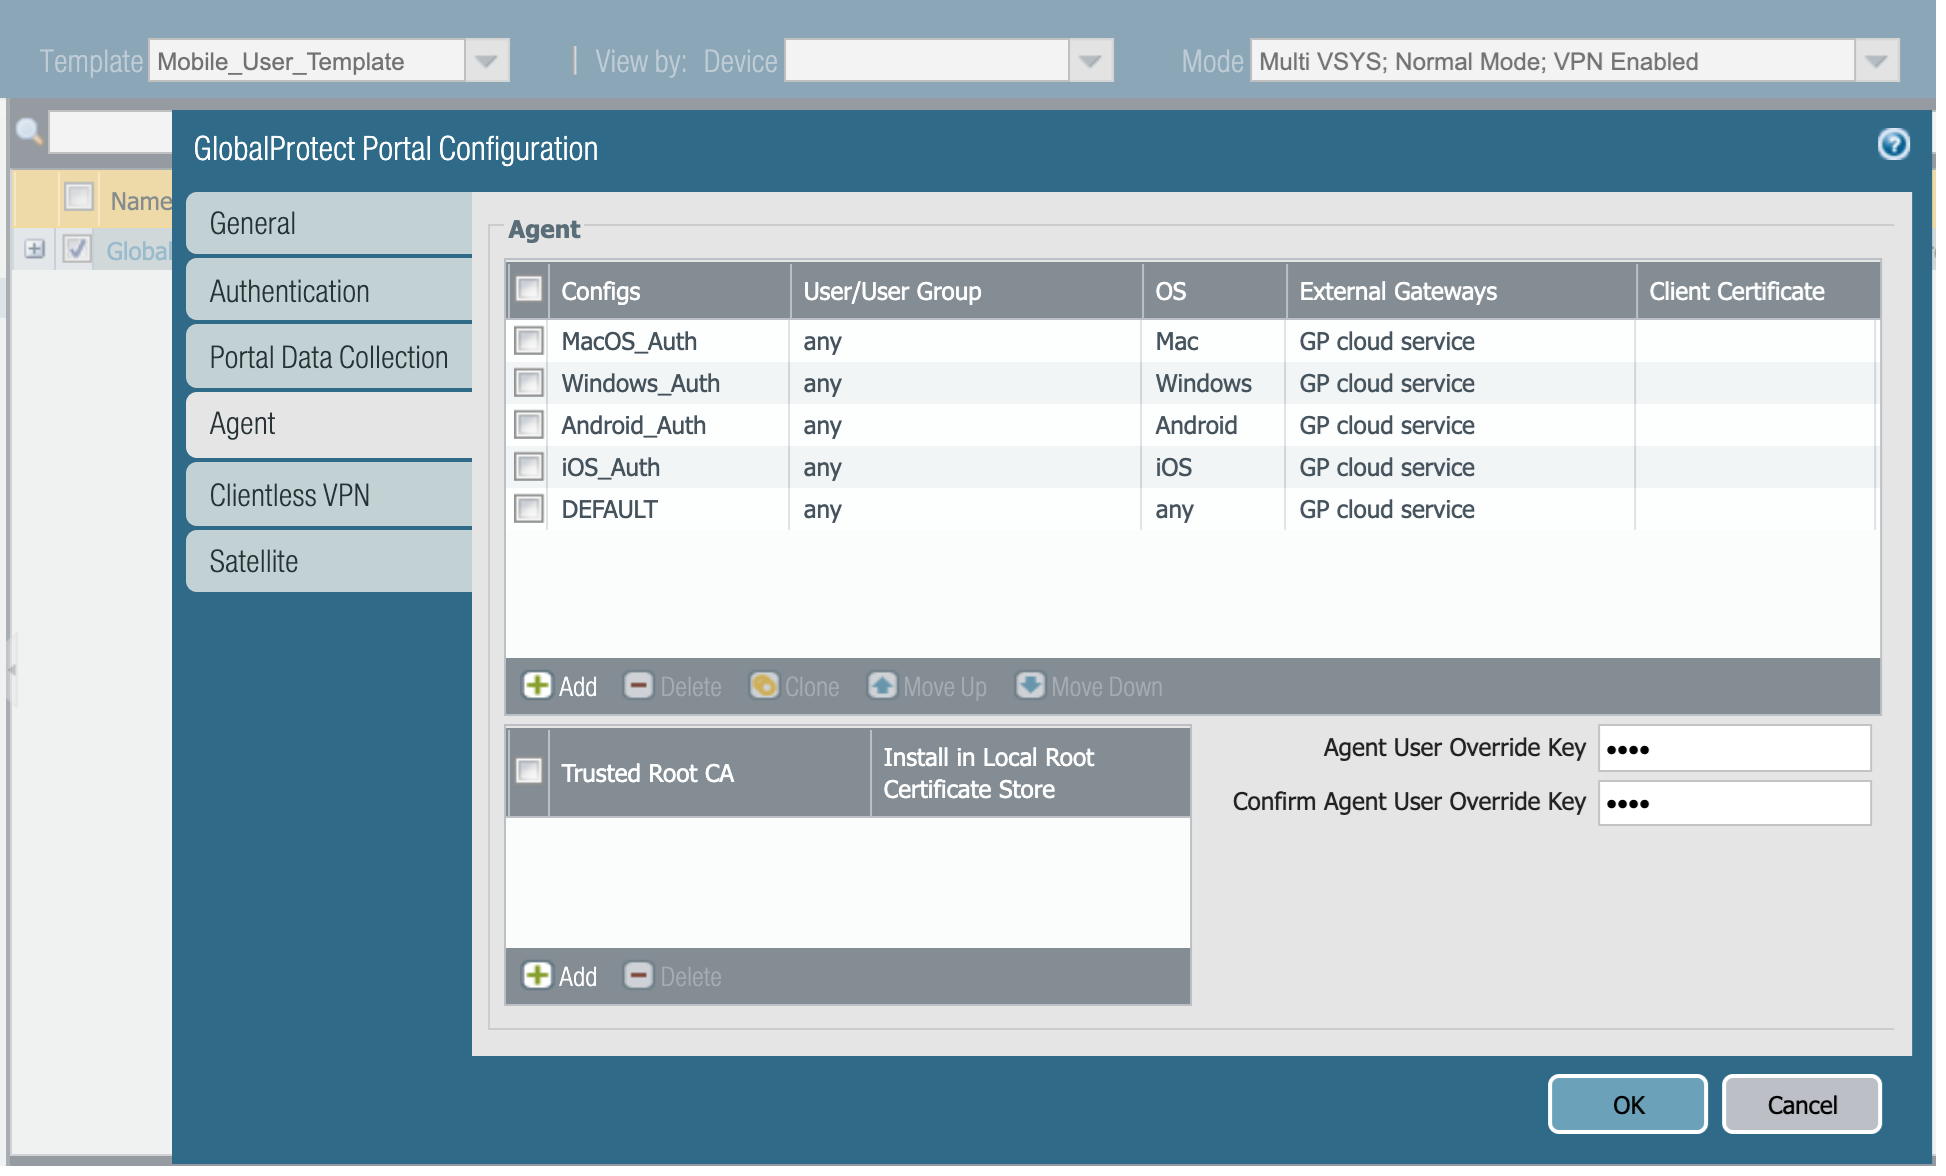
![]() (Optional) If you want to customize the agent configuration that Prisma Access pushes to clients, edit the GlobalProtect portal configuration in the Mobile_User_Template to add a new agent configuration. After configuring the Agent configuration, move it above the DEFAULT agent configuration that is predefined in the template to ensure that your settings take precedence over the default settings. When editing this template, don't remove or change the External Gateway entry.
(Optional) If you want to customize the agent configuration that Prisma Access pushes to clients, edit the GlobalProtect portal configuration in the Mobile_User_Template to add a new agent configuration. After configuring the Agent configuration, move it above the DEFAULT agent configuration that is predefined in the template to ensure that your settings take precedence over the default settings. When editing this template, don't remove or change the External Gateway entry.![]() Configure the device group hierarchy that the cloud service will push to the portal and gateway.
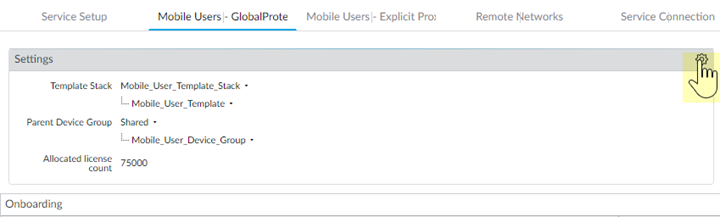
Configure the device group hierarchy that the cloud service will push to the portal and gateway.- Edit the Settings.
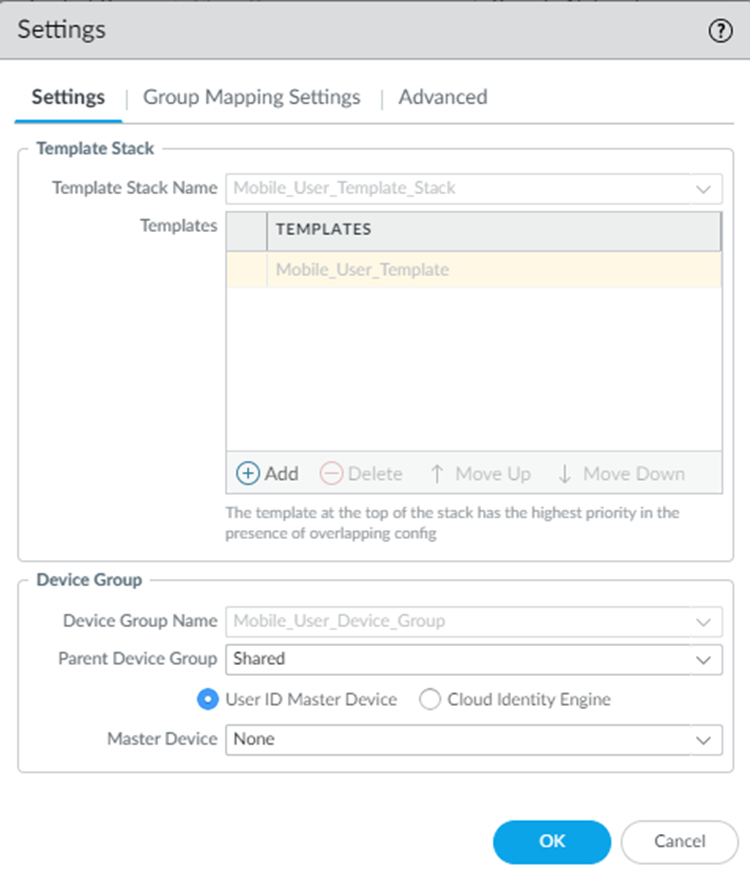
![]() In the Device Group section, select the Parent Device Group that contains the configuration settings you want to push to Prisma Access for Users, or leave the parent device group as Shared to use the Prisma Access device group shared hierarchy.You will push all of the configuration—including the address groups, Security policy, Security profiles, and other policy objects (such as application groups and objects), HIP objects and profiles and authentication policy—that Prisma Access for Users needs to enforce consistent policy to your mobile users using the device group hierarchy you specify here. In addition, you must make sure that you have configured a Log Forwarding profile that forwards the desired log types to Panorama/Strata Logging Service in a device group that gets pushed to Prisma Access for Users; this is the only way that the cloud service knows which logs to forward to Strata Logging Service.(Optional) If you have configured a next-generation firewall as a master device or added a Cloud Identity Engine profile to make user and group information selectable in security policies, select User-ID Master Device or Cloud Identity Engine; then, select either the Master Device or the Cloud Identity Engine profile that you created.
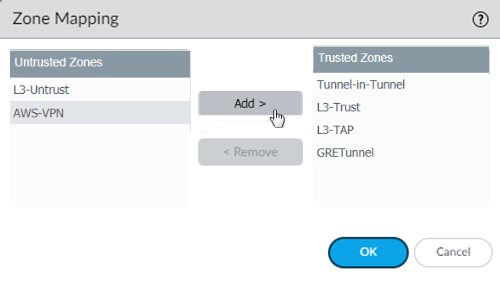
In the Device Group section, select the Parent Device Group that contains the configuration settings you want to push to Prisma Access for Users, or leave the parent device group as Shared to use the Prisma Access device group shared hierarchy.You will push all of the configuration—including the address groups, Security policy, Security profiles, and other policy objects (such as application groups and objects), HIP objects and profiles and authentication policy—that Prisma Access for Users needs to enforce consistent policy to your mobile users using the device group hierarchy you specify here. In addition, you must make sure that you have configured a Log Forwarding profile that forwards the desired log types to Panorama/Strata Logging Service in a device group that gets pushed to Prisma Access for Users; this is the only way that the cloud service knows which logs to forward to Strata Logging Service.(Optional) If you have configured a next-generation firewall as a master device or added a Cloud Identity Engine profile to make user and group information selectable in security policies, select User-ID Master Device or Cloud Identity Engine; then, select either the Master Device or the Cloud Identity Engine profile that you created.![]() (Optional) Configure Prisma Access to use the Directory Sync component of the Cloud Identity Engine to retrieve user and group information.You must configure the Directory Sync component of the Cloud Identity Engine to retrieve user and group information from cloud directory or Active Directory (AD) before you enable and configure Directory Sync integration in Prisma Access Group Mapping Settings.Click OK to save the mobile user settings.Map the zones configured within the template stack as trusted or untrusted.On a Palo Alto Networks next-generation firewall, Security policy is enforced between zones, which map to physical or virtual interfaces on the firewall. However, with Prisma Access for Users, the networking infrastructure is automatically set up for you, which means you no longer need to configure interfaces and associate them with zones. However, to enable consistent security policy enforcement, you must map the zones you use within your organization as trust or untrust so that Prisma Access for Users can translate the policy rules you push to the cloud service to the internal zones within the networking infrastructure.
(Optional) Configure Prisma Access to use the Directory Sync component of the Cloud Identity Engine to retrieve user and group information.You must configure the Directory Sync component of the Cloud Identity Engine to retrieve user and group information from cloud directory or Active Directory (AD) before you enable and configure Directory Sync integration in Prisma Access Group Mapping Settings.Click OK to save the mobile user settings.Map the zones configured within the template stack as trusted or untrusted.On a Palo Alto Networks next-generation firewall, Security policy is enforced between zones, which map to physical or virtual interfaces on the firewall. However, with Prisma Access for Users, the networking infrastructure is automatically set up for you, which means you no longer need to configure interfaces and associate them with zones. However, to enable consistent security policy enforcement, you must map the zones you use within your organization as trust or untrust so that Prisma Access for Users can translate the policy rules you push to the cloud service to the internal zones within the networking infrastructure.- Edit the Zone Mapping settings.By default, all of the zones in the Mobile_User_Template_Stack are classified as Untrusted Zones.For each zone you want to designate as trusted, select it and click Add to move it to the list of Trusted Zones.
![]() Click OK to save your changes.Configure the GlobalProtect portal and external gateway settings.You can configure Prisma Access gateways as external gateways only—not as internal gateways.
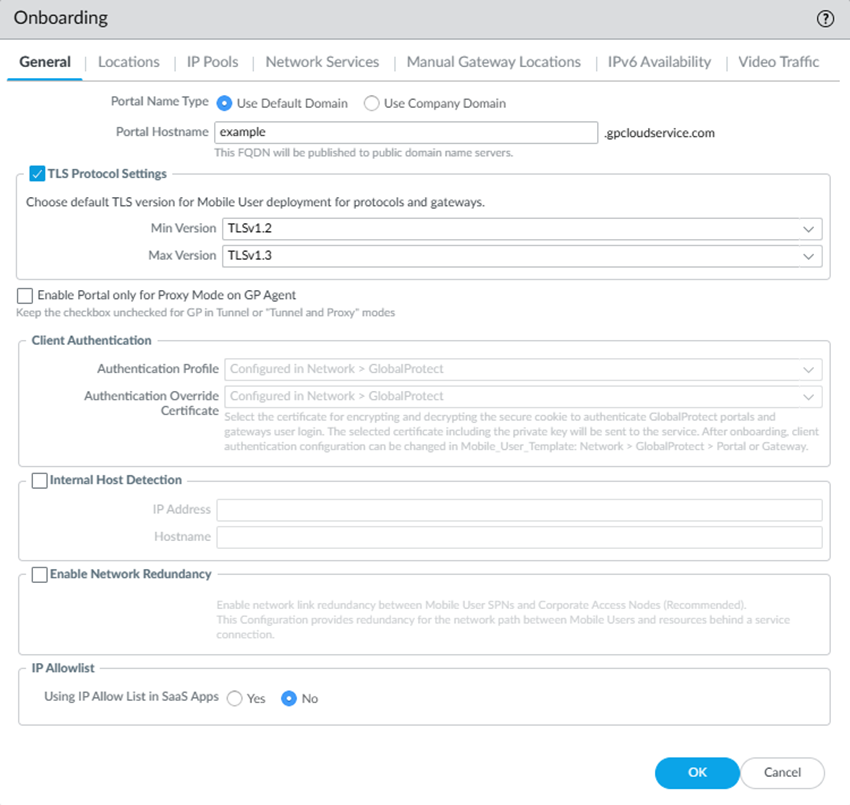
Click OK to save your changes.Configure the GlobalProtect portal and external gateway settings.You can configure Prisma Access gateways as external gateways only—not as internal gateways.- In the Onboarding section, click Configure.On the General tab, specify the Portal Name Type:
- Use Default Domain—If you select this option, your portal hostname uses the default domain name: .gpcloudservice.com. In this case, simply enter a Portal Hostname to append to the default domain name. Prisma Access for Users will automatically create the necessary certificates and publish the hostname to public DNS servers.
![]() If you already have a GlobalProtect deployment with an existing portal name and you want to continue to use that portal name, add a CNAME entry that maps Prisma Access portal name to your existing portal name. For example, if you have an existing portal named portal.acme.com and you want to map the new Prisma Access portal to this same name, you would add a CNAME of gpcs2.gpcloudservice.com to the DNS entry for your existing portal.The *.gpcloudservice.com domain is associated with the Palo Alto Networks application.
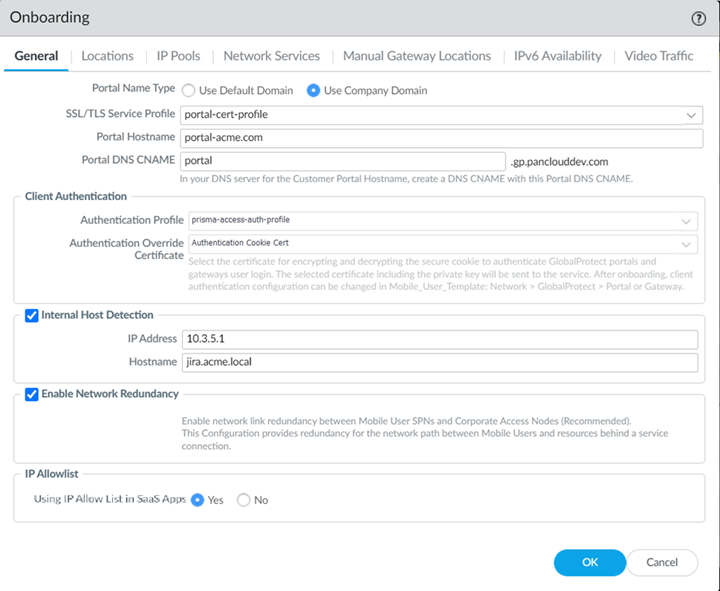
If you already have a GlobalProtect deployment with an existing portal name and you want to continue to use that portal name, add a CNAME entry that maps Prisma Access portal name to your existing portal name. For example, if you have an existing portal named portal.acme.com and you want to map the new Prisma Access portal to this same name, you would add a CNAME of gpcs2.gpcloudservice.com to the DNS entry for your existing portal.The *.gpcloudservice.com domain is associated with the Palo Alto Networks application. - Use Company Domain—Select this option if you want the domain in the portal hostname to match your company domain name (for example, myportal.mydomain.com). If you want to use this option, you must first obtain your own certificate and configure an SSL/TLS service profile that points to it. Then you can configure the portal name by selecting the SSL/TLS Service Profile and entering the Portal Hostname. If you use this option, you must point your internal DNS servers to the Portal DNS CNAME, which is the hostname of the portal with the .gpcloudservice.com domain. For example, if you specified a DNS hostname of acme-portal.acme.com, you would need to create a DNS CNAME entry that maps that hostname to acme-portal.gpcloudservice.com on your internal DNS servers.
![]()
If you need to upload a new certificate, import the certificate and private key; then, view the SSL/TLS service being used by Prisma Access under and check the SSL/TLS Service Profile name. This field only displays if you're using a company domain instead of the default domain. You can then select and replace the certificate in the SSL/TLS profile used by the portal with the certificate you imported.(Optional) Configure TLS Protocol Settings.Select a Min Version and a Max Version. Do not select a Max Version of Max.Select an Authentication Profile that specifies how Prisma Access should authenticate mobile users or create a new one.If you added a parent device group that contains an authentication profile configuration, you should see it on the list of available profiles. If you did not push the profile in the device group, you can create an authentication profile now.After you commit and push your changes, you can't make any changes to the authentication profile and authentication override certificate in this area and the choices become read-only. To make changes after initial onboarding, modify or add one or more GlobalProtect client authentication configurations under the Mobile_User_Template.Select an Authentication Override Certificate to encrypt the secure cookies that mobile users authenticate to the portal and gateway.If you added a parent device group that contains the certificate you want to use to encrypt authentication cookies, you should see it on the list of available certificates. If you did not push a certificate in the device group, you can import or generate one now.(Optional) To ensure that your mobile users always have access to the services and applications that are accessible from service connections, Enable Network Redundancy between the portals or gateways and service connections.This functionality provides redundant network paths between the mobile user dataplane and service connections in different compute locations. Enabling redundancy provides users with more resilient access to resources behind service connections in a data center or headquarters locations. Because a service connection is required for mobile users to access resources from remote networks, users also have more resiliency in accessing resources in remote network locations.(Optional) If you do not require GlobalProtect endpoints to have tunnel connections when on the internal network, enable Internal Host Detection.- Select the Internal Host Detection check box.
- Enter the IP Address of a host that users can reach only from the internal network.
- Enter the DNS Hostname for the IP address you entered. Clients that try to connect perform a reverse DNS lookup on the specified address. If the lookup fails, the client determines that it needs a tunnel connection to Prisma Access for Users.
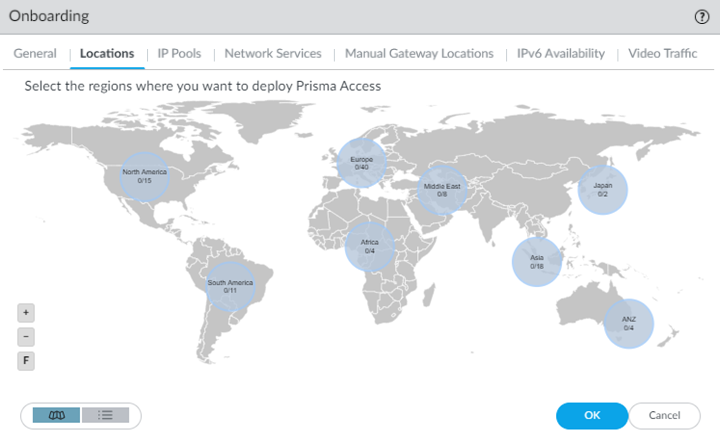
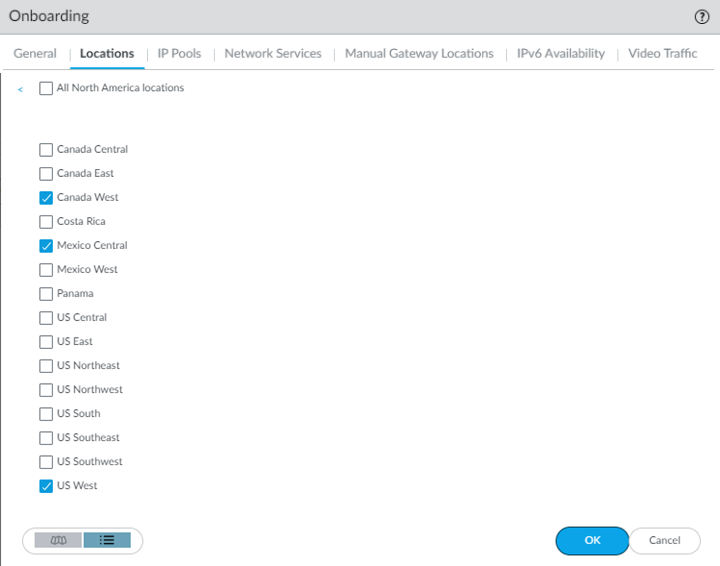
Prisma Access copies the internal host detection settings you specify here to the default agent settings in your GlobalProtect portal configuration (). If you have entered internal host detection settings for the default agent in the GlobalProtect portal, you will not be able to change the options here and must change it in the portal. If you require multiple agent configs, enter settings for the default agent config in the GlobalProtect portal and use those settings for Prisma Access, then select and Add a non-default config, and specify that config in other parts of your deployment.(Optional) If your organization uses allow lists to control access to public or SaaS applications, specify whether or not you're Using IP Allow Lists in SaaS Apps.To enable you to add the public (egress) IP addresses for your GlobalProtect—Mobile User deployment to any SaaS application allow lists you use within your organization, Prisma Access provides you with the IP addresses and lets you verify that you have added them to your allow list before using them in your environment. You can implement allow listing for Prisma Access egress IP addresses for both existing deployments and new deployments.(Optional) Customize the GlobalProtect app settings (for example, specify the connect method GlobalProtect uses) by selecting , selecting the config you want to customize or selecting DEFAULT, selecting App, then customizing the GlobalProtect app.Select the Locations and the regions associated with those locations where you want to deploy your mobile users.The Locations tab displays a map. Highlighting the map shows the global regions (Americas, Europe, and Asia Pacific) and the locations available inside each region. Select a region, then select the locations you want to deploy in each region. Limiting your deployment to a single region provides more granular control over deployed regions and allows you to exclude regions as required by your policy or industry regulations. You can select a location in a region that is closest to your mobile users, or select a location as required by your policy or industry regulations.Prisma Access uses the Hong Kong, Netherlands Central, and US Northwest locations as fallback mobile user locations if other locations are not available. For this reason, Palo Alto Networks strongly recommends that you enable at least one of these locations during mobile user onboarding.Locations denoted with two asterisks are Local Zones. These locations place compute, storage, database, and infrastructure services close to large population and industry centers; however, they also have some limitations. To add a local zone, reach out to your Palo Alto Networks representative.- Click the Locations tab and select a region.
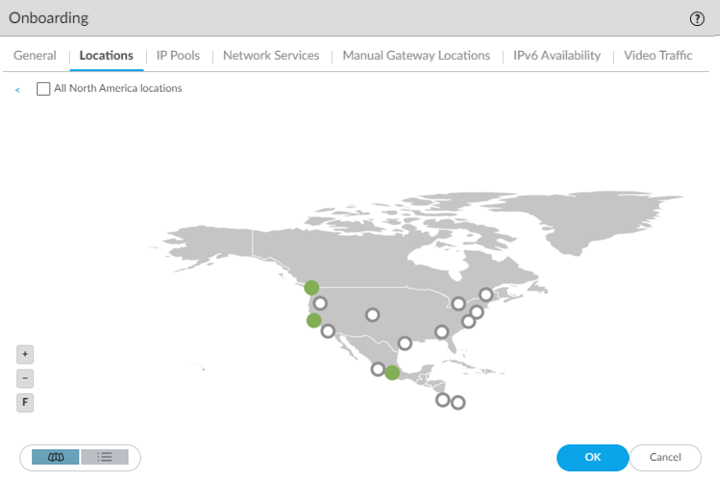
![]() Select one or more Prisma Access gateways within your selected region using the map.Hovering your cursor over a location highlights it. White circles indicate an available location; green circles indicate that you have selected that location.
Select one or more Prisma Access gateways within your selected region using the map.Hovering your cursor over a location highlights it. White circles indicate an available location; green circles indicate that you have selected that location.![]() In addition to the map view, you can view a list of regions and locations. Choose between the map and list view from the lower left corner. In the list view, the list displays regions sorted by columns, with all locations sorted by region. You can select All sites within a region (top of the dialog).
In addition to the map view, you can view a list of regions and locations. Choose between the map and list view from the lower left corner. In the list view, the list displays regions sorted by columns, with all locations sorted by region. You can select All sites within a region (top of the dialog).![]() Set up the IP address pools used to assign IP addresses to GlobalProtect endpoints by selecting the IP Pools tab and Add an IP address pool.
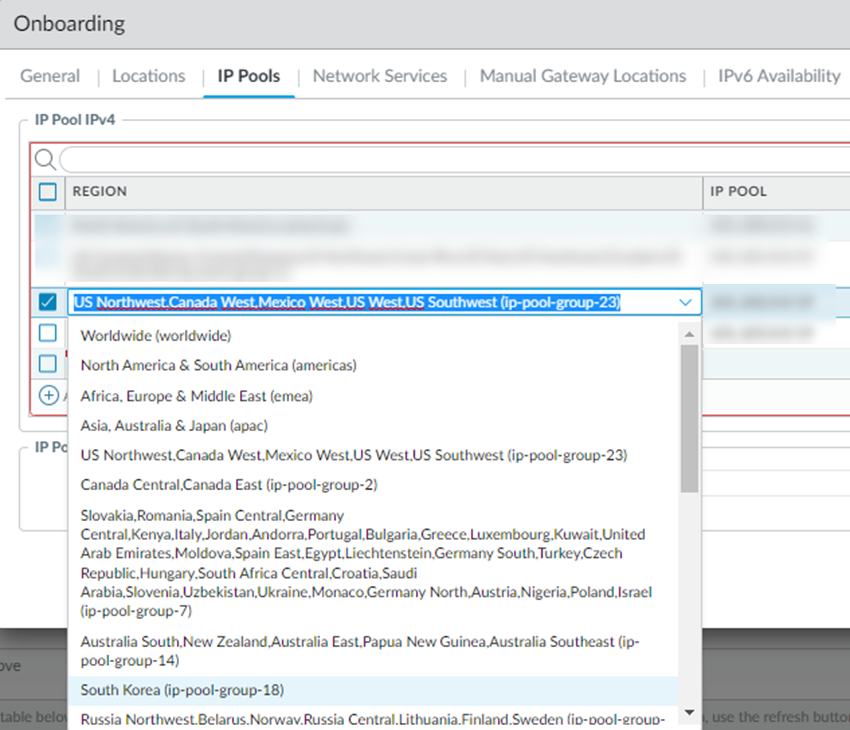
Set up the IP address pools used to assign IP addresses to GlobalProtect endpoints by selecting the IP Pools tab and Add an IP address pool.- Specify a Region for the IP address pool.You can use a single IP address pool for all GlobalProtect endpoints in the world (Worldwide), you can use separate pools for each theater where you have mobile users, or you can specify pools per location group (a group of locations that is smaller than the theater). You can also specify a combination of worldwide, per-theater, or per-location group IP pools. For example, you could add a pool for a specific location group and then add a Worldwide pool to use for all other locations.Use location group-specific IP address pools if you have services that depend on the source IP address of the user to identify the user’s details (such as location-based services or services based on a user group or function) so you can apply access control policies, or to perform routing or policy operations on different countries if the countries are in different compute regions. For example, you could use a separate IP address pool for Canada and one for Brazil, which are in different compute locations, to provide distinct access and security controls.To use location group-specific IP address pools, you must also specify a Worldwide or theater-specific pool.GlobalProtect mobile users consume the IP addresses in the location group first, then theater-specific IP addresses, then Worldwide IP addresses. For example, if you specify a pool for a location group and Worldwide, and you then exhaust the available IP addresses in the location group pool, Prisma Access then takes IP addresses from the Worldwide pool to use in that location group.
- To specify IP pools that can be used by all GlobalProtect mobile users, select Worldwide.
- To specify IP pools that can be used by GlobalProtect users in a specific theater, select the theater.
- To specify IP pools that are specific to the location group, select it from the list.
![]()
Enter an IP Pool to assign to the endpoints in the region you selected.- Enter a minimum required subnet of /23 (512 IP addresses) per location. Additional locations require a minimum /23 subnet. If you specify a Worldwide subnet, the minimum required subnet is /23 but we recommend IP Address Pools for a GlobalProtect Mobile Users Deployment to allocate a of IP addresses that is equal to or greater than the number of licensed mobile users so that they can log in at the same time.Don't specify addresses that overlap with other networks you use internally or with the pools you assigned when you Configure the Prisma Access Service Infrastructure (Panorama). In addition, don't use the following IP addresses and subnets, because Prisma Access reserves those IP addresses and subnets for its internal use.:
- 169.254.0.0/16
- 100.64.0.0/10
We recommend using an RFC 1918-compliant IP address pool. While we support the use of non-RFC 1918-compliant (public) IP addresses for mobile users, we don't recommend using it due to possible conflicts with internet public IP address space.
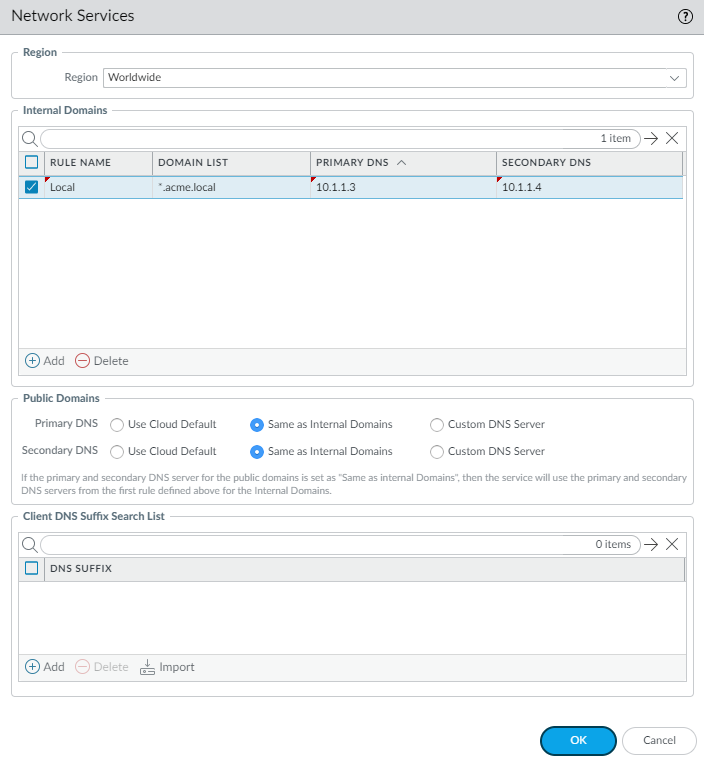
To specify the DNS resolution settings for your internal and external (public) domains, select Network Services tab and Add the settings.GlobalProtect endpoints with an active tunnel connection use their virtual network adapters rather than their physical network adapters and therefore require separate DNS resolution settings.Configure network settings in the Network Services window.- Select a Region from the drop-down.Select Worldwide, select a theater, or select a location group to apply the DNS settings globally. If you specify multiple proxy settings with a mix of Worldwide, theater, and location group-specific settings, Prisma Access uses the settings for the location group, then theater, then Worldwide. Prisma Access evaluates the rules from top to bottom in the list.
- Add one or more rules to configure the DNS settings for Internal Domains.
- Enter a unique Rule Name for the rule.
- Don't enter a 127.0.0.1 address as it can cause Prisma Access internal routing issues.
- you want your internal DNS server to only resolve the domains you specify, enter the domains to resolve in the Domain List. Specify an asterisk in front of the domain; for example, *.acme.com. You can specify a maximum of 1,024 domain entries.Prisma Access has a predefined rule to resolve the *.amazonaws.com, *.aws.amazon.com, *.googleapis.com, and *.google.internal domains using the Cloud Default server. If you want your internal DNS servers to resolve a more-specific domain (for example, *.s3.amazonaws.com instead of *.amazonaws.com), enter the URL in the Domain List. Prisma Access evaluates the domain names from longest to shortest, then from top to bottom in the list.
- If you have a Custom DNS server that can access your internal domains, specify the Primary DNS and Secondary DNS server IP addresses, or select Use Cloud Default to use the default Prisma Access DNS server.
- Specify the DNS settings for Public Domains.
- Use Cloud Default—Use the default Prisma Access DNS server.
- Same as Internal Domains—Use the same server that you use to resolve internal domains. When you select this option, the DNS Server used to resolve public domains is same as the server configured for the first rule in the Internal Domains section.
- Custom DNS server—If you have a DNS server that can access your public (external) domains, enter the Primary DNS server address in that field.
(Optional) You can Add a DNS Suffix to specify the suffix that the client should use locally when an unqualified hostname is entered that it can't resolve, for example, acme.local. Don't enter a wildcard (*) character in front of the domain suffix (for example, acme.com). You can add multiple suffixes. - If you want Prisma Access to proxy DNS requests, configure values for UDP queries (the Interval to retry the query in seconds and the number of retry Attempts to perform.For more information about how Prisma Access proxies DNS requests, see DNS Resolution for Mobile Users—GlobalProtect Deployments.
![]() (Optional) Use Static IP Entries to resolve FQDNs to specific IP addresses.This functionality can be useful if you have guest internet services at your organization and you want your guests to safely use search engines, preventing them from searching for potentially inappropriate or offensive material that could be against company policy. To do so, enter a unique Name for the static entry rule, an FQDN, and the IP Address where the FQDN request should be directed.
(Optional) Use Static IP Entries to resolve FQDNs to specific IP addresses.This functionality can be useful if you have guest internet services at your organization and you want your guests to safely use search engines, preventing them from searching for potentially inappropriate or offensive material that could be against company policy. To do so, enter a unique Name for the static entry rule, an FQDN, and the IP Address where the FQDN request should be directed.![]() (Optional) If your deployment uses Windows Internet Name Service (WINS) based, you can specify WINS servers to resolve NetBIOS name-to-IP address mapping by selecting WINS Configuration; selecting a region for the WINS server or selecting Worldwide to apply the WINS configuration worldwide, then specifying a Primary WINS and, optionally, Secondary WINS server address.After you enable WINS, Prisma Access can push WINS configuration to mobile users’ endpoints over GlobalProtect.(Optional) Select Advanced RCODE Support to allow the primary DNS server to fail over to the secondary DNS server if an RCODE 2 (SERVFAIL) and RCODE 5 (REFUSED) DNS return code is received.A DNS response code of SERVFAIL refers to a communication error with the primary DNS server, and a DNS response code of REFUSED means that the primary DNS server refused to provide the requested information. In both cases, the service fails over to the secondary DNS server.
(Optional) If your deployment uses Windows Internet Name Service (WINS) based, you can specify WINS servers to resolve NetBIOS name-to-IP address mapping by selecting WINS Configuration; selecting a region for the WINS server or selecting Worldwide to apply the WINS configuration worldwide, then specifying a Primary WINS and, optionally, Secondary WINS server address.After you enable WINS, Prisma Access can push WINS configuration to mobile users’ endpoints over GlobalProtect.(Optional) Select Advanced RCODE Support to allow the primary DNS server to fail over to the secondary DNS server if an RCODE 2 (SERVFAIL) and RCODE 5 (REFUSED) DNS return code is received.A DNS response code of SERVFAIL refers to a communication error with the primary DNS server, and a DNS response code of REFUSED means that the primary DNS server refused to provide the requested information. In both cases, the service fails over to the secondary DNS server.![]() (Optional) If you allow your mobile users to manually select gateways from the GlobalProtect app, select the Manual Gateway Locations that the users can view from their GlobalProtect app.Choosing a subset of onboarded locations reduces the number of available gateways that mobile users can view in their GlobalProtect app for manual gateway selection.If you don't select manual gateways in this tab, Prisma Access selects the following list of gateways by default.
(Optional) If you allow your mobile users to manually select gateways from the GlobalProtect app, select the Manual Gateway Locations that the users can view from their GlobalProtect app.Choosing a subset of onboarded locations reduces the number of available gateways that mobile users can view in their GlobalProtect app for manual gateway selection.If you don't select manual gateways in this tab, Prisma Access selects the following list of gateways by default.- Australia Southeast
- Belgium
- Brazil South
- Canada East
- Finland
- France North
- Germany Central
- Hong Kong
- India West
- Ireland
- Israel
- Japan Central
- Netherlands Central
- Saudi Arabia
- Singapore
- South Africa Central
- South Korea
- Taiwan
- UK
- US East
- US West
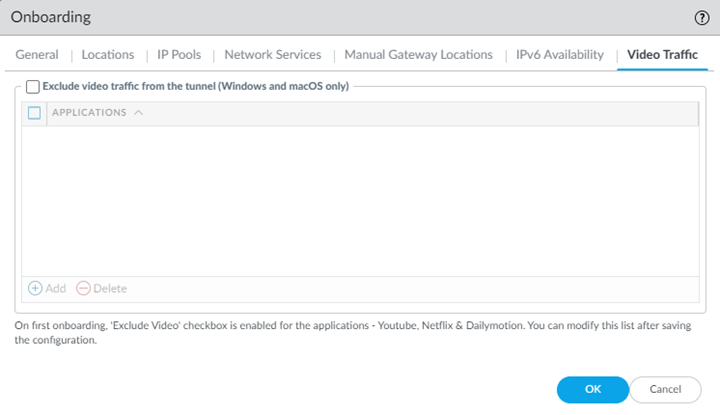
Prisma Access lets you select only gateways that you have onboarded. For example, if you don’t choose UK when you select locations, you can't select UK as a manual gateway (the location is grayed out).![]() If you need to delete a location after you onboard it, and it's selected as one of the Manual Gateway Locations, be sure to deselect it here as well as in the Locations tab.Click OK to save the Onboarding settings.Configure IPv6 Availability options.If you use IPv6 networking in your Mobile Users—GlobalProtect deployment, you can configure Prisma Access to use IPv6 addresses in your mobile user networking. You also need to enable IPv6 networking globally in your Prisma Access infrastructure before you can use IPv6 addressing.(Optional, Windows and macOS GlobalProtect Mobile Users Only) Exclude Video Traffic from the GlobalProtect tunnel.Exclude video traffic from the tunnel to not send video streaming from the listed applications to Prisma Access. ; then, Add or Delete video streaming applications that you want to exclude from the GlobalProtect tunnel.By excluding lower risk video streaming traffic (such as YouTube and Netflix) and applications (such as Microsoft updates (ms-updates)) from the VPN tunnel, you can decrease bandwidth consumption. The video streaming exclusions are applied to all traffic the GlobalProtect app sends to Prisma Access, not just the match criteria you've defined for this rule.
If you need to delete a location after you onboard it, and it's selected as one of the Manual Gateway Locations, be sure to deselect it here as well as in the Locations tab.Click OK to save the Onboarding settings.Configure IPv6 Availability options.If you use IPv6 networking in your Mobile Users—GlobalProtect deployment, you can configure Prisma Access to use IPv6 addresses in your mobile user networking. You also need to enable IPv6 networking globally in your Prisma Access infrastructure before you can use IPv6 addressing.(Optional, Windows and macOS GlobalProtect Mobile Users Only) Exclude Video Traffic from the GlobalProtect tunnel.Exclude video traffic from the tunnel to not send video streaming from the listed applications to Prisma Access. ; then, Add or Delete video streaming applications that you want to exclude from the GlobalProtect tunnel.By excluding lower risk video streaming traffic (such as YouTube and Netflix) and applications (such as Microsoft updates (ms-updates)) from the VPN tunnel, you can decrease bandwidth consumption. The video streaming exclusions are applied to all traffic the GlobalProtect app sends to Prisma Access, not just the match criteria you've defined for this rule.![]() Exclude Application Traffic From the Tunnel to not send application traffic from the listed applications to Prisma Access. By excluding lower risk applications (such as Microsoft updates (ms-updates)) from the VPN tunnel, you can decrease bandwidth consumption. The video streaming exclusions are applied to all traffic the GlobalProtect app sends to Prisma Access, not just the match criteria you've defined for this rule.
Exclude Application Traffic From the Tunnel to not send application traffic from the listed applications to Prisma Access. By excluding lower risk applications (such as Microsoft updates (ms-updates)) from the VPN tunnel, you can decrease bandwidth consumption. The video streaming exclusions are applied to all traffic the GlobalProtect app sends to Prisma Access, not just the match criteria you've defined for this rule.![]() Create security policy rules to secure traffic for your mobile users.
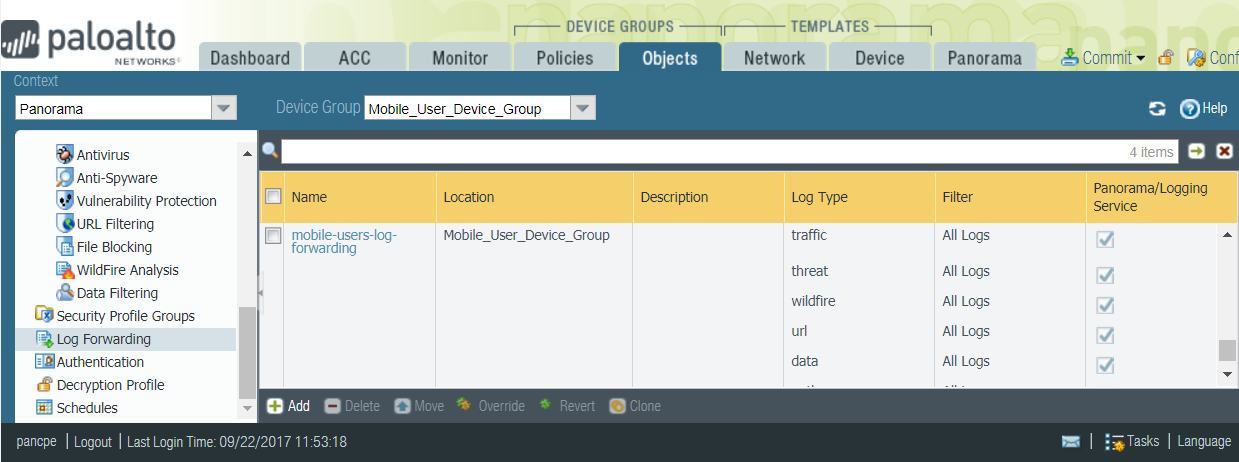
Create security policy rules to secure traffic for your mobile users.- Select the Device Group in which to add policy rules. You can select the Mobile_User_Device_Group or the parent device group that you selected when setting up Prisma Access for mobile users.Create security policy rules. Make sure that you don't define security policy rules to allow traffic from any zone to any zone. In the security policy rules, use the zones that you defined in the template stack.Configure logs to forward to Strata Logging Service.The Cloud Services plugin automatically adds the following Log Settings () after a new installation or when removing non-Prisma Access templates from a Prisma Access template stack:
- Log Settings for System logs (system-gpcs-default), User-ID logs (userid-gpcs-default), HIP Match logs (hipmatch-gpcs-default), and GlobalProtect logs (gp-prismaaccess-default) are added to the Mobile_User_Template.
- Log Settings for System logs (system-gpcs-default), User-ID logs (userid-gpcs-default), and GlobalProtect logs (gp-prismaaccess-default) are added to the Remote_Network_Template.
- Log Settings for System logs (system-gpcs-default) and GlobalProtect logs (gp-prismaaccess-default) are added to the Service_Conn_Template.
These Log Setting configurations automatically forward System, User-ID, and HIP Match logs to Strata Logging Service.(Optional) Forward logs for other log types to Strata Logging Service.To do this, you must create and attach a log forwarding profile to each policy rule for which you want to forward logs.- Select the Device Group in which you added the policy rules.Select and Add a profile. In the Log Forwarding Profile Match List, Add each log type that you want to forward.The following example enables forwarding of Traffic, Threat Prevention, WildFire Submission, URL Filtering, Data Filtering, and Authentication logs.Select Panorama/Strata Logging Service as the Forward Method. When you select Panorama, the logs are forwarded to Strata Logging Service. You will be able to monitor the logs and generate reports from Panorama. Strata Logging Service provides a seamless integration to store logs without backhauling them to your Panorama at the corporate headquarters, and Panorama can query Strata Logging Service as needed.
![]() Select and edit the policy rule. In Actions, select the Log Forwarding profile you created.Commit all your changes to Panorama and push the configuration changes to Prisma Access.
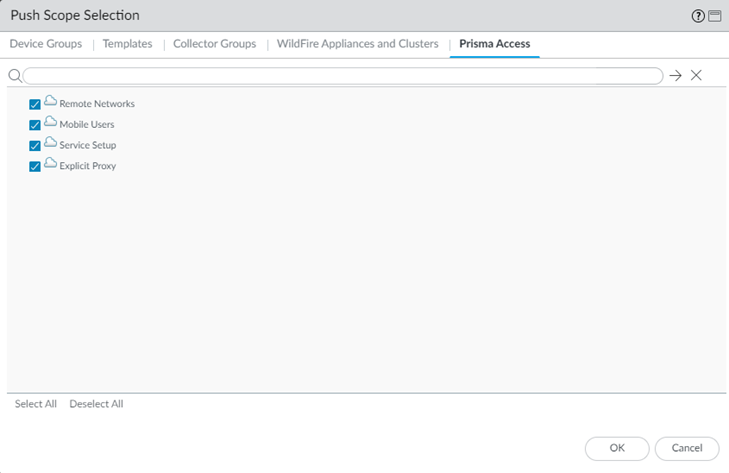
Select and edit the policy rule. In Actions, select the Log Forwarding profile you created.Commit all your changes to Panorama and push the configuration changes to Prisma Access.- Click .Do not Commit to Panorama, as that only commits the changes locally to Panorama and does not push the changes to the Prisma Access infrastructure.Edit Selections and, in the Prisma Access tab, make sure that Mobile Users and Explicit Proxy are selected in the Push Scope, then click OK.
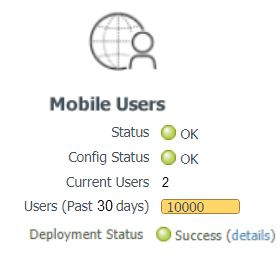
![]() In the Device Groups tab, ensure that you've selected Explicit Proxy and GlobalProtect device groups.Click Commit and Push.To verify that Prisma Access for Users is deployed and active, select .After the provisioning completes, the mobile users Status and Config Status should show OK.The Deployment Status area allows you to view the progress of onboarding and deployment jobs before they complete, as well as see more information about the status of completed jobs.
In the Device Groups tab, ensure that you've selected Explicit Proxy and GlobalProtect device groups.Click Commit and Push.To verify that Prisma Access for Users is deployed and active, select .After the provisioning completes, the mobile users Status and Config Status should show OK.The Deployment Status area allows you to view the progress of onboarding and deployment jobs before they complete, as well as see more information about the status of completed jobs.![]() To view the number of unique users who are currently logged in, or to log out a logged in user, click the hyperlinked number next to Current Users.
To view the number of unique users who are currently logged in, or to log out a logged in user, click the hyperlinked number next to Current Users.![]() To view historical information of previously-logged in users for a 90-day time period, click the number next to Users (Last 90 days).When the number of users in the Users (Last 90 days) field reaches 80% of the total licensed number, the number displays in a red color.To export the list of users to a CSV file, select Export to CSV. Note that a maximum of 45,000 users can be exported to a CSV file.
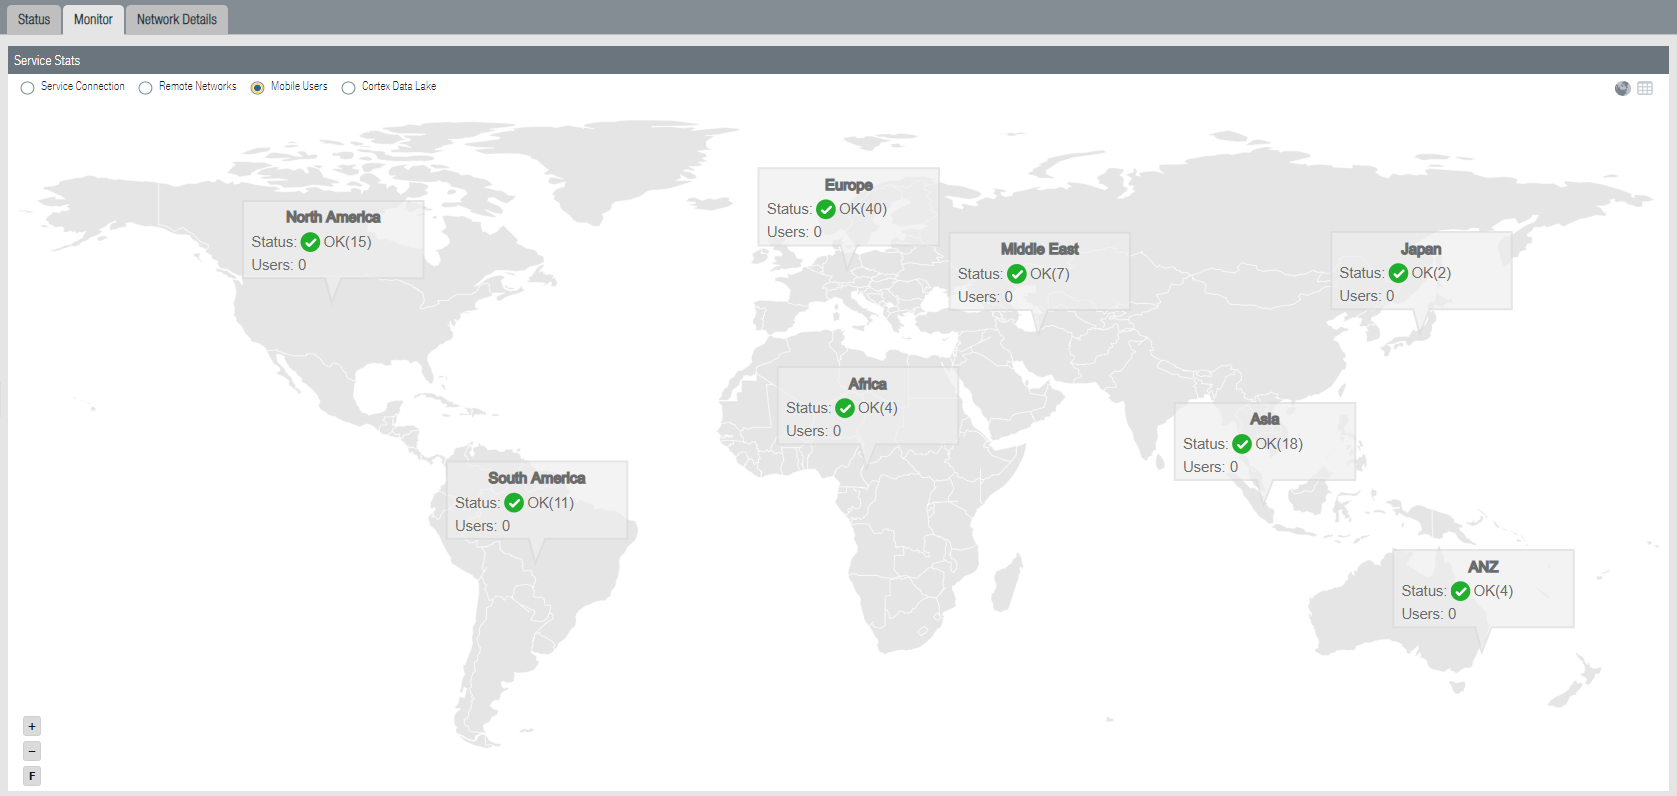
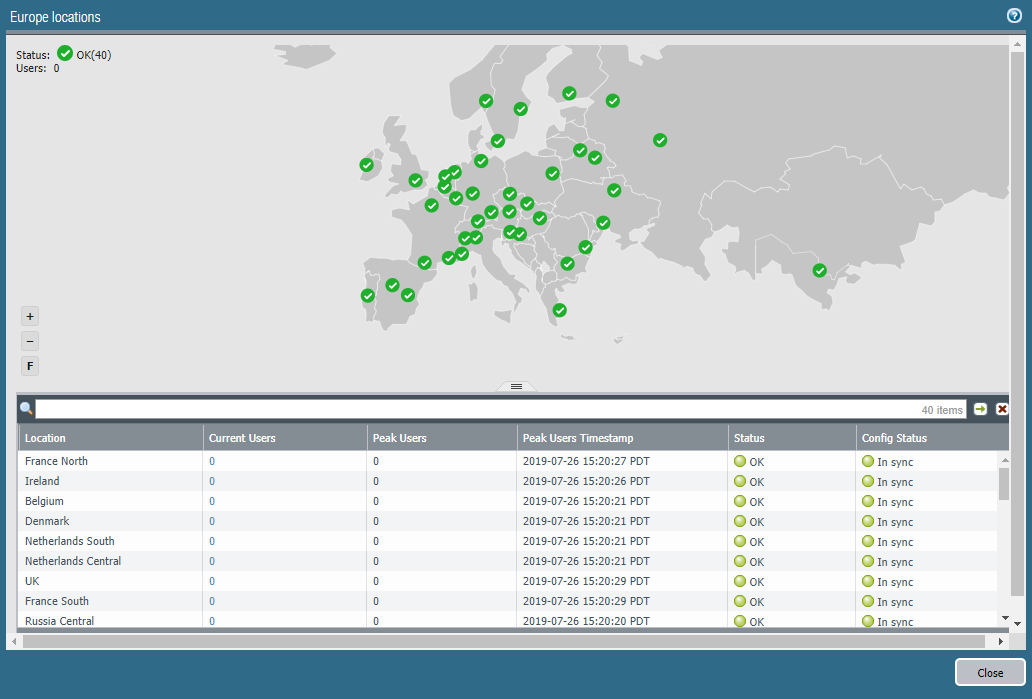
To view historical information of previously-logged in users for a 90-day time period, click the number next to Users (Last 90 days).When the number of users in the Users (Last 90 days) field reaches 80% of the total licensed number, the number displays in a red color.To export the list of users to a CSV file, select Export to CSV. Note that a maximum of 45,000 users can be exported to a CSV file.![]() To display a map that shows the locations of Prisma Access portals and gateways running in the regions you have selected, select Monitor; then, select Mobile Users.
To display a map that shows the locations of Prisma Access portals and gateways running in the regions you have selected, select Monitor; then, select Mobile Users.![]() Select a region to get more detail about that region.
Select a region to get more detail about that region.- Location—The location where your cloud service infrastructure is deployed to secure mobile users on your network.
- Current Users—The number of users who are connected and being secured by the service.When the current mobile user count reaches 80% of its total licensed number, this number displays in red.
- Peak Users—The count for the maximum number of concurrent users.
- Peak Users Timestamp—The timestamp when the Peak Users data was last retrieved.
- Status—The operational status of the connection between Prisma Access and your mobile users.
- Config Status—The status of your last configuration push to the service. If you have made a change locally, and not yet pushed the configuration to the cloud, this may display the status Out of sync. Hover over the status indicator for more detailed information. After committing and pushing the configuration to Prisma Access, the Config Status changes to In sync.
![]() If you chose to Use Company Domain for your portal hostname, you must add a DNS entry on your internal DNS servers to map the portal hostname you defined to the Portal DNS CNAME displayed on the tab (for example, <portal_hostname>.gpcloudservice.com).Deploy the GlobalProtect app software to your end users.For Mac OS or Windows users, you can direct users to the Prisma Access portal address, where they can download the GlobalProtect app from the portal.Prisma Access manages the version of the GlobalProtect app on the portal and you can select the active version from the versions that Prisma Access hosts, as well as control the ability of users to download it.Alternatively, you can host GlobalProtect app software on a web server for your Mac OS and Windows users. Prisma Access is compatible with any GlobalProtect app versions that are not listed as end of life.Mobile app users can download and install the GlobalProtect mobile app from the appropriate app store for their operating systems.
If you chose to Use Company Domain for your portal hostname, you must add a DNS entry on your internal DNS servers to map the portal hostname you defined to the Portal DNS CNAME displayed on the tab (for example, <portal_hostname>.gpcloudservice.com).Deploy the GlobalProtect app software to your end users.For Mac OS or Windows users, you can direct users to the Prisma Access portal address, where they can download the GlobalProtect app from the portal.Prisma Access manages the version of the GlobalProtect app on the portal and you can select the active version from the versions that Prisma Access hosts, as well as control the ability of users to download it.Alternatively, you can host GlobalProtect app software on a web server for your Mac OS and Windows users. Prisma Access is compatible with any GlobalProtect app versions that are not listed as end of life.Mobile app users can download and install the GlobalProtect mobile app from the appropriate app store for their operating systems.